# 《Spring 手撸专栏》第 14 章:笑傲江湖,通过注解配置和包自动扫描的方式完成Bean对象的注册
作者:小傅哥
博客:https://bugstack.cn (opens new window)
原文:https://mp.weixin.qq.com/s/1BWMc9sYUB9-uz2w7TZWmw (opens new window)
沉淀、分享、成长,让自己和他人都能有所收获!😄
# 一、前言
忒复杂,没等搞明白大促都过去了!
你经历过618和双11吗?你加入过大促时候那么多复杂的营销活动赚几毛钱吗?你开发过连读明白玩法都需要一周但只使用3天的大促需求吗?有时候对于有些产品的需求真的是太复杂了,复杂到开发、测试都需要在整个过程中不断的学习最后才可能读懂产品为啥这样的玩,要是一个长期的活动可能也就算了,培养用户心智吗!但这一整套拉新、助力、激活、下单、投保、领券、消费、开红包等等一连串的骚操作下来,如果在线上只用3天呢,或者是只用1天,那TM连参与的用户都没弄明白呢,活动就结束了,最后能打来什么样好的数据呢?对于这样流程复杂,估计连羊毛当都看不上!!!
以上只是举个例子,大部分时候并不会搞的这么恶心,评审也是过不去的!而同样的道理用在程序设计开发和使用中也是一样的,如果你把你的代码逻辑实现的过于分散,让外部调用方在使用的时候,需要调用你的接口多个和多次,还没有消息触达,只能定时自己轮训你的接口查看订单状态,每次还只能查10条,查多了你说不行,等等反人类的设计,都会给调用方带来要干你的体会。
所以,如果我们能在完成目的的情况下,都是希望尽可能流程简单、模式清晰、自动服务。那这在Spring的框架中也是有所体现的,这个框架的普及使用程度和它所能带来的方便性是分不开的,而我们如果能做到如此的方便,那肯定是一种好的设计和实现。
# 二、目标
其实到本章节我们已经把关于 IOC 和 AOP 全部核心内容都已经实现完成了,只不过在使用上还有点像早期的 Spring 版本,需要一个一个在 spring.xml 中进行配置。这与实际的目前使用的 Spring 框架还是有蛮大的差别,而这种差别其实都是在核心功能逻辑之上建设的在更少的配置下,做到更简化的使用。
这其中就包括:包的扫描注册、注解配置的使用、占位符属性的填充等等,而我们的目标就是在目前的核心逻辑上填充一些自动化的功能,让大家可以学习到这部分的设计和实现,从中体会到一些关于代码逻辑的实现过程,总结一些编码经验。
# 三、方案
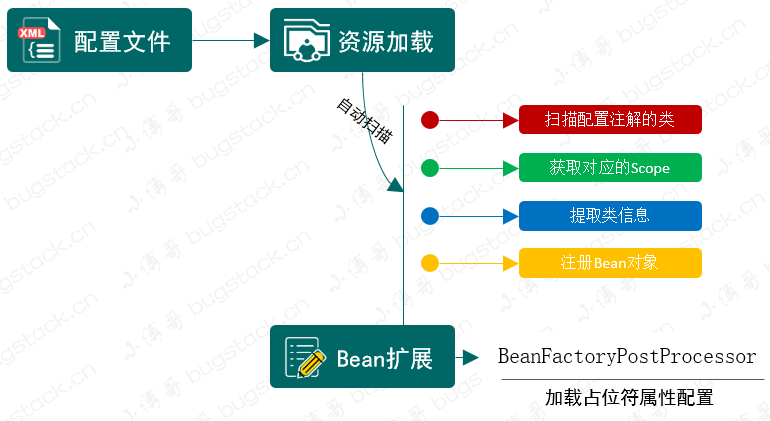
首先我们要考虑🤔,为了可以简化 Bean 对象的配置,让整个 Bean 对象的注册都是自动扫描的,那么基本需要的元素包括:扫描路径入口、XML解析扫描信息、给需要扫描的Bean对象做注解标记、扫描Class对象摘取Bean注册的基本信息,组装注册信息、注册成Bean对象。那么在这些条件元素的支撑下,就可以实现出通过自定义注解和配置扫描路径的情况下,完成 Bean 对象的注册。除此之外再顺带解决一个配置中占位符属性的知识点,比如可以通过 ${token} 给 Bean 对象注入进去属性信息,那么这个操作需要用到 BeanFactoryPostProcessor,因为它可以处理 在所有的 BeanDefinition 加载完成后,实例化 Bean 对象之前,提供修改 BeanDefinition 属性的机制 而实现这部分内容是为了后续把此类内容结合到自动化配置处理中。整体设计结构如下图:

结合bean的生命周期,包扫描只不过是扫描特定注解的类,提取类的相关信息组装成BeanDefinition注册到容器中。
在XmlBeanDefinitionReader中解析<context:component-scan />标签,扫描类组装BeanDefinition然后注册到容器中的操作在ClassPathBeanDefinitionScanner#doScan中实现。
- 自动扫描注册主要是扫描添加了自定义注解的类,在xml加载过程中提取类的信息,组装 BeanDefinition 注册到 Spring 容器中。
- 所以我们会用到
<context:component-scan />配置包路径并在 XmlBeanDefinitionReader 解析并做相应的处理。这里的处理会包括对类的扫描、获取注解信息等 - 最后还包括了一部分关于
BeanFactoryPostProcessor的使用,因为我们需要完成对占位符配置信息的加载,所以需要使用到 BeanFactoryPostProcessor 在所有的 BeanDefinition 加载完成后,实例化 Bean 对象之前,修改 BeanDefinition 的属性信息。这一部分的实现也为后续处理关于占位符配置到注解上做准备
# 四、实现
# 1. 工程结构
small-spring-step-13
└── src
    ├── main
    │   └── java
    │       └── cn.bugstack.springframework
    │           ├── aop
    │           │   ├── aspectj
    │           │   │   └── AspectJExpressionPointcut.java
    │           │   │   └── AspectJExpressionPointcutAdvisor.java
    │           │   ├── framework
    │           │   │   ├── adapter
    │           │   │   │   └── MethodBeforeAdviceInterceptor.java
    │           │   │   ├── autoproxy
    │           │   │   │   └── MethodBeforeAdviceInterceptor.java
    │           │   │   ├── AopProxy.java
    │           │   │   ├── Cglib2AopProxy.java
    │           │   │   ├── JdkDynamicAopProxy.java
    │           │   │   ├── ProxyFactory.java
    │           │   │   └── ReflectiveMethodInvocation.java
    │           │   ├── AdvisedSupport.java
    │           │   ├── Advisor.java
    │           │   ├── BeforeAdvice.java
    │           │   ├── ClassFilter.java
    │           │   ├── MethodBeforeAdvice.java
    │           │   ├── MethodMatcher.java
    │           │   ├── Pointcut.java
    │           │   ├── PointcutAdvisor.java
    │           │   └── TargetSource.java
    │           ├── beans
    │           │   ├── factory
    │           │   │   ├── config
    │           │   │   │   ├── AutowireCapableBeanFactory.java
    │           │   │   │   ├── BeanDefinition.java
    │           │   │   │   ├── BeanFactoryPostProcessor.java
    │           │   │   │   ├── BeanPostProcessor.java
    │           │   │   │   ├── BeanReference.java
    │           │   │   │   ├── ConfigurableBeanFactory.java
    │           │   │   │   ├── InstantiationAwareBeanPostProcessor.java
    │           │   │   │   └── SingletonBeanRegistry.java
    │           │   │   ├── support
    │           │   │   │   ├── AbstractAutowireCapableBeanFactory.java
    │           │   │   │   ├── AbstractBeanDefinitionReader.java
    │           │   │   │   ├── AbstractBeanFactory.java
    │           │   │   │   ├── BeanDefinitionReader.java
    │           │   │   │   ├── BeanDefinitionRegistry.java
    │           │   │   │   ├── CglibSubclassingInstantiationStrategy.java
    │           │   │   │   ├── DefaultListableBeanFactory.java
    │           │   │   │   ├── DefaultSingletonBeanRegistry.java
    │           │   │   │   ├── DisposableBeanAdapter.java
    │           │   │   │   ├── FactoryBeanRegistrySupport.java
    │           │   │   │   ├── InstantiationStrategy.java
    │           │   │   │   └── SimpleInstantiationStrategy.java
    │           │   │   ├── support
    │           │   │   │   └── XmlBeanDefinitionReader.java
    │           │   │   ├── Aware.java
    │           │   │   ├── BeanClassLoaderAware.java
    │           │   │   ├── BeanFactory.java
    │           │   │   ├── BeanFactoryAware.java
    │           │   │   ├── BeanNameAware.java
    │           │   │   ├── ConfigurableListableBeanFactory.java
    │           │   │   ├── DisposableBean.java
    │           │   │   ├── FactoryBean.java
    │           │   │   ├── HierarchicalBeanFactory.java
    │           │   │   ├── InitializingBean.java
    │           │   │   ├── ListableBeanFactory.java
    │           │   │   └── PropertyPlaceholderConfigurer.java
    │           │   ├── BeansException.java
    │           │   ├── PropertyValue.java
    │           │   └── PropertyValues.java
    │           ├── context
    │           │   ├── annotation
    │           │   │   ├── ClassPathBeanDefinitionScanner.java
    │           │   │   ├── ClassPathScanningCandidateComponentProvider.java
    │           │   │   └── Scope.java
    │           │   ├── event
    │           │   │   ├── AbstractApplicationEventMulticaster.java
    │           │   │   ├── ApplicationContextEvent.java
    │           │   │   ├── ApplicationEventMulticaster.java
    │           │   │   ├── ContextClosedEvent.java
    │           │   │   ├── ContextRefreshedEvent.java
    │           │   │   └── SimpleApplicationEventMulticaster.java
    │           │   ├── support
    │           │   │   ├── AbstractApplicationContext.java
    │           │   │   ├── AbstractRefreshableApplicationContext.java
    │           │   │   ├── AbstractXmlApplicationContext.java
    │           │   │   ├── ApplicationContextAwareProcessor.java
    │           │   │   └── ClassPathXmlApplicationContext.java
    │           │   ├── ApplicationContext.java
    │           │   ├── ApplicationContextAware.java
    │           │   ├── ApplicationEvent.java
    │           │   ├── ApplicationEventPublisher.java
    │           │   ├── ApplicationListener.java
    │           │   └── ConfigurableApplicationContext.java
    │           ├── core.io
    │           │   ├── ClassPathResource.java
    │           │   ├── DefaultResourceLoader.java
    │           │   ├── FileSystemResource.java
    │           │   ├── Resource.java
    │           │   ├── ResourceLoader.java
    │           │   └── UrlResource.java
    │           ├── stereotype
    │           │   └── Component.java
    │           └── utils
    │               └── ClassUtils.java
    └── test
        └── java
            └── cn.bugstack.springframework.test
                ├── bean
                │   ├── IUserService.java
                │   └── UserService.java
                └── ApiTest.java
2
3
4
5
6
7
8
9
10
11
12
13
14
15
16
17
18
19
20
21
22
23
24
25
26
27
28
29
30
31
32
33
34
35
36
37
38
39
40
41
42
43
44
45
46
47
48
49
50
51
52
53
54
55
56
57
58
59
60
61
62
63
64
65
66
67
68
69
70
71
72
73
74
75
76
77
78
79
80
81
82
83
84
85
86
87
88
89
90
91
92
93
94
95
96
97
98
99
100
101
102
103
104
105
106
107
108
109
110
111
工程源码:公众号「bugstack虫洞栈」,回复:Spring 专栏,获取完整源码
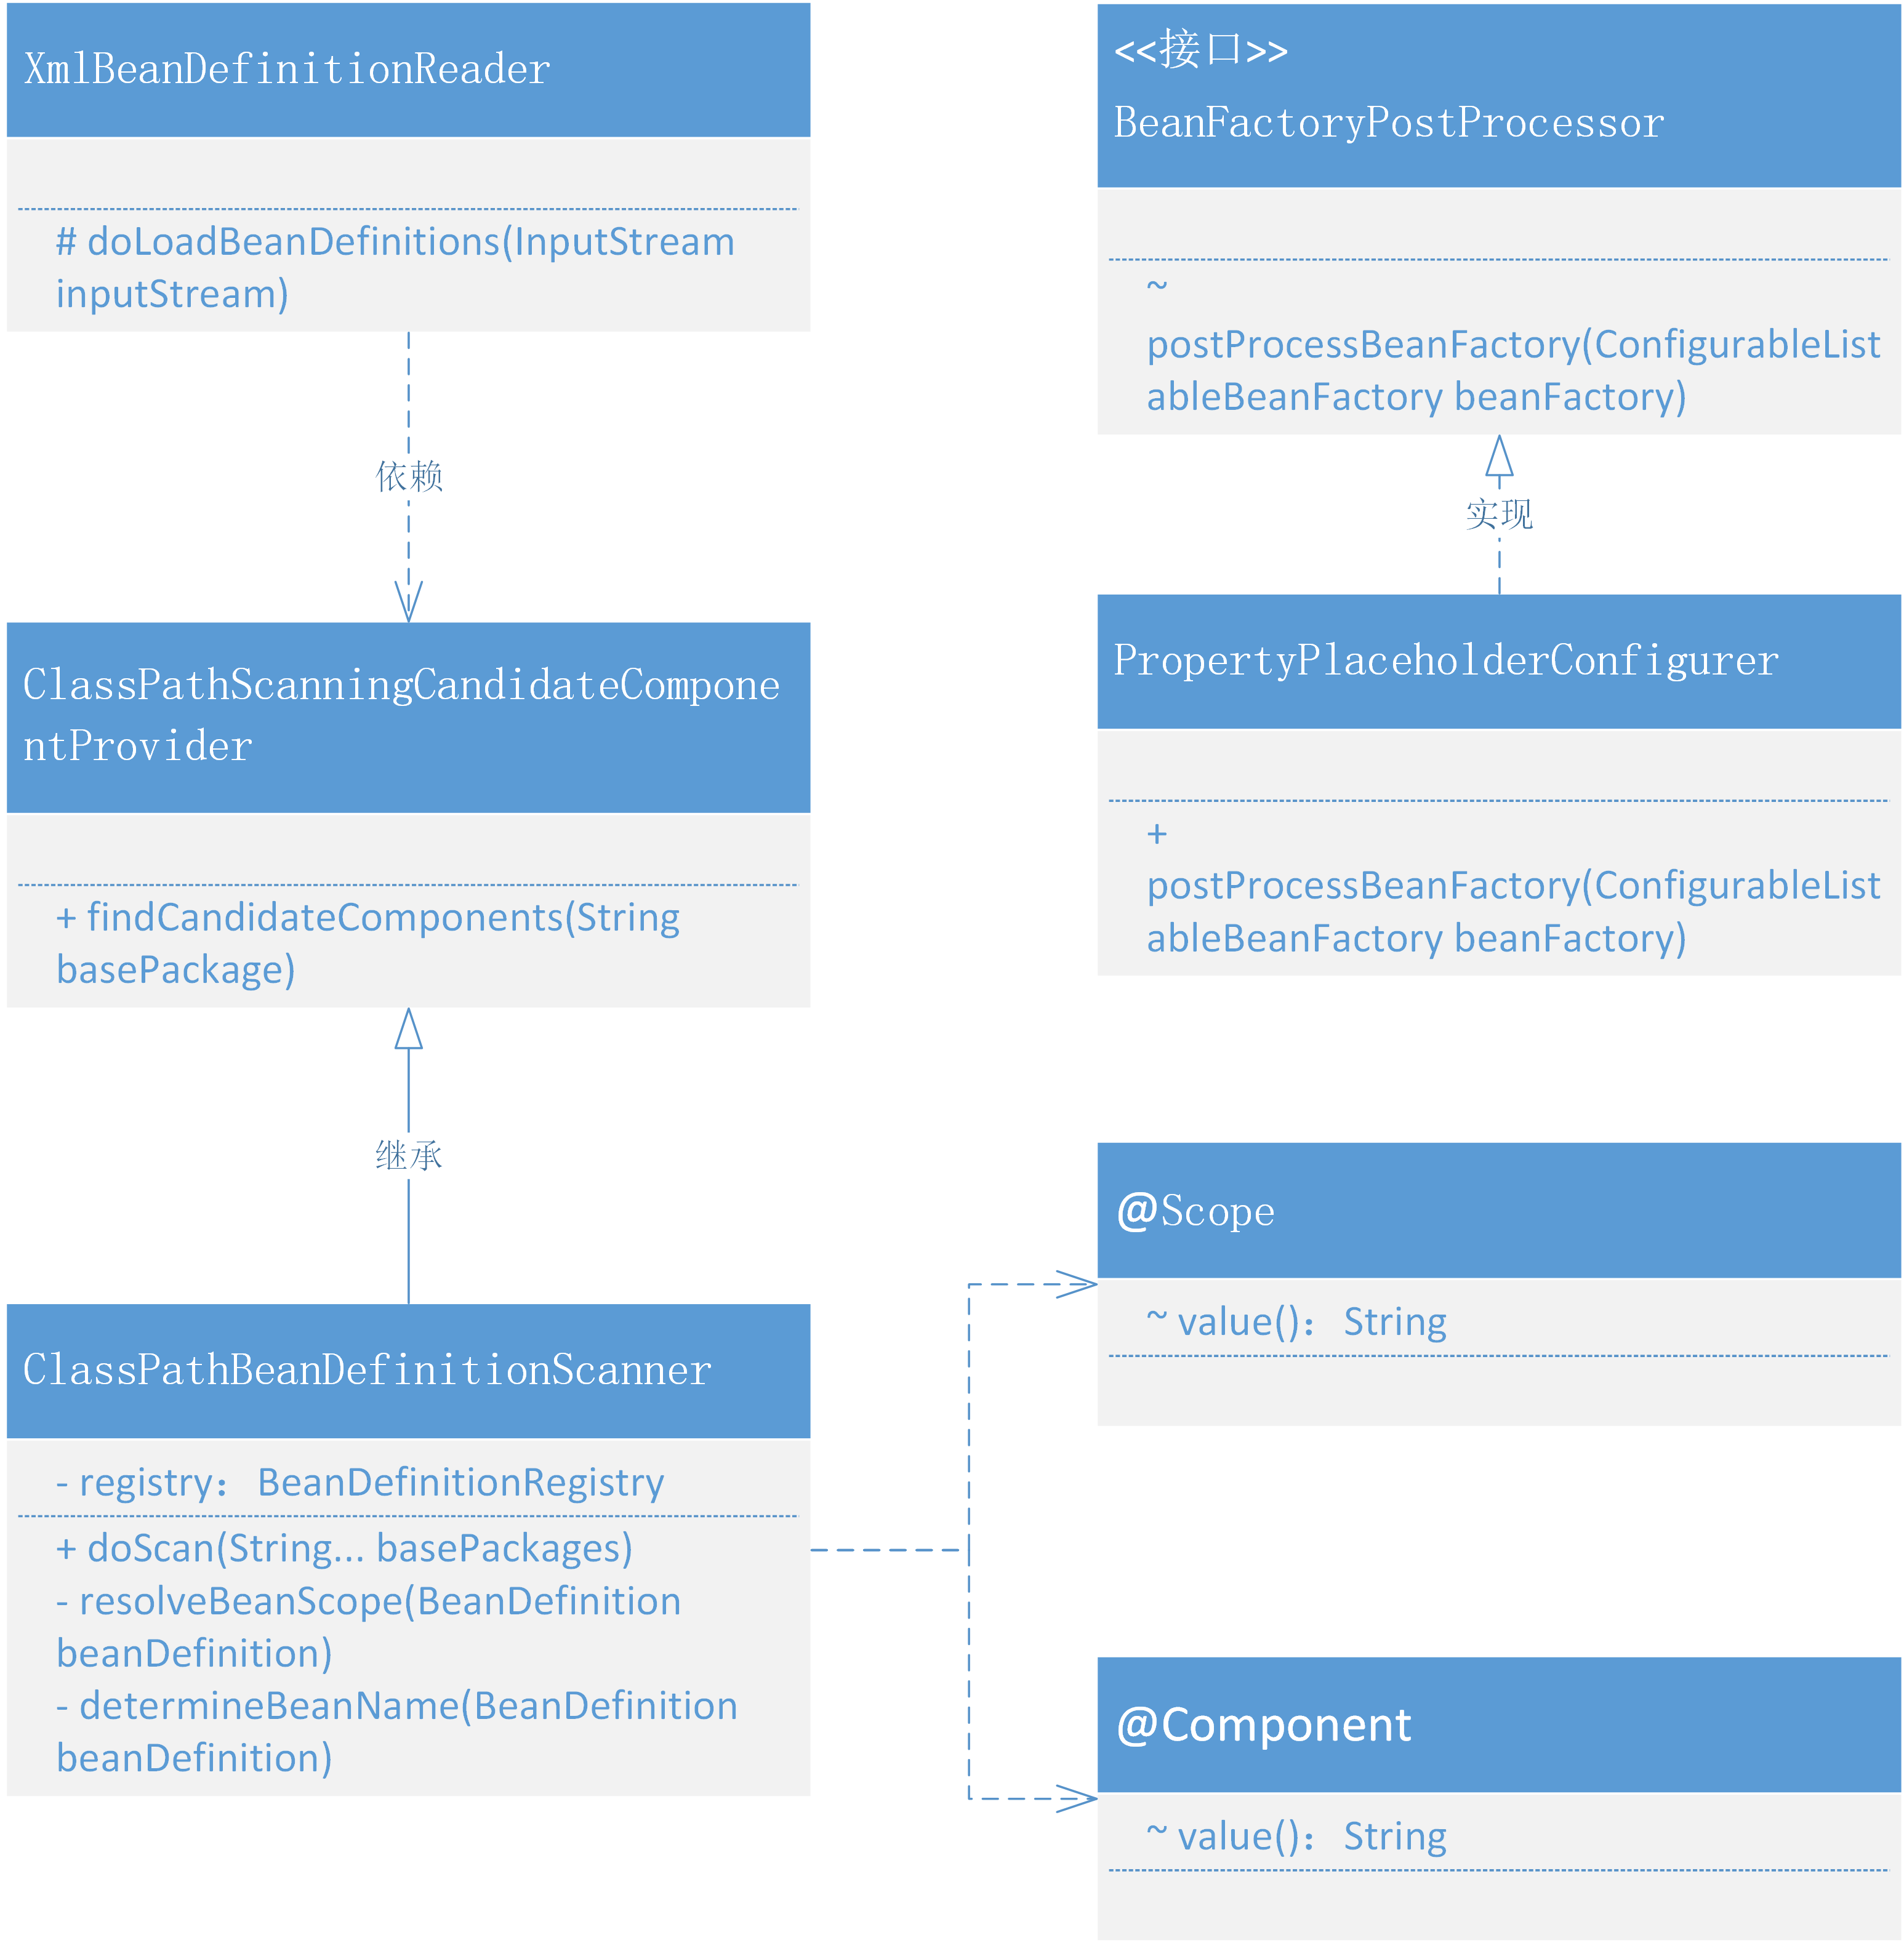
在Bean的生命周期中自动加载包扫描注册Bean对象和设置占位符属性的类关系,如图 14-2

- 整个类的关系结构来看,其实涉及的内容并不多,主要包括的就是 xml 解析类 XmlBeanDefinitionReader 对 ClassPathBeanDefinitionScanner#doScan 的使用。
- 在 doScan 方法中处理所有指定路径下添加了注解的类,拆解出类的信息:名称、作用范围等,进行创建 BeanDefinition 好用于 Bean 对象的注册操作。
- PropertyPlaceholderConfigurer 目前看上去像一块单独的内容,后续会把这块的内容与自动加载 Bean 对象进行整合,也就是可以在注解上使用占位符配置一些在配置文件里的属性信息。
# 2. 处理占位符配置
cn.bugstack.springframework.beans.factory.PropertyPlaceholderConfigurer
public class PropertyPlaceholderConfigurer implements BeanFactoryPostProcessor {

    /**
     * Default placeholder prefix: {@value}
     */
    public static final String DEFAULT_PLACEHOLDER_PREFIX = "${";

    /**
     * Default placeholder suffix: {@value}
     */
    public static final String DEFAULT_PLACEHOLDER_SUFFIX = "}";

    private String location;

    @Override
    public void postProcessBeanFactory(ConfigurableListableBeanFactory beanFactory) throws BeansException {
        // 加载属性文件
        try {
            DefaultResourceLoader resourceLoader = new DefaultResourceLoader();
            Resource resource = resourceLoader.getResource(location);
            Properties properties = new Properties();
            properties.load(resource.getInputStream());

            String[] beanDefinitionNames = beanFactory.getBeanDefinitionNames();
            for (String beanName : beanDefinitionNames) {
                BeanDefinition beanDefinition = beanFactory.getBeanDefinition(beanName);

                PropertyValues propertyValues = beanDefinition.getPropertyValues();
                for (PropertyValue propertyValue : propertyValues.getPropertyValues()) {
                    Object value = propertyValue.getValue();
                    if (!(value instanceof String)) continue;
                    String strVal = (String) value;
                    StringBuilder buffer = new StringBuilder(strVal);
                    int startIdx = strVal.indexOf(DEFAULT_PLACEHOLDER_PREFIX);
                    int stopIdx = strVal.indexOf(DEFAULT_PLACEHOLDER_SUFFIX);
                    if (startIdx != -1 && stopIdx != -1 && startIdx < stopIdx) {
                        String propKey = strVal.substring(startIdx + 2, stopIdx);
                        String propVal = properties.getProperty(propKey);
                        buffer.replace(startIdx, stopIdx + 1, propVal);
                        propertyValues.addPropertyValue(new PropertyValue(propertyValue.getName(), buffer.toString()));
                    }
                }
            }
        } catch (IOException e) {
            throw new BeansException("Could not load properties", e);
        }
    }

    public void setLocation(String location) {
        this.location = location;
    }

}
2
3
4
5
6
7
8
9
10
11
12
13
14
15
16
17
18
19
20
21
22
23
24
25
26
27
28
29
30
31
32
33
34
35
36
37
38
39
40
41
42
43
44
45
46
47
48
49
50
51
52
53
- 依赖于 BeanFactoryPostProcessor 在 Bean 生命周期的属性,可以在 Bean 对象实例化之前,改变属性信息。所以这里通过实现 BeanFactoryPostProcessor 接口,完成对配置文件的加载以及摘取占位符中的在属性文件里的配置。
- 这样就可以把提取到的配置信息放置到属性配置中了,
buffer.replace(startIdx, stopIdx + 1, propVal); propertyValues.addPropertyValue
# 3. 定义拦截注解
cn.bugstack.springframework.context.annotation.Scope
@Target({ElementType.TYPE, ElementType.METHOD})
@Retention(RetentionPolicy.RUNTIME)
@Documented
public @interface Scope {

    String value() default "singleton";

}
2
3
4
5
6
7
8
- 用于配置作用域的自定义注解,方便通过配置Bean对象注解的时候,拿到Bean对象的作用域。不过一般都使用默认的 singleton
cn.bugstack.springframework.stereotype.Component
@Target(ElementType.TYPE)
@Retention(RetentionPolicy.RUNTIME)
@Documented
public @interface Component {

    String value() default "";

}
2
3
4
5
6
7
8
- Component 自定义注解大家都非常熟悉了,用于配置到 Class 类上的。除此之外还有 Service、Controller,不过所有的处理方式基本一致,这里就只展示一个 Component 即可。
# 4. 处理对象扫描装配
cn.bugstack.springframework.context.annotation.ClassPathScanningCandidateComponentProvider
public class ClassPathScanningCandidateComponentProvider {

    public Set<BeanDefinition> findCandidateComponents(String basePackage) {
        Set<BeanDefinition> candidates = new LinkedHashSet<>();
        Set<Class<?>> classes = ClassUtil.scanPackageByAnnotation(basePackage, Component.class);
        for (Class<?> clazz : classes) {
            candidates.add(new BeanDefinition(clazz));
        }
        return candidates;
    }

}
2
3
4
5
6
7
8
9
10
11
12
- 这里先要提供一个可以通过配置路径
basePackage=cn.bugstack.springframework.test.bean,解析出 classes 信息的工具方法 findCandidateComponents,通过这个方法就可以扫描到所有 @Component 注解的 Bean 对象了。
cn.bugstack.springframework.context.annotation.ClassPathBeanDefinitionScanner
public class ClassPathBeanDefinitionScanner extends ClassPathScanningCandidateComponentProvider {

    private BeanDefinitionRegistry registry;

    public ClassPathBeanDefinitionScanner(BeanDefinitionRegistry registry) {
        this.registry = registry;
    }

    public void doScan(String... basePackages) {
        for (String basePackage : basePackages) {
            Set<BeanDefinition> candidates = findCandidateComponents(basePackage);
            for (BeanDefinition beanDefinition : candidates) {
                // 解析 Bean 的作用域 singleton、prototype
                String beanScope = resolveBeanScope(beanDefinition);
                if (StrUtil.isNotEmpty(beanScope)) {
                    beanDefinition.setScope(beanScope);
                }
                registry.registerBeanDefinition(determineBeanName(beanDefinition), beanDefinition);
            }
        }
    }

    private String resolveBeanScope(BeanDefinition beanDefinition) {
        Class<?> beanClass = beanDefinition.getBeanClass();
        Scope scope = beanClass.getAnnotation(Scope.class);
        if (null != scope) return scope.value();
        return StrUtil.EMPTY;
    }

    private String determineBeanName(BeanDefinition beanDefinition) {
        Class<?> beanClass = beanDefinition.getBeanClass();
        Component component = beanClass.getAnnotation(Component.class);
        String value = component.value();
        if (StrUtil.isEmpty(value)) {
            value = StrUtil.lowerFirst(beanClass.getSimpleName());
        }
        return value;
    }

}
2
3
4
5
6
7
8
9
10
11
12
13
14
15
16
17
18
19
20
21
22
23
24
25
26
27
28
29
30
31
32
33
34
35
36
37
38
39
40
- ClassPathBeanDefinitionScanner 是继承自 ClassPathScanningCandidateComponentProvider 的具体扫描包处理的类,在 doScan 中除了获取到扫描的类信息以后,还需要获取 Bean 的作用域和类名,如果不配置类名基本都是把首字母缩写。
# 5. 解析xml中调用扫描
cn.bugstack.springframework.beans.factory.xml.XmlBeanDefinitionReader
public class XmlBeanDefinitionReader extends AbstractBeanDefinitionReader {

    protected void doLoadBeanDefinitions(InputStream inputStream) throws ClassNotFoundException, DocumentException {
        SAXReader reader = new SAXReader();
        Document document = reader.read(inputStream);
        Element root = document.getRootElement();

        // 解析 context:component-scan 标签,扫描包中的类并提取相关信息,用于组装 BeanDefinition
        Element componentScan = root.element("component-scan");
        if (null != componentScan) {
            String scanPath = componentScan.attributeValue("base-package");
            if (StrUtil.isEmpty(scanPath)) {
                throw new BeansException("The value of base-package attribute can not be empty or null");
            }
            scanPackage(scanPath);
        }

        // ... 省略其他

        // 注册 BeanDefinition
        getRegistry().registerBeanDefinition(beanName, beanDefinition);
    }

    private void scanPackage(String scanPath) {
        String[] basePackages = StrUtil.splitToArray(scanPath, ',');
        ClassPathBeanDefinitionScanner scanner = new ClassPathBeanDefinitionScanner(getRegistry());
        scanner.doScan(basePackages);
    }

}
2
3
4
5
6
7
8
9
10
11
12
13
14
15
16
17
18
19
20
21
22
23
24
25
26
27
28
29
30
- 关于 XmlBeanDefinitionReader 中主要是在加载配置文件后,处理新增的自定义配置属性
component-scan,解析后调用 scanPackage 方法,其实也就是我们在 ClassPathBeanDefinitionScanner#doScan 功能。 - 另外这里需要注意,为了可以方便的加载和解析xml,XmlBeanDefinitionReader 已经全部替换为 dom4j 的方式进行解析处理。
# 五、测试
# 1. 事先准备
@Component("userService")
public class UserService implements IUserService {

    private String token;

    public String queryUserInfo() {
        try {
            Thread.sleep(new Random(1).nextInt(100));
        } catch (InterruptedException e) {
            e.printStackTrace();
        }
        return "小傅哥,100001,深圳";
    }

    public String register(String userName) {
        try {
            Thread.sleep(new Random(1).nextInt(100));
        } catch (InterruptedException e) {
            e.printStackTrace();
        }
        return "注册用户:" + userName + " success!";
    }

    @Override
    public String toString() {
        return "UserService#token = { " + token + " }";
    }

    public String getToken() {
        return token;
    }

    public void setToken(String token) {
        this.token = token;
    }
}
2
3
4
5
6
7
8
9
10
11
12
13
14
15
16
17
18
19
20
21
22
23
24
25
26
27
28
29
30
31
32
33
34
35
36
- 给 UserService 类添加一个自定义注解
@Component("userService")和一个属性信息String token。这是为了分别测试包扫描和占位符属性。
# 2. 属性配置文件
token=RejDlI78hu223Opo983Ds
- 这里配置一个 token 的属性信息,用于通过占位符的方式进行获取
# 3. spring.xml 配置对象
spring-property.xml
<?xml version="1.0" encoding="UTF-8"?>
<beans xmlns="http://www.springframework.org/schema/beans"
       xmlns:xsi="http://www.w3.org/2001/XMLSchema-instance"
       xmlns:context="http://www.springframework.org/schema/context"
       xsi:schemaLocation="http://www.springframework.org/schema/beans
	         http://www.springframework.org/schema/beans/spring-beans.xsd
		 http://www.springframework.org/schema/context">

    <bean class="cn.bugstack.springframework.beans.factory.PropertyPlaceholderConfigurer">
        <property name="location" value="classpath:token.properties"/>
    </bean>

    <bean id="userService" class="cn.bugstack.springframework.test.bean.UserService">
        <property name="token" value="${token}"/>
    </bean>

</beans>
2
3
4
5
6
7
8
9
10
11
12
13
14
15
16
17
- 加载
classpath:token.properties设置占位符属性值${token}
spring-scan.xml
<?xml version="1.0" encoding="UTF-8"?>
<beans xmlns="http://www.springframework.org/schema/beans"
       xmlns:xsi="http://www.w3.org/2001/XMLSchema-instance"
       xmlns:context="http://www.springframework.org/schema/context"
       xsi:schemaLocation="http://www.springframework.org/schema/beans
	         http://www.springframework.org/schema/beans/spring-beans.xsd
		 http://www.springframework.org/schema/context">

    <context:component-scan base-package="cn.bugstack.springframework.test.bean"/>

</beans>
2
3
4
5
6
7
8
9
10
11
- 添加
component-scan属性,设置包扫描根路径
# 4. 单元测试(占位符)
@Test
public void test_property() {
    ClassPathXmlApplicationContext applicationContext = new ClassPathXmlApplicationContext("classpath:spring-property.xml");
    IUserService userService = applicationContext.getBean("userService", IUserService.class);
    System.out.println("测试结果:" + userService);
}
2
3
4
5
6
测试结果
测试结果:UserService#token = { RejDlI78hu223Opo983Ds }

Process finished with exit code 0
2
3
- 通过测试结果可以看到 UserService 中的 token 属性已经通过占位符的方式设置进去配置文件里的
token.properties的属性值了。
# 5. 单元测试(包扫描)
@Test
public void test_scan() {
    ClassPathXmlApplicationContext applicationContext = new ClassPathXmlApplicationContext("classpath:spring-scan.xml");
    IUserService userService = applicationContext.getBean("userService", IUserService.class);
    System.out.println("测试结果:" + userService.queryUserInfo());
}
2
3
4
5
6
测试结果
测试结果:小傅哥,100001,深圳

Process finished with exit code 0
2
3
- 通过这个测试结果可以看出来,现在使用注解的方式就可以让 Class 注册完成 Bean 对象了。
# 六、总结
- 通过整篇的内容实现可以看出来,目前的功能添加其实已经不复杂了,都是在 IOC 和 AOP 核心的基础上来补全功能。这些补全的功能也是在完善 Bean 的生命周期,让整个功能使用也越来越容易。
- 在你不断的实现着 Spring 的各项功能时,也可以把自己在平常使用 Spring 的一些功能想法融入进来,比如像 Spring 是如何动态切换数据源的,线程池是怎么提供配置的,这些内容虽然不是最基础的核心范围,但也非常重要。
- 可能有些时候这些类实现的内容对新人来说比较多,可以一点点动手实现逐步理解,在把一些稍微较有难度的内容实现后,其实后面也就没有那么难理解了。
# 七、优秀作业
- 利用自定义注解 实现Bean的自动化扫描注册 @Rechie (opens new window)
- 解决包扫描问题以及${}字符映射 @Chin (opens new window)
- 目前需要在spring.xml中配置
,才可以使用使用Spring容器完成Bean的生命周期 @liuc (opens new window) - 这一章节比较简单,主要是进一步简化配置文件操作,扫描指定路径并通过注解完成 Bean 的注册。 @Homage (opens new window)
- 在实现自动扫描带 @Component 注解的对象自动装配和注册的基础上,额可以使用 @Autowired、@Value 注解,完成对属性和对象的注入操作。@水中捞月 (opens new window)
- 在创建 Bean 对象之前,要先获取到 Bean 的属性信息组装成 BeanDefinition @lucien (opens new window)

