# 《Spring 手撸专栏》第 15 章:万人之敌,通过注解给属性注入配置和Bean对象
作者:小傅哥
博客:https://bugstack.cn (opens new window)
原文:https://mp.weixin.qq.com/s/GNLA10AimmxUSZ0VoDI_xA (opens new window)
沉淀、分享、成长,让自己和他人都能有所收获!😄
# 一、前言
写代码,就是从能用到好用的不断折腾!
你听过扰动函数吗?你写过斐波那契(Fibonacci)散列吗?你实现过梅森旋转算法吗?怎么 没听过这些写不了代码吗!不会的,即使没听过你一样可以写的了代码,比如你实现的数据库路由数据总是落在1库1表它不散列分布、你实现的抽奖系统总是把运营配置的最大红包发出去提高了运营成本、你开发的秒杀系统总是在开始后的1秒就挂了货品根本给不出去。
除了一部分仅把编码当成搬砖应付工作外的程序员,还有一部分总是在追求极致的码农。写代码还能赚钱,真开心! 这样的码农总是会考虑🤔还有没有更好的实现逻辑能让代码不仅是能用,还要好用呢?其实这一点的追求到完成,需要大量扩展性学习和深度挖掘,这样你设计出来的系统才更你考虑的更加全面,也能应对各种复杂的场景。
# 二、目标
在目前 IOC、AOP 两大核心功能模块的支撑下,完全可以管理 Bean 对象的注册和获取,不过这样的使用方式总感觉像是刀耕火种有点难用。因此在上一章节我们解决需要手动配置 Bean 对象到 spring.xml 文件中,改为可以自动扫描带有注解 @Component 的对象完成自动装配和注册到 Spring 容器的操作。
那么在自动扫描包注册 Bean 对象之后,就需要把原来在配置文件中通过 property name="token" 配置属性和Bean的操作,也改为可以自动注入。这就像我们使用 Spring 框架中 @Autowired、@Value 注解一样,完成我们对属性和对象的注入操作。
# 三、方案
其实从我们在完成 Bean 对象的基础功能后,后续陆续添加的功能都是围绕着 Bean 的生命周期进行的,比如修改 Bean 的定义 BeanFactoryPostProcessor,处理 Bean 的属性要用到 BeanPostProcessor,完成个性的属性操作则专门继承 BeanPostProcessor 提供新的接口,因为这样才能通过 instanceof 判断出具有标记性的接口。所以关于 Bean 等等的操作,以及监听 Aware、获取 BeanFactory,都需要在 Bean 的生命周期中完成。那么我们在设计属性和 Bean 对象的注入时候,也会用到 BeanPostProcessor 来完成在设置 Bean 属性之前,允许 BeanPostProcessor 修改属性值。整体设计结构如下图:
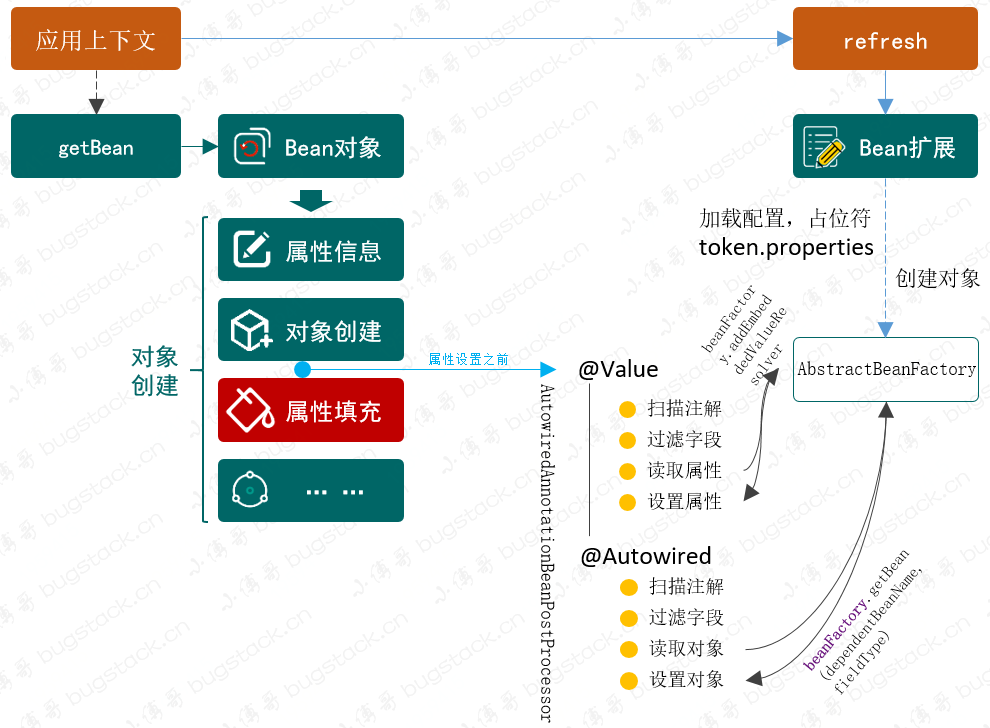
- 要处理自动扫描注入,包括属性注入、对象注入,则需要在对象属性
applyPropertyValues填充之前 ,把属性信息写入到 PropertyValues 的集合中去。这一步的操作相当于是解决了以前在 spring.xml 配置属性的过程。 - 而在属性的读取中,需要依赖于对 Bean 对象的类中属性的配置了注解的扫描,
field.getAnnotation(Value.class);依次拿出符合的属性并填充上相应的配置信息。这里有一点 ,属性的配置信息需要依赖于 BeanFactoryPostProcessor 的实现类 PropertyPlaceholderConfigurer,把值写入到 AbstractBeanFactory的embeddedValueResolvers集合中,这样才能在属性填充中利用 beanFactory 获取相应的属性值 - 还有一个是关于 @Autowired 对于对象的注入,其实这一个和属性注入的唯一区别是对于对象的获取
beanFactory.getBean(fieldType),其他就没有什么差一点了。 - 当所有的属性被设置到 PropertyValues 完成以后,接下来就到了创建对象的下一步,属性填充,而此时就会把我们一一获取到的配置和对象填充到属性上,也就实现了自动注入的功能。
# 四、实现
# 1. 工程结构
small-spring-step-14
└── src
    ├── main
    │   └── java
    │       └── cn.bugstack.springframework
    │           ├── aop
    │           │   ├── aspectj
    │           │   │   └── AspectJExpressionPointcut.java
    │           │   │   └── AspectJExpressionPointcutAdvisor.java
    │           │   ├── framework
    │           │   │   ├── adapter
    │           │   │   │   └── MethodBeforeAdviceInterceptor.java
    │           │   │   ├── autoproxy
    │           │   │   │   └── MethodBeforeAdviceInterceptor.java
    │           │   │   ├── AopProxy.java
    │           │   │   ├── Cglib2AopProxy.java
    │           │   │   ├── JdkDynamicAopProxy.java
    │           │   │   ├── ProxyFactory.java
    │           │   │   └── ReflectiveMethodInvocation.java
    │           │   ├── AdvisedSupport.java
    │           │   ├── Advisor.java
    │           │   ├── BeforeAdvice.java
    │           │   ├── ClassFilter.java
    │           │   ├── MethodBeforeAdvice.java
    │           │   ├── MethodMatcher.java
    │           │   ├── Pointcut.java
    │           │   ├── PointcutAdvisor.java
    │           │   └── TargetSource.java
    │           ├── beans
    │           │   ├── factory
    │           │   │   ├── annotation
    │           │   │   │   ├── Autowired.java
    │           │   │   │   ├── AutowiredAnnotationBeanPostProcessor.java
    │           │   │   │   ├── Qualifier.java
    │           │   │   │   └── Value.java
    │           │   │   ├── config
    │           │   │   │   ├── AutowireCapableBeanFactory.java
    │           │   │   │   ├── BeanDefinition.java
    │           │   │   │   ├── BeanFactoryPostProcessor.java
    │           │   │   │   ├── BeanPostProcessor.java
    │           │   │   │   ├── BeanReference.java
    │           │   │   │   ├── ConfigurableBeanFactory.java
    │           │   │   │   ├── InstantiationAwareBeanPostProcessor.java
    │           │   │   │   └── SingletonBeanRegistry.java
    │           │   │   ├── support
    │           │   │   │   ├── AbstractAutowireCapableBeanFactory.java
    │           │   │   │   ├── AbstractBeanDefinitionReader.java
    │           │   │   │   ├── AbstractBeanFactory.java
    │           │   │   │   ├── BeanDefinitionReader.java
    │           │   │   │   ├── BeanDefinitionRegistry.java
    │           │   │   │   ├── CglibSubclassingInstantiationStrategy.java
    │           │   │   │   ├── DefaultListableBeanFactory.java
    │           │   │   │   ├── DefaultSingletonBeanRegistry.java
    │           │   │   │   ├── DisposableBeanAdapter.java
    │           │   │   │   ├── FactoryBeanRegistrySupport.java
    │           │   │   │   ├── InstantiationStrategy.java
    │           │   │   │   └── SimpleInstantiationStrategy.java
    │           │   │   ├── support
    │           │   │   │   └── XmlBeanDefinitionReader.java
    │           │   │   ├── Aware.java
    │           │   │   ├── BeanClassLoaderAware.java
    │           │   │   ├── BeanFactory.java
    │           │   │   ├── BeanFactoryAware.java
    │           │   │   ├── BeanNameAware.java
    │           │   │   ├── ConfigurableListableBeanFactory.java
    │           │   │   ├── DisposableBean.java
    │           │   │   ├── FactoryBean.java
    │           │   │   ├── HierarchicalBeanFactory.java
    │           │   │   ├── InitializingBean.java
    │           │   │   ├── ListableBeanFactory.java
    │           │   │   └── PropertyPlaceholderConfigurer.java
    │           │   ├── BeansException.java
    │           │   ├── PropertyValue.java
    │           │   └── PropertyValues.java
    │           ├── context
    │           │   ├── annotation
    │           │   │   ├── ClassPathBeanDefinitionScanner.java
    │           │   │   ├── ClassPathScanningCandidateComponentProvider.java
    │           │   │   └── Scope.java
    │           │   ├── event
    │           │   │   ├── AbstractApplicationEventMulticaster.java
    │           │   │   ├── ApplicationContextEvent.java
    │           │   │   ├── ApplicationEventMulticaster.java
    │           │   │   ├── ContextClosedEvent.java
    │           │   │   ├── ContextRefreshedEvent.java
    │           │   │   └── SimpleApplicationEventMulticaster.java
    │           │   ├── support
    │           │   │   ├── AbstractApplicationContext.java
    │           │   │   ├── AbstractRefreshableApplicationContext.java
    │           │   │   ├── AbstractXmlApplicationContext.java
    │           │   │   ├── ApplicationContextAwareProcessor.java
    │           │   │   └── ClassPathXmlApplicationContext.java
    │           │   ├── ApplicationContext.java
    │           │   ├── ApplicationContextAware.java
    │           │   ├── ApplicationEvent.java
    │           │   ├── ApplicationEventPublisher.java
    │           │   ├── ApplicationListener.java
    │           │   └── ConfigurableApplicationContext.java
    │           ├── core.io
    │           │   ├── ClassPathResource.java
    │           │   ├── DefaultResourceLoader.java
    │           │   ├── FileSystemResource.java
    │           │   ├── Resource.java
    │           │   ├── ResourceLoader.java
    │           │   └── UrlResource.java
    │           ├── stereotype
    │           │   └── Component.java
    │           └── utils
    │               ├── ClassUtils.java
    │               └── StringValueResolver.java
    └── test
        └── java
            └── cn.bugstack.springframework.test
                ├── bean
                │   ├── IUserService.java
                │   └── UserService.java
                └── ApiTest.java
2
3
4
5
6
7
8
9
10
11
12
13
14
15
16
17
18
19
20
21
22
23
24
25
26
27
28
29
30
31
32
33
34
35
36
37
38
39
40
41
42
43
44
45
46
47
48
49
50
51
52
53
54
55
56
57
58
59
60
61
62
63
64
65
66
67
68
69
70
71
72
73
74
75
76
77
78
79
80
81
82
83
84
85
86
87
88
89
90
91
92
93
94
95
96
97
98
99
100
101
102
103
104
105
106
107
108
109
110
111
112
113
114
115
116
117
工程源码:公众号「bugstack虫洞栈」,回复:Spring 专栏,获取完整源码
自动扫描注入占位符配置和对象的类关系,如图 15-2
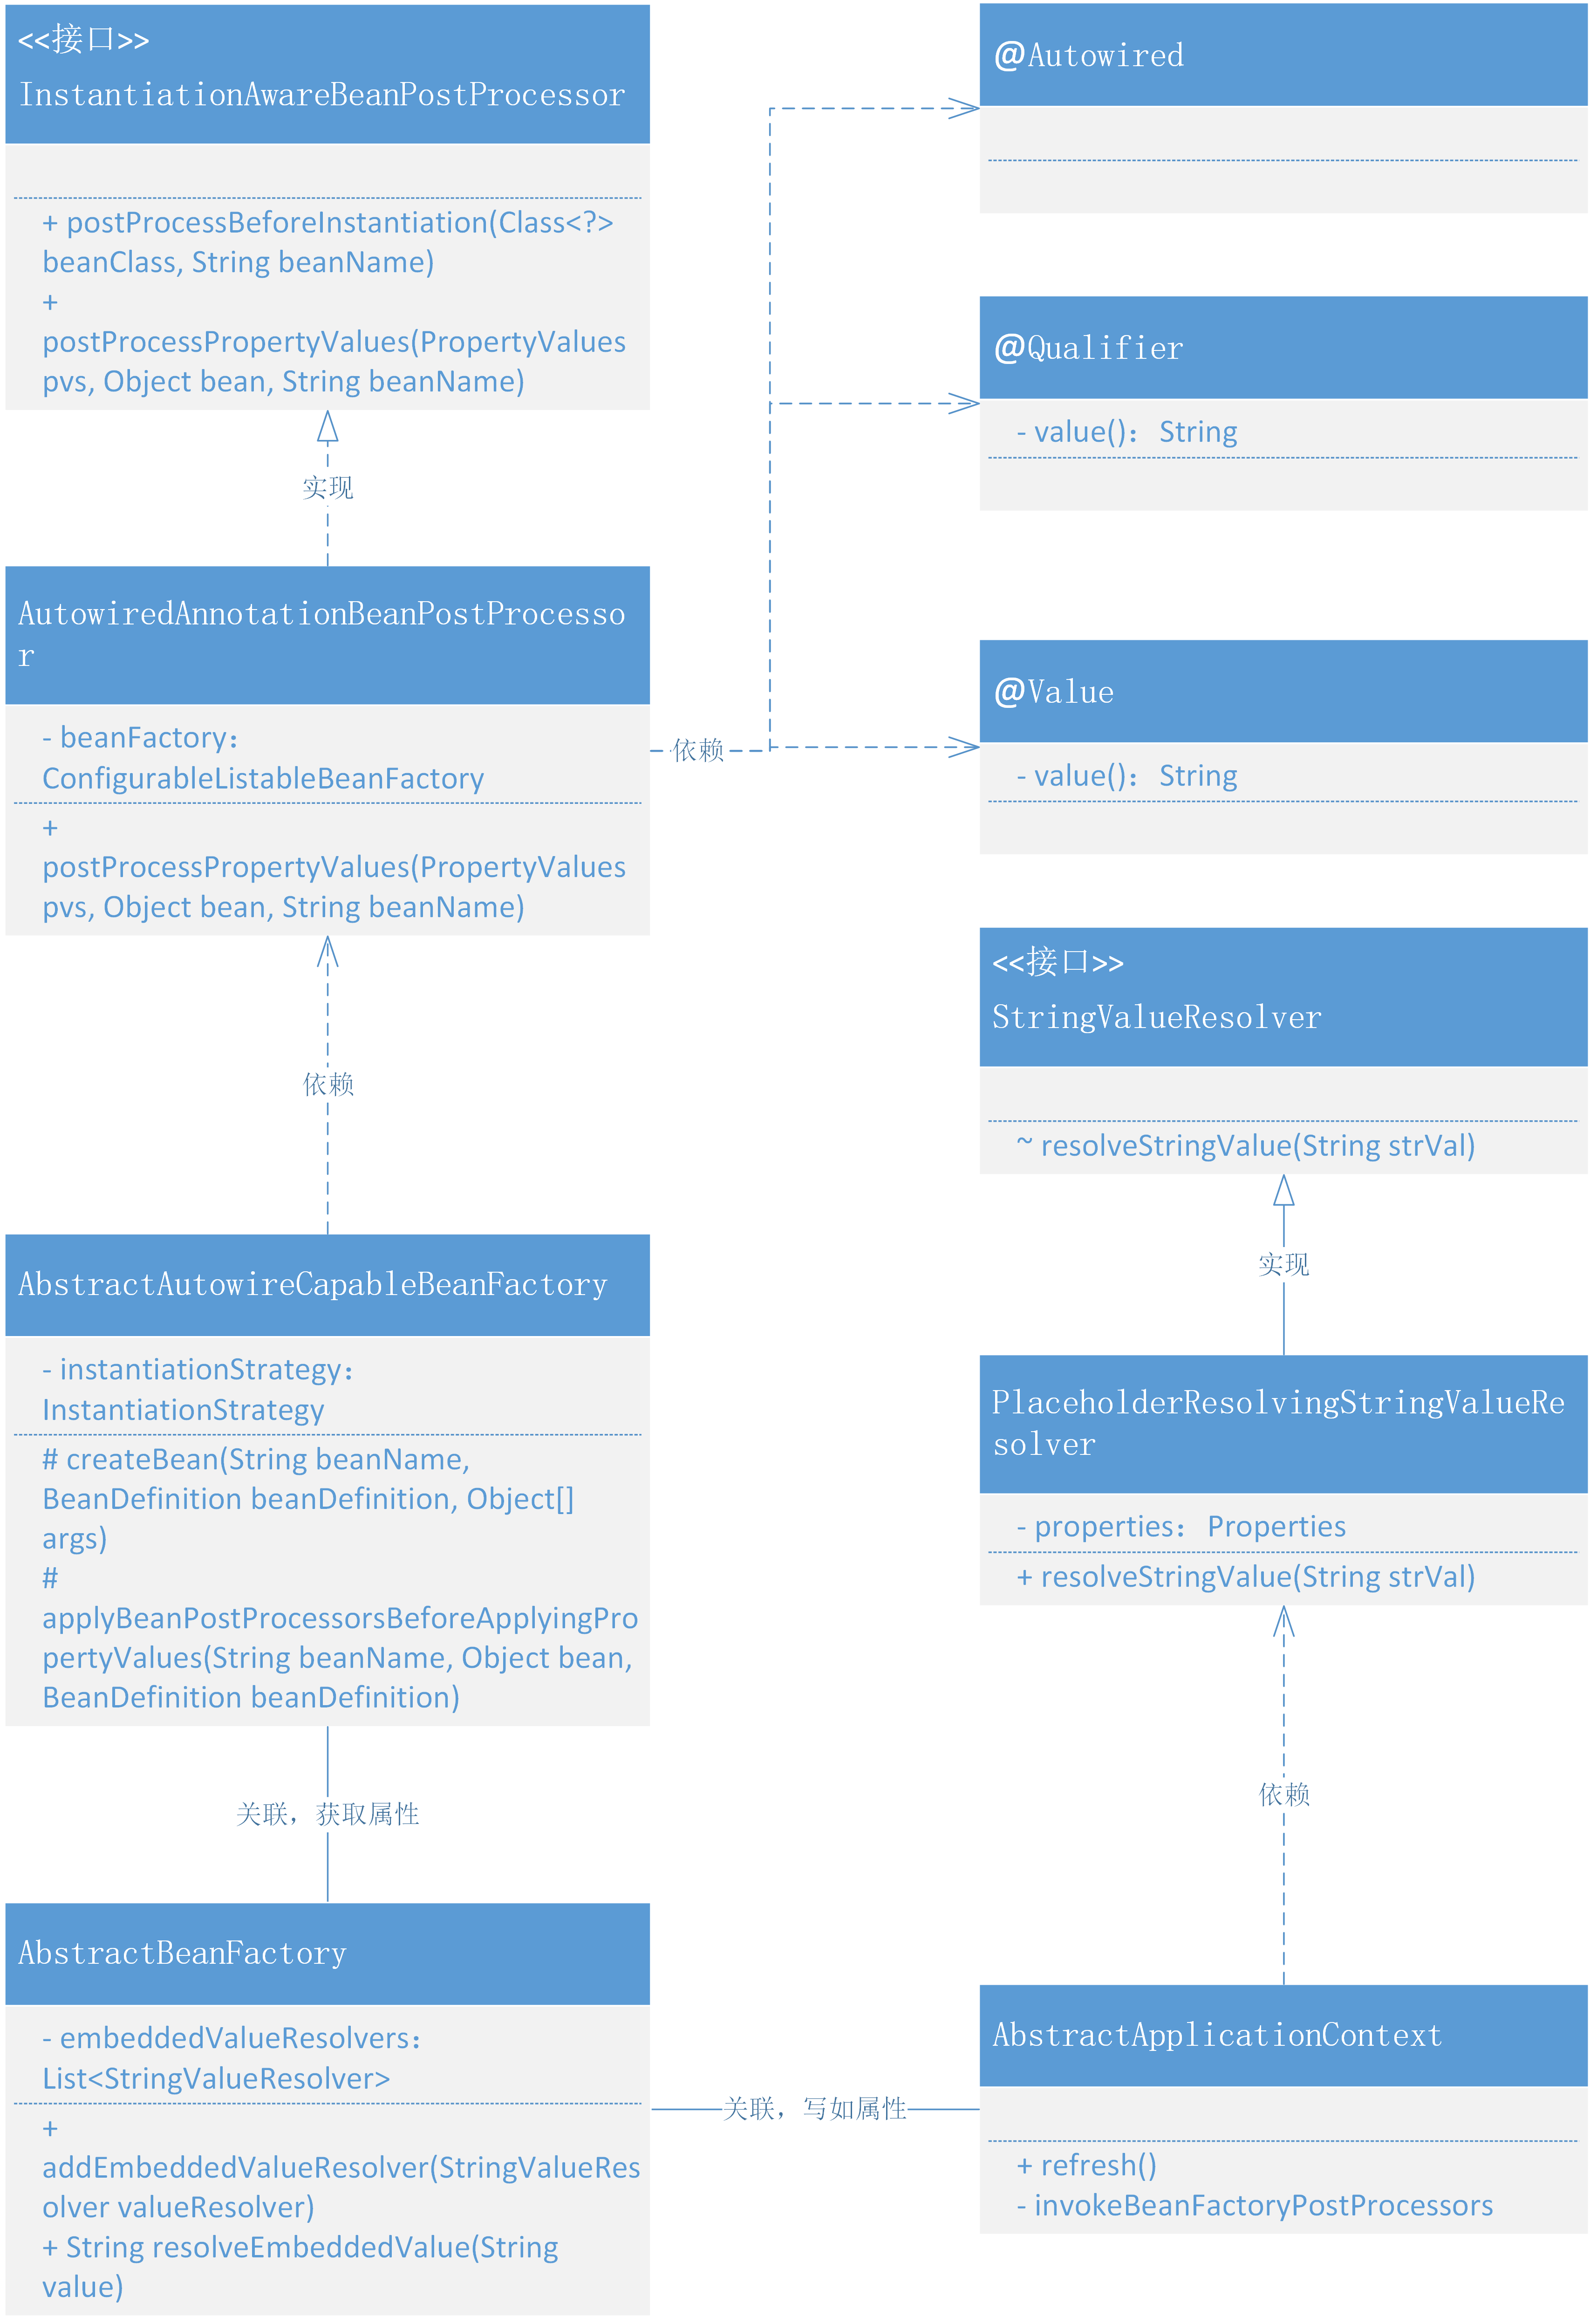
- 在整个类图中以围绕实现接口 InstantiationAwareBeanPostProcessor 的类 AutowiredAnnotationBeanPostProcessor 作为入口点,被 AbstractAutowireCapableBeanFactory创建 Bean 对象过程中调用扫描整个类的属性配置中含有自定义注解
Value、Autowired、Qualifier,的属性值。 - 这里稍有变动的是关于属性值信息的获取,在注解配置的属性字段扫描到信息注入时,包括了占位符从配置文件获取信息也包括 Bean 对象,Bean 对象可以直接获取,但配置信息需要在 AbstractBeanFactory 中添加新的属性集合 embeddedValueResolvers,由 PropertyPlaceholderConfigurer#postProcessBeanFactory 进行操作填充到属性集合中。
# 2. 把读取到属性填充到容器
定义解析字符串接口
cn.bugstack.springframework.util.StringValueResolver
public interface StringValueResolver {

    String resolveStringValue(String strVal);

}
2
3
4
5
- 接口 StringValueResolver 是一个解析字符串操作的接口
填充字符串
public class PropertyPlaceholderConfigurer implements BeanFactoryPostProcessor {

    @Override
    public void postProcessBeanFactory(ConfigurableListableBeanFactory beanFactory) throws BeansException {
        try {
            // 加载属性文件
            DefaultResourceLoader resourceLoader = new DefaultResourceLoader();
            Resource resource = resourceLoader.getResource(location);

            // ... 占位符替换属性值、设置属性值

            // 向容器中添加字符串解析器,供解析@Value注解使用
            StringValueResolver valueResolver = new PlaceholderResolvingStringValueResolver(properties);
            beanFactory.addEmbeddedValueResolver(valueResolver);

        } catch (IOException e) {
            throw new BeansException("Could not load properties", e);
        }
    }

    private class PlaceholderResolvingStringValueResolver implements StringValueResolver {

        private final Properties properties;

        public PlaceholderResolvingStringValueResolver(Properties properties) {
            this.properties = properties;
        }

        @Override
        public String resolveStringValue(String strVal) {
            return PropertyPlaceholderConfigurer.this.resolvePlaceholder(strVal, properties);
        }

    }

}
2
3
4
5
6
7
8
9
10
11
12
13
14
15
16
17
18
19
20
21
22
23
24
25
26
27
28
29
30
31
32
33
34
35
36
- 在解析属性配置的类 PropertyPlaceholderConfigurer 中,最主要的其实就是这行代码的操作
beanFactory.addEmbeddedValueResolver(valueResolver)这是把属性值写入到了 AbstractBeanFactory 的 embeddedValueResolvers 中。 - 这里说明下,embeddedValueResolvers 是 AbstractBeanFactory 类新增加的集合
List<StringValueResolver> embeddedValueResolversString resolvers to apply e.g. to annotation attribute values
# 3. 自定义属性注入注解
自定义注解,Autowired、Qualifier、Value
@Retention(RetentionPolicy.RUNTIME)
@Target({ElementType.CONSTRUCTOR, ElementType.FIELD, ElementType.METHOD})
public @interface Autowired {
}

@Target({ElementType.FIELD, ElementType.METHOD, ElementType.PARAMETER, ElementType.TYPE, ElementType.ANNOTATION_TYPE})
@Retention(RetentionPolicy.RUNTIME)
@Inherited
@Documented
public @interface Qualifier {

    String value() default "";

}

@Target({ElementType.FIELD, ElementType.METHOD, ElementType.PARAMETER})
@Retention(RetentionPolicy.RUNTIME)
@Documented
public @interface Value {

    /**
     * The actual value expression: e.g. "#{systemProperties.myProp}".
     */
    String value();

}
2
3
4
5
6
7
8
9
10
11
12
13
14
15
16
17
18
19
20
21
22
23
24
25
26
- 3个注解在我们日常使用 Spring 也是非常常见的,注入对象、注入属性,而 Qualifier 一般与 Autowired 配合使用。
# 4. 扫描自定义注解
cn.bugstack.springframework.beans.factory.annotation.AutowiredAnnotationBeanPostProcessor
public class AutowiredAnnotationBeanPostProcessor implements InstantiationAwareBeanPostProcessor, BeanFactoryAware {

    private ConfigurableListableBeanFactory beanFactory;

    @Override
    public void setBeanFactory(BeanFactory beanFactory) throws BeansException {
        this.beanFactory = (ConfigurableListableBeanFactory) beanFactory;
    }

    @Override
    public PropertyValues postProcessPropertyValues(PropertyValues pvs, Object bean, String beanName) throws BeansException {
        // 1. 处理注解 @Value
        Class<?> clazz = bean.getClass();
        clazz = ClassUtils.isCglibProxyClass(clazz) ? clazz.getSuperclass() : clazz;

        Field[] declaredFields = clazz.getDeclaredFields();

        for (Field field : declaredFields) {
            Value valueAnnotation = field.getAnnotation(Value.class);
            if (null != valueAnnotation) {
                String value = valueAnnotation.value();
                value = beanFactory.resolveEmbeddedValue(value);
                BeanUtil.setFieldValue(bean, field.getName(), value);
            }
        }

        // 2. 处理注解 @Autowired
        for (Field field : declaredFields) {
            Autowired autowiredAnnotation = field.getAnnotation(Autowired.class);
            if (null != autowiredAnnotation) {
                Class<?> fieldType = field.getType();
                String dependentBeanName = null;
                Qualifier qualifierAnnotation = field.getAnnotation(Qualifier.class);
                Object dependentBean = null;
                if (null != qualifierAnnotation) {
                    dependentBeanName = qualifierAnnotation.value();
                    dependentBean = beanFactory.getBean(dependentBeanName, fieldType);
                } else {
                    dependentBean = beanFactory.getBean(fieldType);
                }
                BeanUtil.setFieldValue(bean, field.getName(), dependentBean);
            }
        }

        return pvs;
    }

}
2
3
4
5
6
7
8
9
10
11
12
13
14
15
16
17
18
19
20
21
22
23
24
25
26
27
28
29
30
31
32
33
34
35
36
37
38
39
40
41
42
43
44
45
46
47
48
- AutowiredAnnotationBeanPostProcessor 是实现接口 InstantiationAwareBeanPostProcessor 的一个用于在 Bean 对象实例化完成后,设置属性操作前的处理属性信息的类和操作方法。只有实现了 BeanPostProcessor 接口才有机会在 Bean 的生命周期中处理初始化信息
- 核心方法 postProcessPropertyValues,主要用于处理类含有 @Value、@Autowired 注解的属性,进行属性信息的提取和设置。
- 这里需要注意一点因为我们在 AbstractAutowireCapableBeanFactory 类中使用的是 CglibSubclassingInstantiationStrategy 进行类的创建,所以在 AutowiredAnnotationBeanPostProcessor#postProcessPropertyValues 中需要判断是否为 CGlib 创建对象,否则是不能正确拿到类信息的。
ClassUtils.isCglibProxyClass(clazz) ? clazz.getSuperclass() : clazz;
# 5. 向BeanFactory中注册AutowiredAnnotationBeanPostProcessor
public class ClassPathBeanDefinitionScanner extends ClassPathScanningCandidateComponentProvider {

    private BeanDefinitionRegistry registry;

    public ClassPathBeanDefinitionScanner(BeanDefinitionRegistry registry) {
        this.registry = registry;
    }

    public void doScan(String... basePackages) {
        for (String basePackage : basePackages) {
            Set<BeanDefinition> candidates = findCandidateComponents(basePackage);
            for (BeanDefinition beanDefinition : candidates) {
                // 解析 Bean 的作用域 singleton、prototype
                String beanScope = resolveBeanScope(beanDefinition);
                if (StrUtil.isNotEmpty(beanScope)) {
                    beanDefinition.setScope(beanScope);
                }
                registry.registerBeanDefinition(determineBeanName(beanDefinition), beanDefinition);
            }
        }

        // 注册处理注解的 BeanPostProcessor(@Autowired、@Value)
        registry.registerBeanDefinition("cn.bugstack.springframework.context.annotation.internalAutowiredAnnotationProcessor", new BeanDefinition(AutowiredAnnotationBeanPostProcessor.class));
    }

    // ...
}
2
3
4
5
6
7
8
9
10
11
12
13
14
15
16
17
18
19
20
21
22
23
24
25
26
27
- 由于AutowiredAnnotationBeanPostProcessor并没有标注@Component,所以是无法在类扫描时注入到beanFactory中的,此处需要我们手动进行注册.
# 6. 在Bean的生命周期中调用属性注入
cn.bugstack.springframework.beans.factory.support.AbstractAutowireCapableBeanFactory
public abstract class AbstractAutowireCapableBeanFactory extends AbstractBeanFactory implements AutowireCapableBeanFactory {

    private InstantiationStrategy instantiationStrategy = new CglibSubclassingInstantiationStrategy();

    @Override
    protected Object createBean(String beanName, BeanDefinition beanDefinition, Object[] args) throws BeansException {
        Object bean = null;
        try {
            // 判断是否返回代理 Bean 对象
            bean = resolveBeforeInstantiation(beanName, beanDefinition);
            if (null != bean) {
                return bean;
            }
            // 实例化 Bean
            bean = createBeanInstance(beanDefinition, beanName, args);
            // 在设置 Bean 属性之前,允许 BeanPostProcessor 修改属性值
            applyBeanPostProcessorsBeforeApplyingPropertyValues(beanName, bean, beanDefinition);
            // 给 Bean 填充属性
            applyPropertyValues(beanName, bean, beanDefinition);
            // 执行 Bean 的初始化方法和 BeanPostProcessor 的前置和后置处理方法
            bean = initializeBean(beanName, bean, beanDefinition);
        } catch (Exception e) {
            throw new BeansException("Instantiation of bean failed", e);
        }

        // 注册实现了 DisposableBean 接口的 Bean 对象
        registerDisposableBeanIfNecessary(beanName, bean, beanDefinition);

        // 判断 SCOPE_SINGLETON、SCOPE_PROTOTYPE
        if (beanDefinition.isSingleton()) {
            registerSingleton(beanName, bean);
        }
        return bean;
    }

    /**
     * 在设置 Bean 属性之前,允许 BeanPostProcessor 修改属性值
     *
     * @param beanName
     * @param bean
     * @param beanDefinition
     */
    protected void applyBeanPostProcessorsBeforeApplyingPropertyValues(String beanName, Object bean, BeanDefinition beanDefinition) {
        for (BeanPostProcessor beanPostProcessor : getBeanPostProcessors()) {
            if (beanPostProcessor instanceof InstantiationAwareBeanPostProcessor){
                PropertyValues pvs = ((InstantiationAwareBeanPostProcessor) beanPostProcessor).postProcessPropertyValues(beanDefinition.getPropertyValues(), bean, beanName);
                if (null != pvs) {
                    for (PropertyValue propertyValue : pvs.getPropertyValues()) {
                        beanDefinition.getPropertyValues().addPropertyValue(propertyValue);
                    }
                }
            }
        }
    }

    // ...
}
2
3
4
5
6
7
8
9
10
11
12
13
14
15
16
17
18
19
20
21
22
23
24
25
26
27
28
29
30
31
32
33
34
35
36
37
38
39
40
41
42
43
44
45
46
47
48
49
50
51
52
53
54
55
56
57
- AbstractAutowireCapableBeanFactory#createBean 方法中有这一条新增加的方法调用,就是在
设置 Bean 属性之前,允许 BeanPostProcessor 修改属性值的操作applyBeanPostProcessorsBeforeApplyingPropertyValues - 那么这个 applyBeanPostProcessorsBeforeApplyingPropertyValues 方法中,首先就是获取已经注入的 BeanPostProcessor 集合并从中筛选出继承接口 InstantiationAwareBeanPostProcessor 的实现类。
- 最后就是调用相应的 postProcessPropertyValues 方法以及循环设置属性值信息,
beanDefinition.getPropertyValues().addPropertyValue(propertyValue);
# 五、测试
# 1. 事先准备
配置 Dao
@Component
public class UserDao {

    private static Map<String, String> hashMap = new HashMap<>();

    static {
        hashMap.put("10001", "小傅哥,北京,亦庄");
        hashMap.put("10002", "八杯水,上海,尖沙咀");
        hashMap.put("10003", "阿毛,天津,东丽区");
    }

    public String queryUserName(String uId) {
        return hashMap.get(uId);
    }

}
2
3
4
5
6
7
8
9
10
11
12
13
14
15
16
- 给类配置上一个自动扫描注册 Bean 对象的注解
@Component,接下来会把这个类注入到 UserService 中。
注解注入到 UserService
@Component("userService")
public class UserService implements IUserService {

    @Value("${token}")
    private String token;

    @Autowired
    private UserDao userDao;

    public String queryUserInfo() {
        try {
            Thread.sleep(new Random(1).nextInt(100));
        } catch (InterruptedException e) {
            e.printStackTrace();
        }
        return userDao.queryUserName("10001") + "," + token;
    }

    // ...
}
2
3
4
5
6
7
8
9
10
11
12
13
14
15
16
17
18
19
20
- 这里包括了两种类型的注入,一个是占位符注入属性信息
@Value("${token}"),另外一个是注入对象信息@Autowired
# 2. 属性配置文件
token.properties
token=RejDlI78hu223Opo983Ds
spring.xml
<?xml version="1.0" encoding="UTF-8"?>
<beans xmlns="http://www.springframework.org/schema/beans"
       xmlns:xsi="http://www.w3.org/2001/XMLSchema-instance"
       xmlns:context="http://www.springframework.org/schema/context"
       xsi:schemaLocation="http://www.springframework.org/schema/beans
	         http://www.springframework.org/schema/beans/spring-beans.xsd
		 http://www.springframework.org/schema/context">

    <bean class="cn.bugstack.springframework.beans.factory.PropertyPlaceholderConfigurer">
        <property name="location" value="classpath:token.properties"/>
    </bean>

    <context:component-scan base-package="cn.bugstack.springframework.test.bean"/>

</beans>
2
3
4
5
6
7
8
9
10
11
12
13
14
15
- 在 spring.xml 中配置了扫描属性信息和自动扫描包路径范围。
# 3. 单元测试
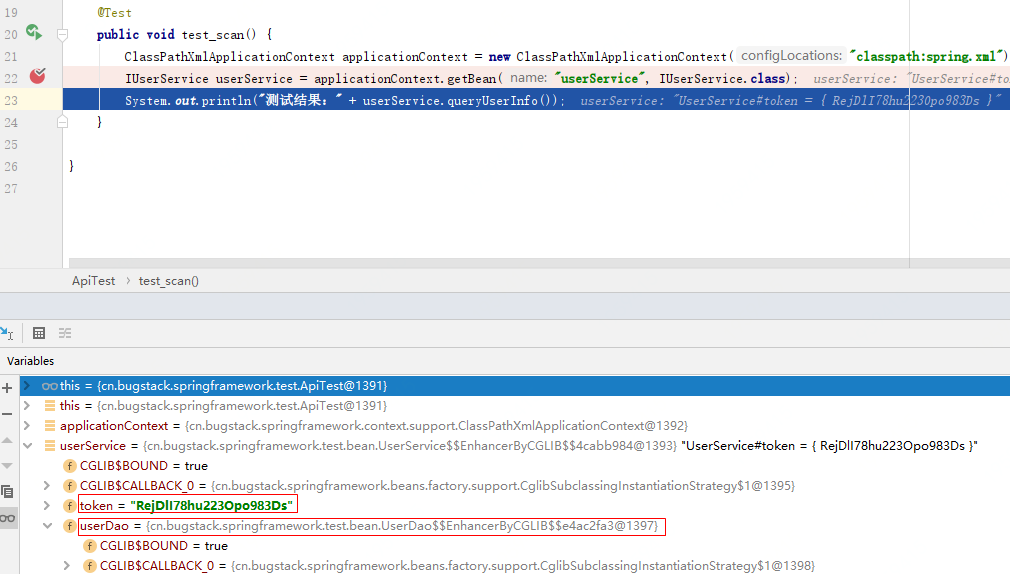
@Test
public void test_scan() {
    ClassPathXmlApplicationContext applicationContext = new ClassPathXmlApplicationContext("classpath:spring.xml");
    IUserService userService = applicationContext.getBean("userService", IUserService.class);
    System.out.println("测试结果:" + userService.queryUserInfo());
}
2
3
4
5
6
- 单元测试时候就可以完整的测试一个类注入到 Spring 容器,同时这个属性信息也可以被自动扫描填充上。
测试结果
测试结果:小傅哥,北京,亦庄,RejDlI78hu223Opo983Ds

Process finished with exit code 0
2
3
- 从测试结果可以看到现在我们的使用方式已经通过了,有自动扫描类,有注解注入属性。这与使用 Spring 框架越来越像了。
# 六、总结
- 从整个注解信息扫描注入的实现内容来看,我们一直是围绕着在 Bean 的生命周期中进行处理,就像 BeanPostProcessor 用于修改新实例化 Bean 对象的扩展点,提供的接口方法可以用于处理 Bean 对象实例化前后进行处理操作。而有时候需要做一些差异化的控制,所以还需要继承 BeanPostProcessor 接口,定义新的接口 InstantiationAwareBeanPostProcessor 这样就可以区分出不同扩展点的操作了。
- 像是接口用 instanceof 判断,注解用 Field.getAnnotation(Value.class); 获取,都是相当于在类上做的一些标识性信息,便于可以用一些方法找到这些功能点,以便进行处理。所以在我们日常开发设计的组件中,也可以运用上这些特点。
- 当你思考把你的实现融入到一个已经细分好的 Bean 生命周期中,你会发现它的设计是如此的好,可以让你在任何初始化的时间点上,任何面上,都能做你需要的扩展或者改变,这也是我们做程序设计时追求的灵活性。
# 七、优秀作业
- 利用 BeanPostProcessor 实现Bean属性的注解注入 (opens new window)
- 解决属性注入,@Value和@Autowired注解 @Chin (opens new window)
- 使用注解来进行自动注入 @W (opens new window)
- 将原来在spring.xml中配置bean,改为在在类上添加@Component注解扫描 @liuc (opens new window)
- 在实现自动扫描带 @Component 注解的对象自动装配和注册的基础上,额可以使用 @Autowired、@Value 注解,完成对属性和对象的注入操作。@水中捞月 (opens new window)
- Component-scan定义扫描的包 @Liuliuliu (opens new window)
- 对自定义注解的相关属性进行了回顾与整理 @在九月 (opens new window)
- 把代理对象的创建融入到 Bean 的生命周期中 @lucien (opens new window)

京公网安备 11030102010881号
| GPL Licensed | Copyright © 2019 小傅哥,All rights reserved.