# 中小厂,其实选这套网关就够用了。
作者:小傅哥
博客:https://bugstack.cn (opens new window)
沉淀、分享、成长,让自己和他人都能有所收获!😄
大家好,我是技术UP主小傅哥。
我发现了一个很有意思的缩写单词 gw、wg,都是网关的意思。因为 gw = gateway、wg = wangguan,所以在各个系统开发中,既有 gw 也有 wg 的存在。而网关也是各个互联网中用于统一对外的核心系统,当然使用网关的手段也不同,有中大厂自研,也有中小厂使用开源的组件。所以小傅哥的这个系列会陆续的分享出各个类型的网关,让大家了解以及按需选择使用。

其实只要一个公司有拆分较多的微服务,有很多的应用都要对外提供接口,就需要引入网关系统。否则就会有非常多共性功能重复在各个系统开发。比如;负载、熔断、降级、限流、切量、统一登录、地址转发等功能。这些东西要是让每个系统实现一遍,后续是非常难管理的。
那么这么多开源网关选择哪个,或者如何自研网关呢,小傅哥会陆续的分享出各个网关的介绍和使用,以及自研的教程,让大家可以积累自己的知识体系以及做技术选型。
前面已经分享了一篇 Higress (opens new window) 今天分享的是 SpringCloud Gateway
- 官网:https://docs.spring.io/spring-cloud-gateway/docs/current/reference/html/#glossary (opens new window)
- 案例:https://gitcode.net/KnowledgePlanet/road-map/xfg-dev-tech-springcloud-gateway (opens new window)
Spring Cloud Gateway 是一套非常容易使用的网关服务,通过yml配置或者代码编程的方式实现网关功能。对于网关你可以理解在接收一个 http 请求后,通过网关的配置过滤、替换、拦截、转发等操作到指定的请求地址上去。
# 一、SpringCloud Gateway 介绍
Spring Cloud Gateway 是一个基于 Spring Framework 和 Spring Boot 提供的网关解决方案。可以帮助开发者轻松地构建出具有动态路由、限流、熔断等特性的 API 网关。
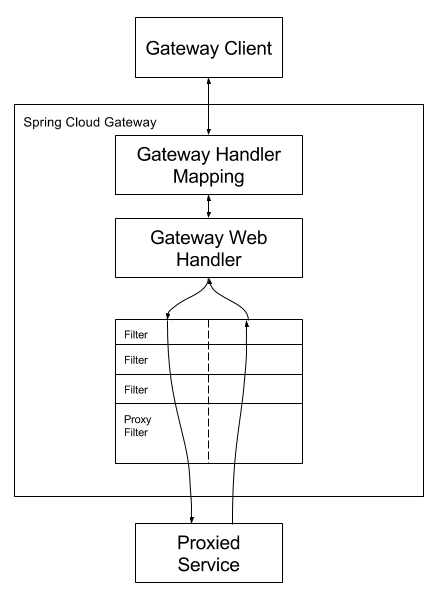
- 基于异步非阻塞模型:Spring Cloud Gateway 基于 Project Reactor 和 WebFlux,采用了异步非阻塞的 API,可以提供更高的吞吐量和更低的延迟。
- 动态路由:可以通过配置文件或者 API 动态地添加、修改或删除路由规则,不需要重启服务。
- 路由断言:可以根据 HTTP 请求的各种参数(如路径、头部、请求参数等)来匹配路由。
- 过滤器:提供了一系列内置的 GatewayFilter 工厂,可以在请求被路由前或后执行各种操作,如修改请求头、增加参数、限流等。同时也支持自定义过滤器。
- 集成与安全:可以与 Spring Cloud 的服务发现和断路器等组件无缝集成,同时也可以集成 Spring Security 实现安全控制。
- 限流与熔断:可以集成如 Resilience4J 等库来实现限流和熔断功能,保护后端服务不被过多的请求压垮。
- 监控与跟踪:可以与 Spring Cloud Sleuth 和 Zipkin 等组件集成,实现请求的跟踪和监控。
Spring Cloud Gateway 的工作原理是将进入的 HTTP 请求根据配置的路由规则转发到对应的后端服务。它在转发请求的过程中可以执行一系列的过滤器链,这些过滤器可以修改请求和响应,或者根据特定的逻辑决定是否继续处理请求。
# 二、环境部署
# 1. 测试工程
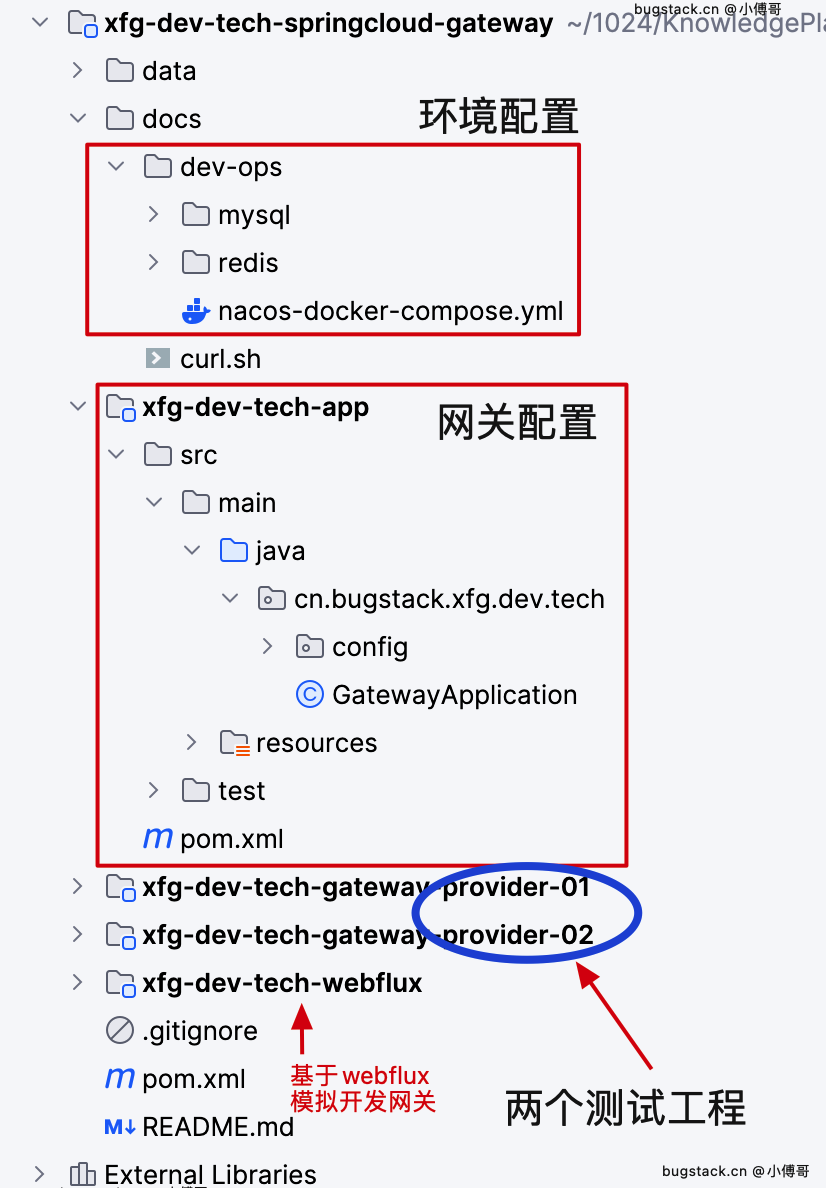
- 注意;本机安装了 docker 或者云服务器安装了 docker + compose。在小傅哥的 bugstack.cn (opens new window) 路书系列教程中,有云服务器操作。
- 在小傅哥提供的案例工程中,包括;环境配置(nacos - 注册中心、redis - 限流使用)、curl 测试访问网关地址、app 是网关配置、provider-01\02 是2个测试工程,提供了2个接口,方便验转发。
- 最后的 webflux 是使用这项技术来模拟开发网关,让大家了解到 SpringCloud Gateway 简单运行机制。
# 2. 基础环境
- 开发环境:JDK 17
- 云服务器:2c4g 最低,我是用的 2c8g 体验的。https://yun.xfg.plus (opens new window)- 价格实惠。
- 基础环境:Docker、Portainer、Git 【在小傅哥的 bugstack.cn 路书中都有讲解安装和使用】

- docker 安装 mysql 会自动根据 docker compose 脚本配置,把 nacos 需要的 sql 导入进去。
- Phpmyadmin - MySQL 后台管理工具、redis-admin - Redis 后台管理工具。
# 3. 生产接口
xfg-dev-tech-gateway-provider-01、xfg-dev-tech-gateway-provider-02,分别提供了2个生产的 http 接口。你可以启动服务后单独访问接口测试。我们这里主要的用途是通过网关来使用这2个接口。
📢 注意以下测试,都要先启动这2个接口提供者工程。
# 3.1 生产者01
@RestController()
@CrossOrigin("*")
@RequestMapping("/api/user/")
public class HiGatewayController {

    /**
     * curl http://127.0.0.1:8091/api/user/hi
     */
    @RequestMapping(value = "hi", method = RequestMethod.GET)
    public String hi() {
        return "hello gateway,provider 01";
    }

}
2
3
4
5
6
7
8
9
10
11
12
13
14
# 3.1 生产者01
@RestController()
@CrossOrigin("*")
@RequestMapping("/api/user/")
public class HiGatewayController {

    /**
     * curl http://127.0.0.1:8092/api/user/hi
     */
    @RequestMapping(value = "hi", method = RequestMethod.GET)
    public String hi() {
        return "hello gateway,provider 02!";
    }

}
2
3
4
5
6
7
8
9
10
11
12
13
14
# 三、模拟网关 - webflux
基于 webflux 开发 api网关,不要引入 spring web 组件,而是引入以下组件;
<dependency>
    <groupId>org.springframework.boot</groupId>
    <artifactId>spring-boot-starter-webflux</artifactId>
</dependency>
<dependency>
    <groupId>io.netty</groupId>
    <artifactId>netty-all</artifactId>
    <version>4.1.97.Final</version>
</dependency>
2
3
4
5
6
7
8
9
# 1. 简单路由
@Configuration
public class GatewayRouter {

    @Bean
    public RouterFunction<ServerResponse> routeToService() {
        return RouterFunctions
                .route(GET("/service1").and(RequestPredicates.accept(MediaType.APPLICATION_JSON)),
                        request -> ServerResponse.ok().bodyValue("Response from Service 1"))
                .andRoute(GET("/service2").and(RequestPredicates.accept(MediaType.APPLICATION_JSON)),
                        request -> ServerResponse.ok().bodyValue("Response from Service 2"));
    }

}
2
3
4
5
6
7
8
9
10
11
12
13
- 这是一个请求地址和返回接口的简单路由。
- 你可以启动服务后,访问地址:
http://localhost:9091/service1http://localhost:9091/service2
# 2. 接口路由
@Configuration
public class ApiGatewayConfiguration {

    private final WebClient.Builder webClientBuilder;

    public ApiGatewayConfiguration(WebClient.Builder webClientBuilder) {
        this.webClientBuilder = webClientBuilder;
    }

    /**
     * curl http://localhost:9091/wg/service1/8091
     * curl http://localhost:9091/wg/service2/8092
     * @return
     */
    @Bean
    public RouterFunction<ServerResponse> routerFunction() {
        return route(GET("/wg/service1/{id}"), this::service1Handler)
                .andRoute(GET("/wg/service2/{id}"), this::service2Handler);
    }

    public Mono<ServerResponse> service1Handler(ServerRequest request) {
        String id = request.pathVariable("id");
        Mono<String> response = webClientBuilder.build()
                .get()
                .uri("http://127.0.0.1:8091/api/user/hi?" + id)
                .retrieve()
                .bodyToMono(String.class);
        return ServerResponse.ok().body(response, String.class);
    }

    public Mono<ServerResponse> service2Handler(ServerRequest request) {
        String id = request.pathVariable("id");
        Mono<String> response = webClientBuilder.build()
                .get()
                .uri("http://127.0.0.1:8092/api/user/hi?" + id)
                .retrieve()
                .bodyToMono(String.class);
        return ServerResponse.ok().body(response, String.class);
    }

}
2
3
4
5
6
7
8
9
10
11
12
13
14
15
16
17
18
19
20
21
22
23
24
25
26
27
28
29
30
31
32
33
34
35
36
37
38
39
40
41

- 通过 routerFunction 对不同的请求地址进行转发操作。
- 如图
curl http://localhost:9091/wg/service1/8091、curl http://localhost:9091/wg/service2/8092可以得到不同的响应结果。
# 四、网关测试 - SpringCloud Gateway
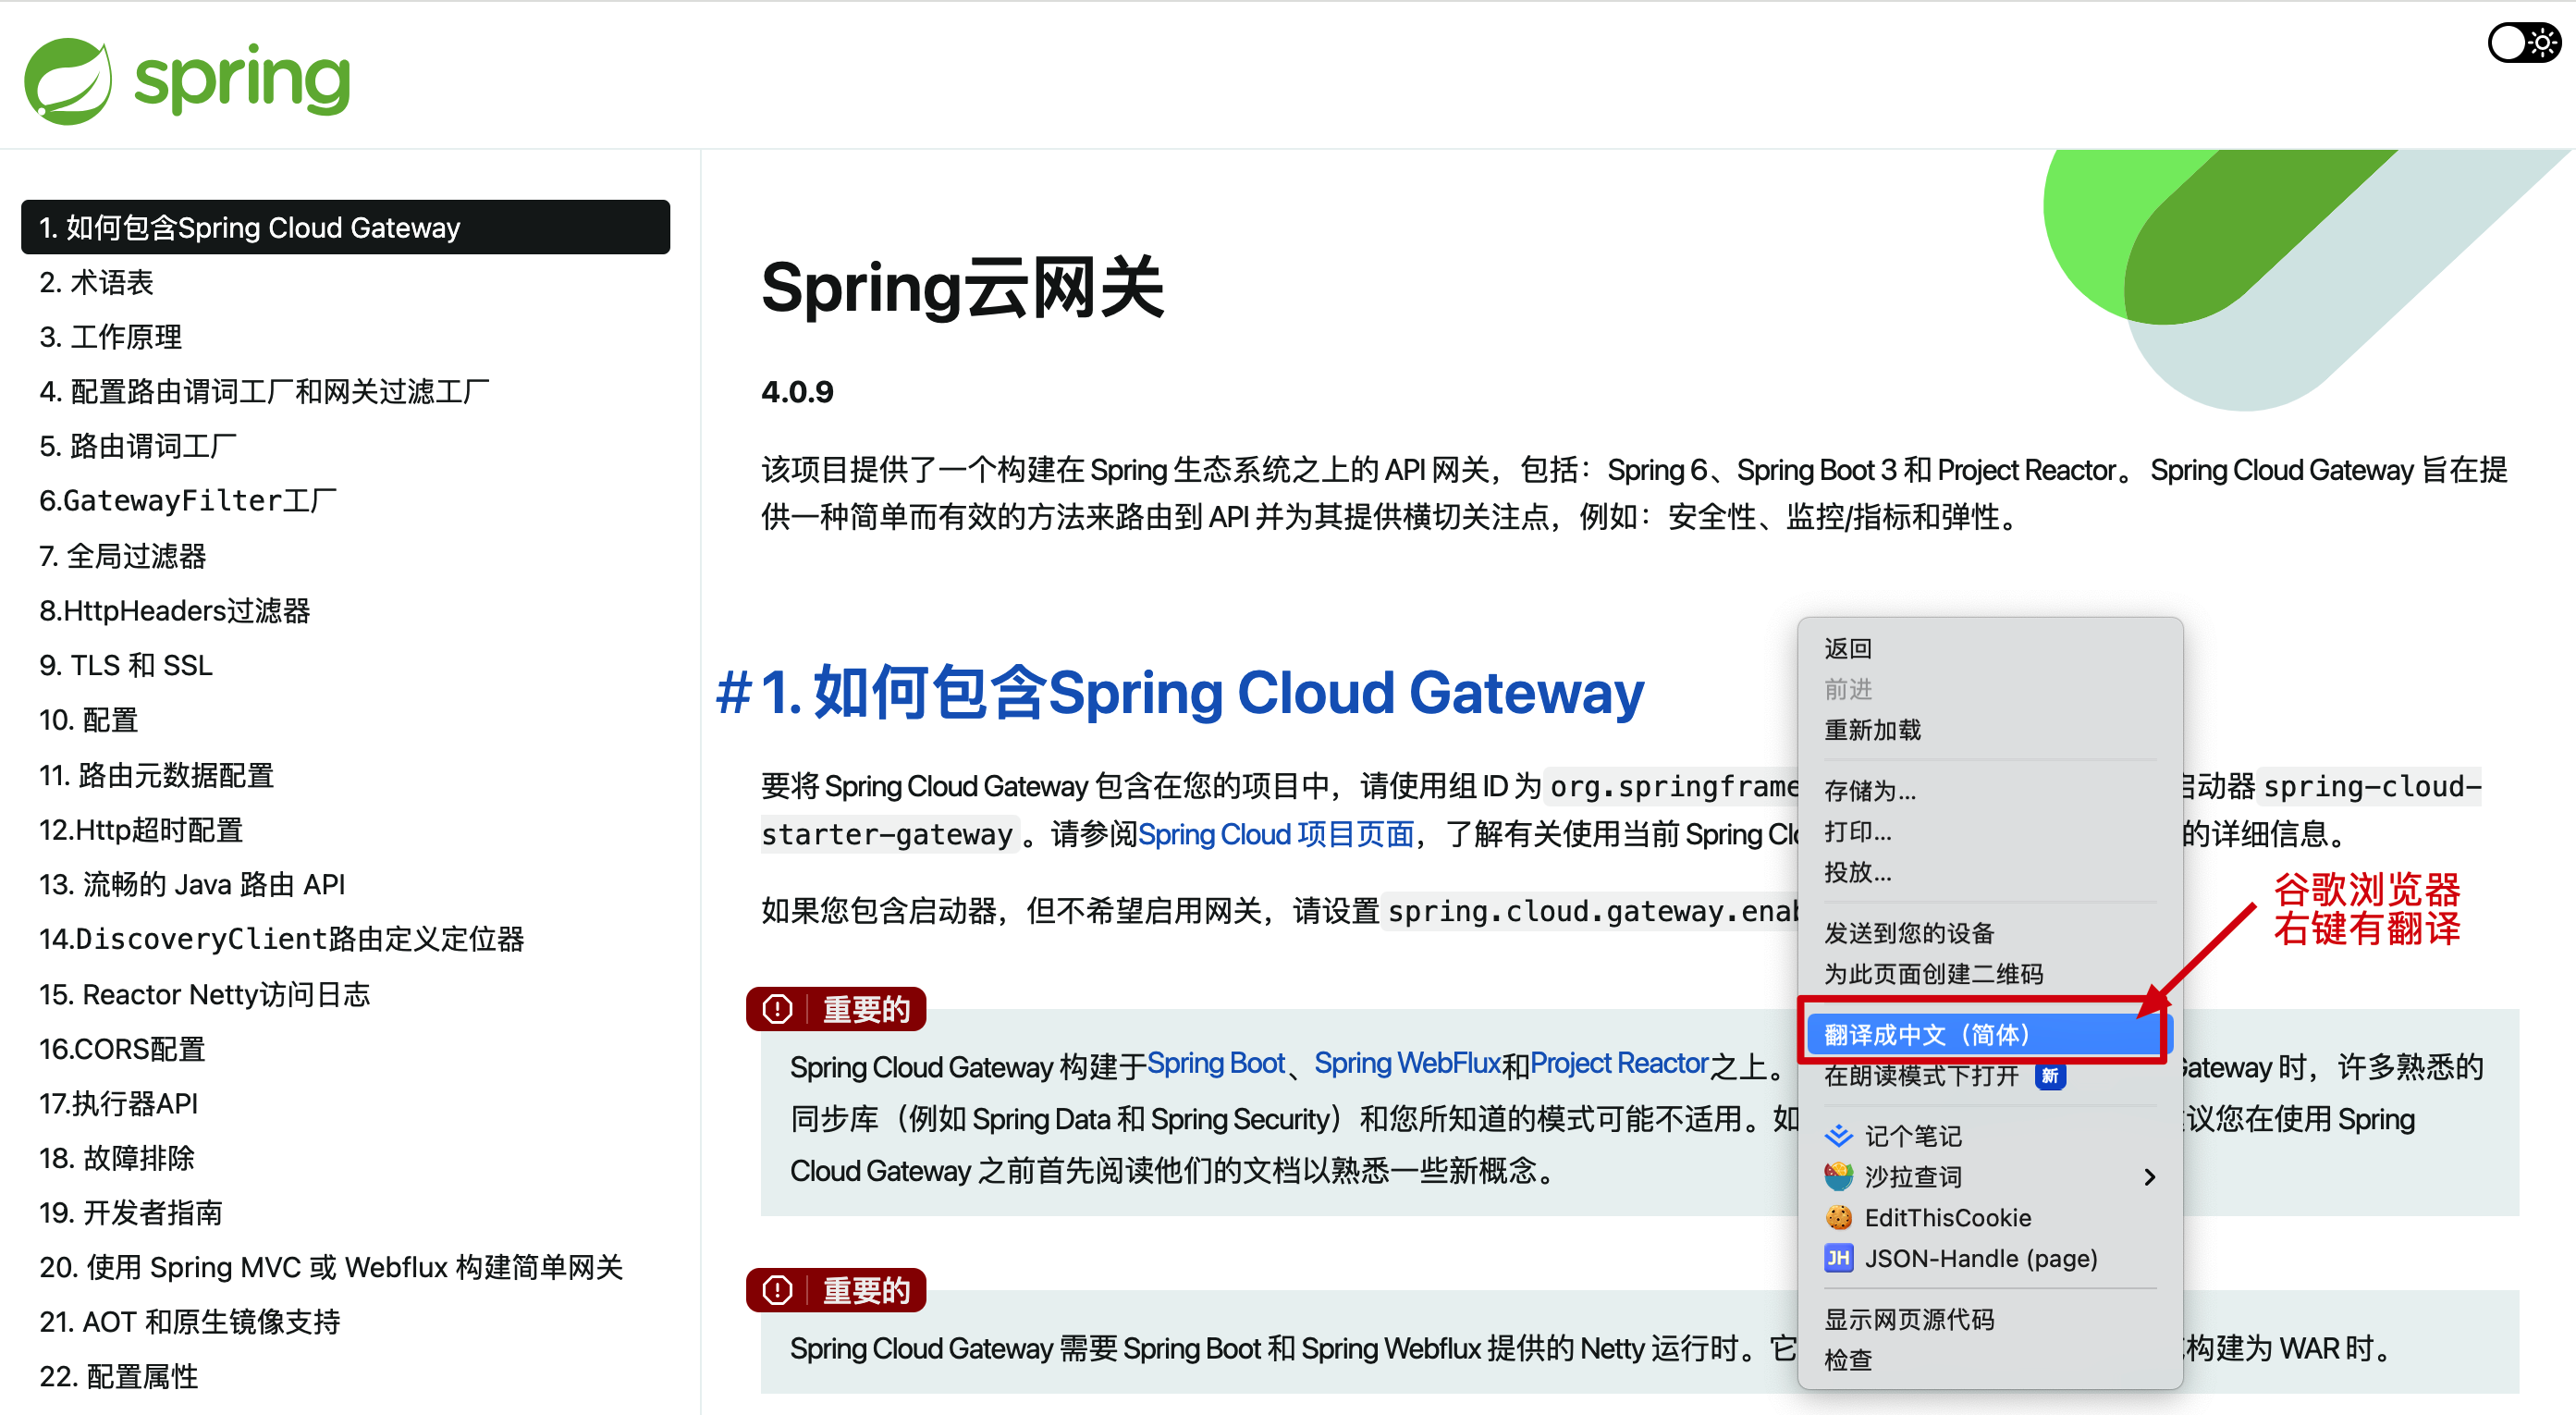
- 文档:https://docs.spring.io/spring-cloud-gateway/docs/current/reference/html (opens new window)
- 使用:你可以右键翻译文档,根据文档的说明来配置各个场景验证网关使用。
# 1. yml配置
spring:
  redis:
    host: 127.0.0.1
    port: 16379
    database: 0
    lettuce:
      pool:
        max-active: 10
        max-wait: 1000
        max-idle: 5
        min-idle: 3
  application:
    name: xfg-dev-tech-springcloud-gateway
  cloud:
    nacos:
      discovery:
        server-addr: 127.0.0.1:8848
        username: nacos
        password: nacos
        locator:
          enabled: true
    gateway:
      discovery:
        locator:
          enabled: true
      globalcors:
        cors-configurations:
          '[/**]':
            allowedOrigins: "*"
            allowedMethods: "*"
            alloedHeaders: "*"
      routes:
        - id: route_01
          uri: lb://provider-01
          order: 1
          predicates:
            - Path=/gw/**
            - Weight=group1, 1
          filters:
            - StripPrefix=1
        - id: route_02
          uri: lb://provider-02
          order: 1
          predicates:
            - Path=/gw/**
            - Weight=group1, 9
          filters:
            - StripPrefix=1
            - name: RequestRateLimiter
              args:
                key-resolver: "#{@ipKeyResolver}" # 限流方式:Bean名称
                redis-rate-limiter.replenishRate: 1 # 生成令牌速率:个/秒
                redis-rate-limiter.burstCapacity: 3 # 令牌桶容量
                redis-rate-limiter.requestedTokens: 1 # 每次消费的Token数量
2
3
4
5
6
7
8
9
10
11
12
13
14
15
16
17
18
19
20
21
22
23
24
25
26
27
28
29
30
31
32
33
34
35
36
37
38
39
40
41
42
43
44
45
46
47
48
49
50
51
52
53
54
- 配置 Redis 是为了使用限流组件,同时要配置 RequestRateLimiter 类,配置对应的限流 bean 名称。
- nacos 是注册中心,网关走的是 nacos 注册中心里的服务。这些服务是生产者接口配置了 nacos 注册到注册中心了。这样就可以通过 lb://provider-02 进行访问。lb = nacos,provider-02 是生产者配置的服务名称。
- 在 yml 配置中,一组 id: route_01 下面是对应的网关配置,以这个距离,访问
Path=/gw/**路径,filters 过滤掉StripPrefix=11个路径 gw 其余的打到 provider-01 服务上,也就是可以访问具体的服务了。另外Weight=group1, 1是权重配置,group1 代表这一组的,1 表示权重比。如果你不用 nacos,uri 也可以配置一个具体的 http 地址测试 - 这些内容在 SpringCloud Gateway 官网有对应的介绍,直接按照文档配置使用即可。
# 2. 代码配置
源码:cn.bugstack.xfg.dev.tech.config.RouteConfiguration
@Bean
public RouteLocator route(RouteLocatorBuilder builder, UriConfiguration uriConfiguration) {
    String httpUri = uriConfiguration.getHttp();
    return builder.routes()
            .route(p -> p.path("/baidu").uri("https://www.baidu.com/"))
            .route(p -> p.path("/bugstack").uri("https://bugstack.cn/md/road-map/road-map.html"))
            .route(p -> p.path("/error").uri("forward:/fallback"))
            .route(p -> p.path("/get").filters(f -> f.addRequestHeader("Hello", "World")).uri(httpUri))
            .build();
}
2
3
4
5
6
7
8
9
10
- 除了 yml 中的配置,还可以使用代码配置。有代码配置是非常重要的,这样就可以根据写到数据库中的数据,以及提供一个管理后台来操作网关的配置了,在网关启动的时候从数据库读取数据来动态实例化所有的配置内容。
# 3. 测试验证
启动服务后,访问地址:curl http://localhost:8090/gw/api/user/hi、curl http://localhost:8090/error
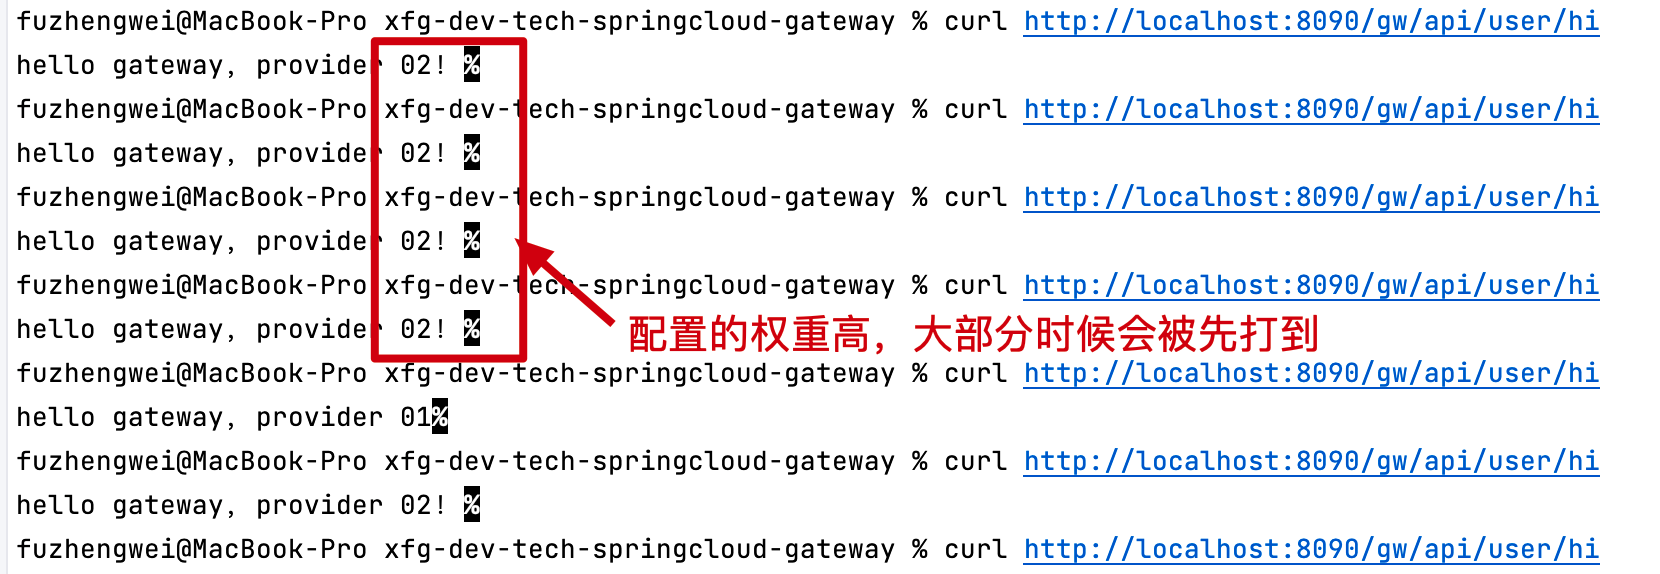

- 访问后,分别可以看到不通的响应结果。
# 五、网关学习
除了业务开发,小傅哥自己也是非常感兴趣于这样的网关技术组件的实现,所以在日常的工作中也积累了很多网关的设计。后来在22年做了一套轻量的网关系统,把核心的内核逻辑实现出来让大家学习。帮助了很多伙伴学习项目后找到了不错的工作。
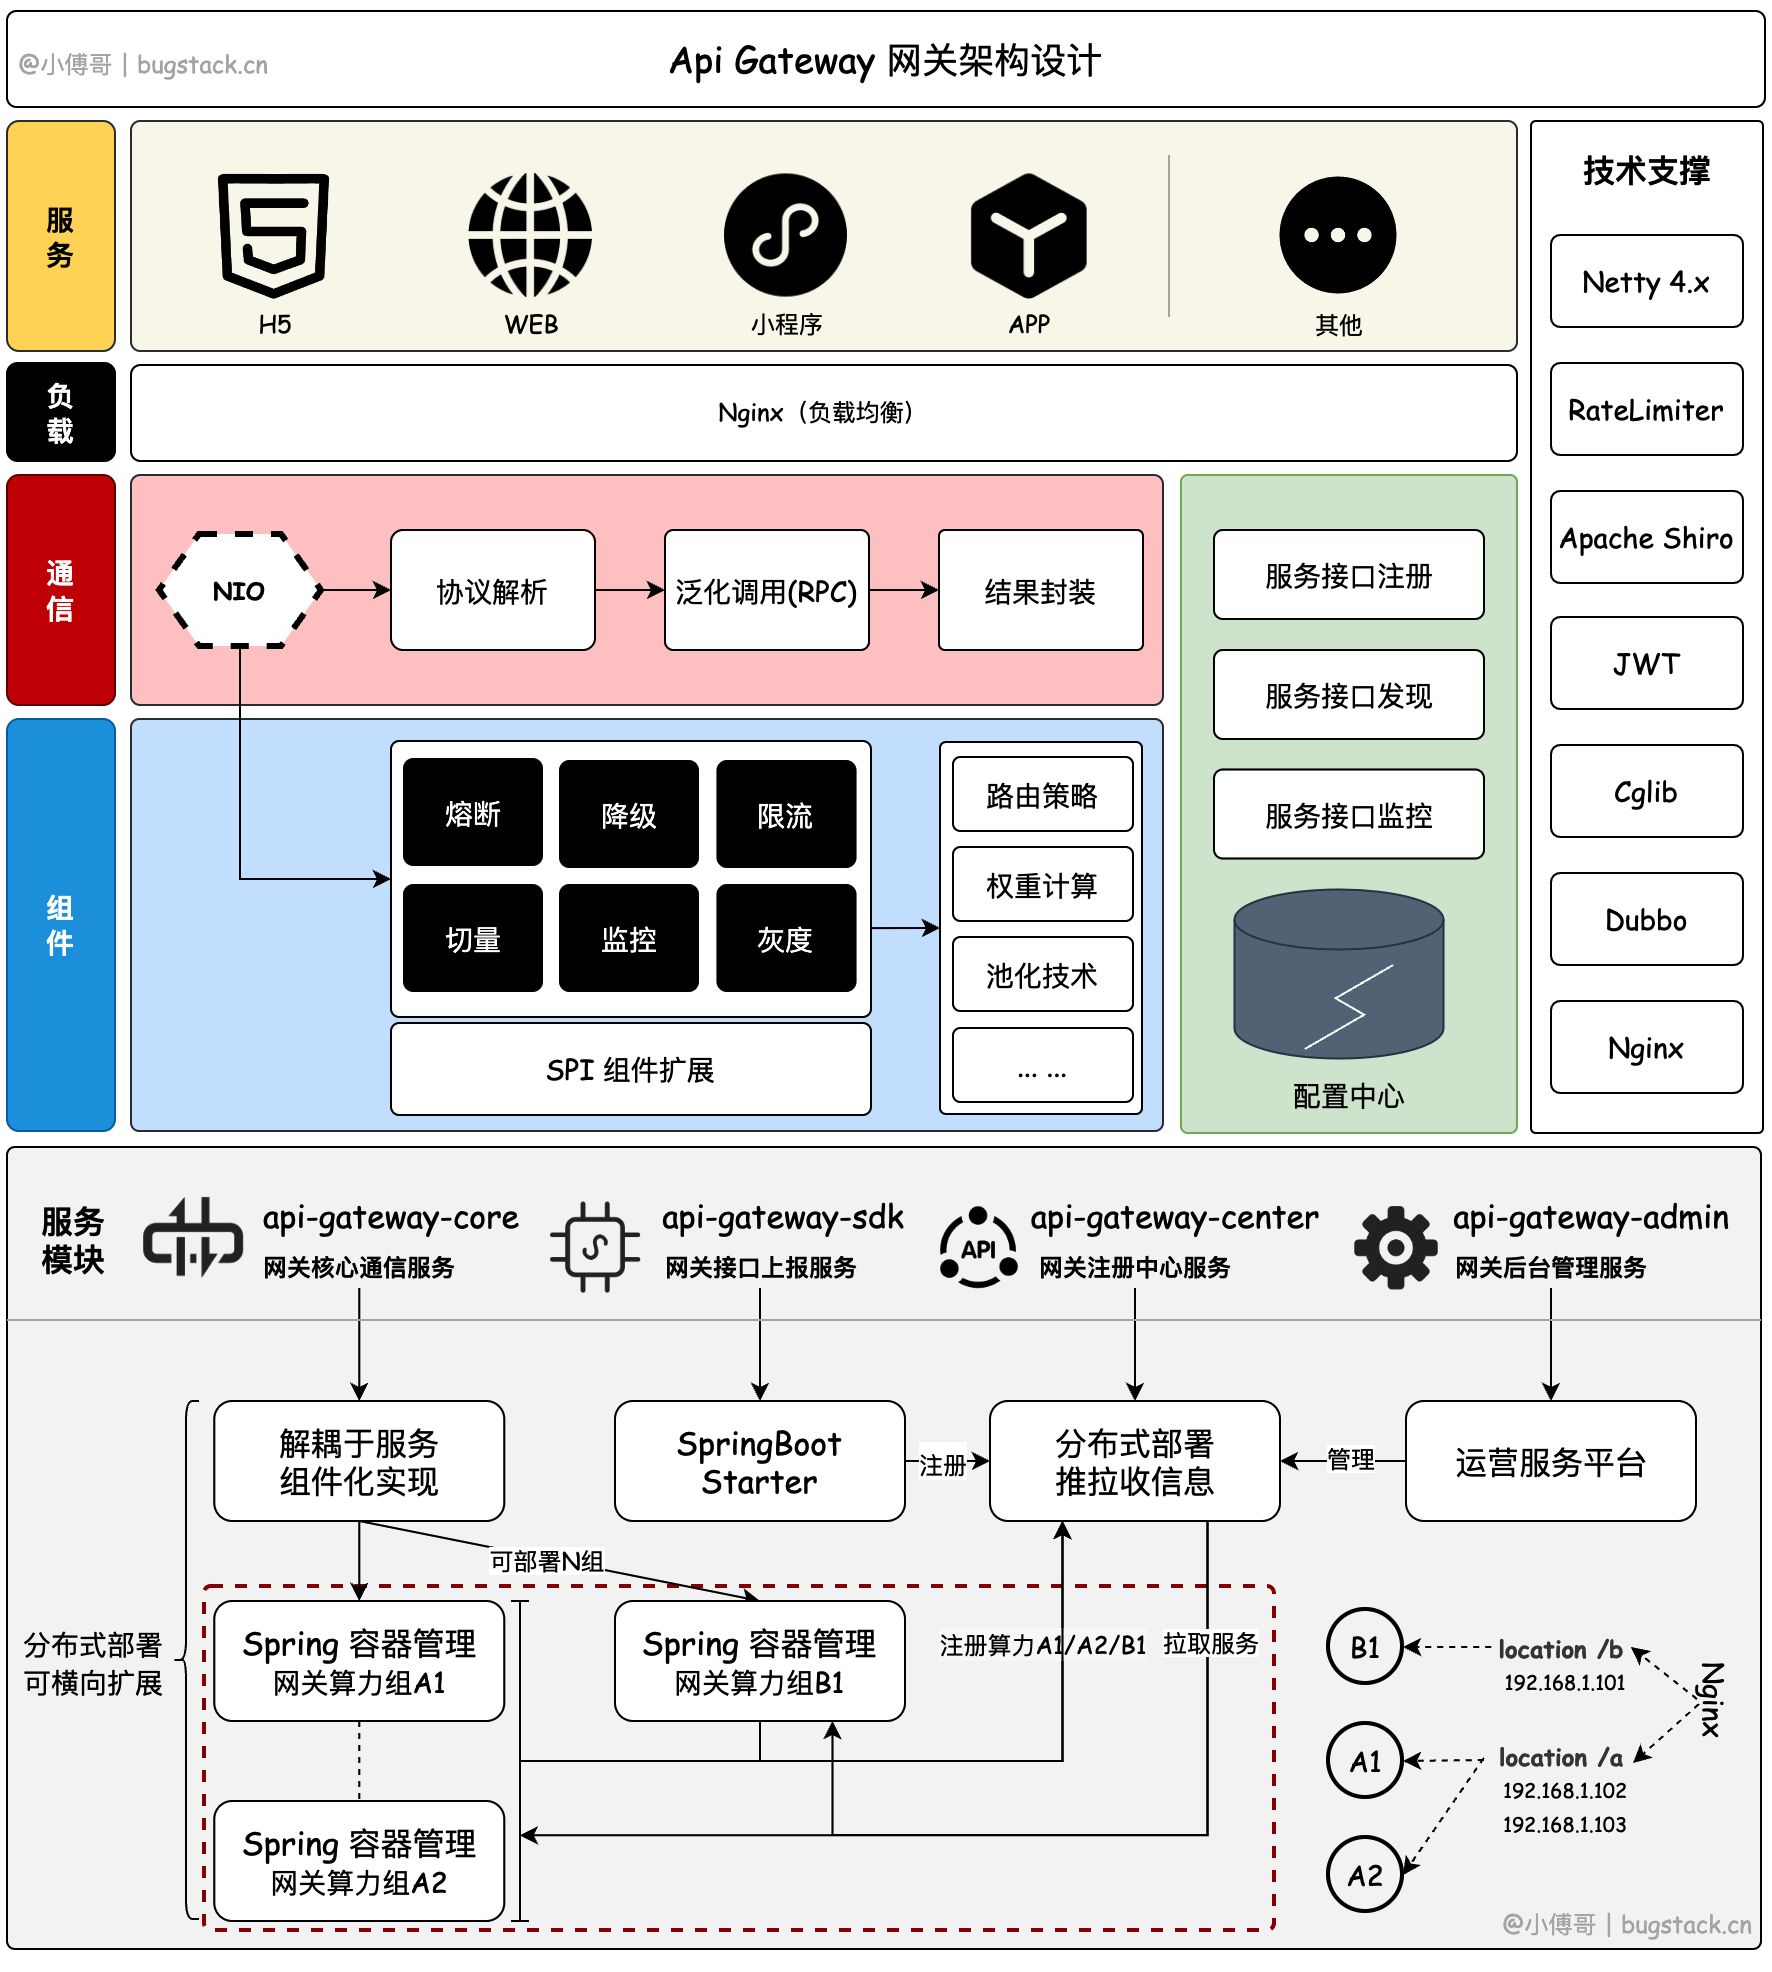
整个API网关设计核心内容分为这么五块;
第一块:是关于通信的协议处理,也是网关最本质的处理内容。这里需要借助 NIO 框架 Netty 处理 HTTP 请求,并进行协议转换泛化调用到 RPC 服务返回数据信息。第二块:是关于注册中心,这里需要把网关通信系统当做一个算力,每部署一个网关服务,都需要向注册中心注册一个算力。而注册中心还需要接收 RPC 接口的注册,这部分可以是基于 SDK 自动扫描注册也可以是人工介入管理。当 RPC 注册完成后,会被注册中心经过AHP权重计算分配到一组网关算力上进行使用。第三块:是关于路由服务,每一个注册上来的Netty通信服务,都会与他对应提供的分组网关相关联,例如:wg/(a/b/c)/user/... a/b/c 需要匹配到 Nginx 路由配置上,以确保不同的接口调用请求到对应的 Netty 服务上。PS:如果对应错误或者为启动,可能会发生类似B站事故。第四块:责任链下插件模块的调用,鉴权、授信、熔断、降级、限流、切量等,这些服务虽然不算是网关的定义下的内容,但作为共性通用的服务,它们通常也是被放到网关层统一设计实现和使用的。【这块内容可以自行扩展】第五块:管理后台,作为一个网关项目少不了一个与之对应的管理后台,用户接口的注册维护、mock测试、日志查询、流量整形、网关管理等服务。
项目学习地址:https://bugstack.cn/md/assembly/api-gateway/api-gateway.html
← Higress-Ai apisix →

