# OAuth2 SSO - 前后端分离,单点登录案例
作者:小傅哥
博客:https://bugstack.cn (opens new window)
沉淀、分享、成长,让自己和他人都能有所收获!😄
大家好,我是技术UP主小傅哥。
当你进入一个较大一些的中大厂互联网公司以后,你会发现自己参与的业务系统开发,好像从来没有关心过关于用户的身份鉴权,而是直接拿到用户的ID就做业务了。那这里的鉴权跑到哪里去了呢?🤔

其实在公司里是一套统一的授权服务和组件的,并且维护用户的ID、用户的关联绑定也都是这套系统来处理的。之后这套系统会和 API 网关进行对接,等网关下发到你的后端服务系统时,在内部微服间流转就是真实的用户ID啦。
那么为了让伙伴们更好的理解关于 OAuth2 SSO 统一单点登录的前后端分离服务,小傅哥这里做了一个结合 Spring Security OAuth2很容易理解案例工程。学习后就可以扩展使用 SSO 到你自己的系统了,比如可以做一个统一的用户鉴权中心。
# 一、单点登录
单点登录(Single Sign-On,SSO)是一种认证技术,用户只需进行一次身份验证,就可以访问多个相互信任的应用系统,而无需再次输入凭证。SSO的主要目的是简化用户的登录过程,提高用户体验和安全性,同时减少管理多个用户名和密码的复杂性。
SSO的工作原理通常涉及以下几个步骤:
- 身份验证:用户在第一次访问SSO系统时输入用户名和密码等凭据进行验证。
- 创建会话:成功验证后,系统创建一个会话,可以是令牌、票证或其他凭据,以证明用户的身份。
- 访问授权:当用户访问不同的应用时,SSO系统将会话信息传递给这些应用,以确认用户的身份并授予访问权限。
- 信任机制:应用之间需要建立信任关系,通常通过共享密钥或使用公钥基础设施(PKI)来实现验证和授权。
SSO的优点包括:
- 提高用户体验:用户只需记住一个用户名和密码,减少了填写登录信息的次数。
- 增强安全性:集中管理用户身份,方便监控和保护密码策略。
- 降低管理成本:减少IT部门处理密码重置等事务的工作量。
# 二、案例工程
# 1. 编程环境
JDK 1.8
SpringBoot 2.6.2
Maven 3.8.1
Docker - 负责安装 Nginx,如果没有 Docker 就本地直接安装 Nginx
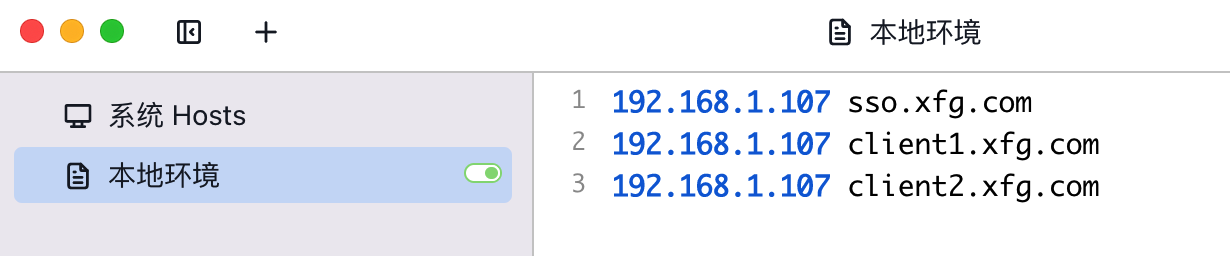
SwitchHosts - 切换host,映射自定义域名地址,可以避免跨域问题。如果没有就直接修改本地的 host 文件。你可以配置自己的。
192.168.1.107 sso.xfg.com
192.168.1.107 client1.xfg.com
192.168.1.107 client2.xfg.com
2
3
# 2. 工程结构
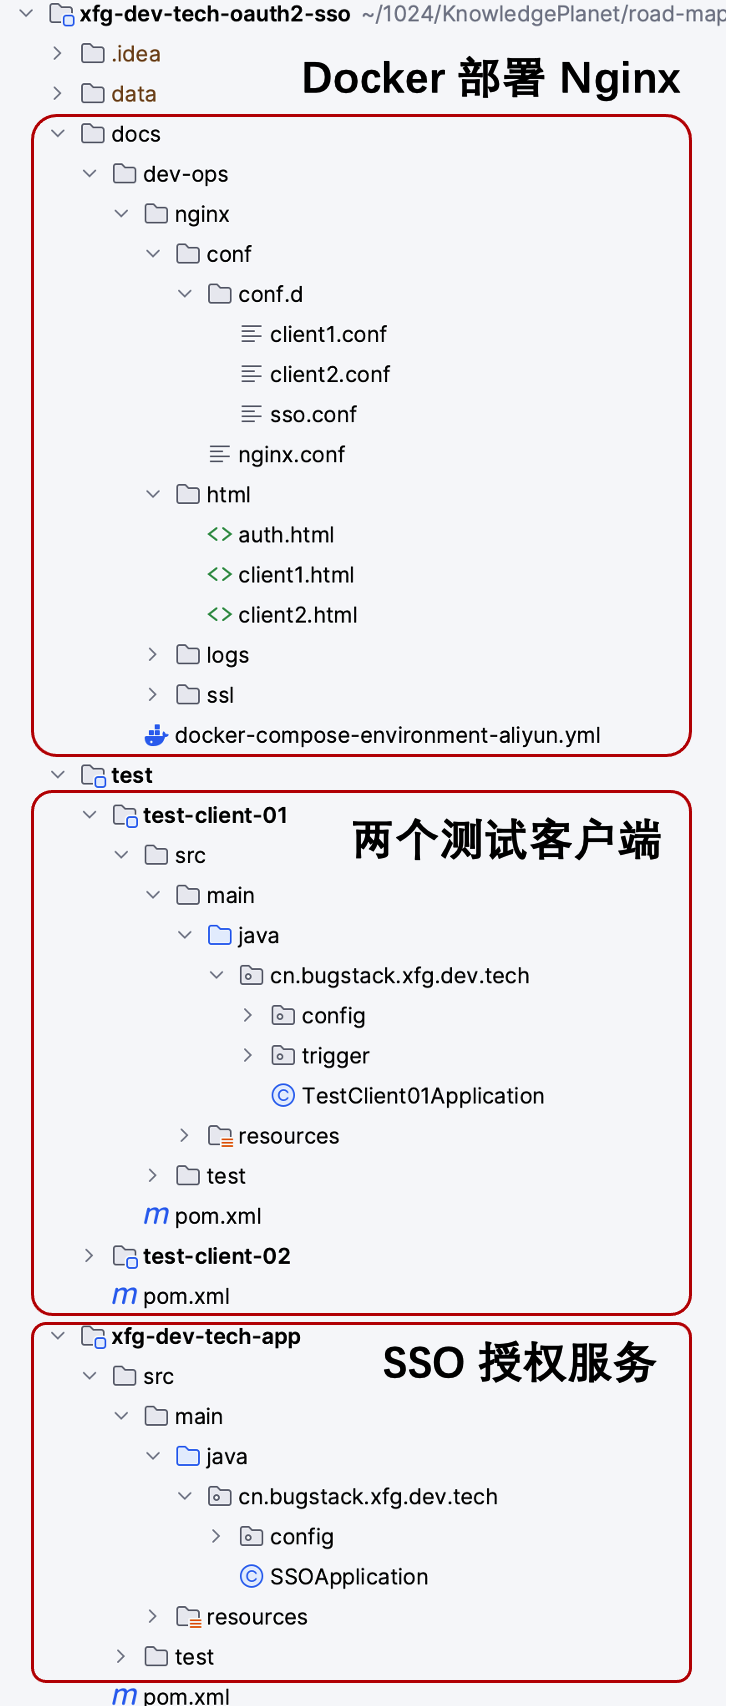
- xfg-dev-tech-app 是 SSO Auth 的鉴权服务。
- test 模块下有2个 client,方便验证一个登录成功后,另外一个不会再跳转登录了。
- docs/dev-ops 下提供了 docker compose 脚本,用于部署 Nginx 以及配合的前后端分离的前端页面。
# 3. 鉴权服务
server:
  port: 8091
  application:
    name: xfg-dev-tech-sso
  servlet:
    context-path: /auth
    session:
      cookie:
        name: OAuth2SSOToken
2
3
4
5
6
7
8
9
10
- yml 配置了 auth 路径和一个 session 名称。
# 3.1 鉴权配置
AuthorizationServerConfig
@Bean
public ClientDetailsService inMemoryClientDetailsService() throws Exception {
    return new InMemoryClientDetailsServiceBuilder()
            // client1 mall
            .withClient("client1")
            .secret(passwordEncoder.encode("client1_secret"))
            .scopes("all")
            .authorizedGrantTypes("authorization_code", "refresh_token")
            .redirectUris("http://client1.xfg.com/client1/login")
            .accessTokenValiditySeconds(7200)
            .autoApprove(true)
            .and()

            // client2 lottery
            .withClient("client2")
            .secret(passwordEncoder.encode("client2_secret"))
            .scopes("all")
            .authorizedGrantTypes("authorization_code", "refresh_token")
            .redirectUris("http://client2.xfg.com/client2/login")
            .accessTokenValiditySeconds(7200)
            .autoApprove(true)
            .and()
            .build();
}
2
3
4
5
6
7
8
9
10
11
12
13
14
15
16
17
18
19
20
21
22
23
24
- 配置鉴权信息,这里配置了两个客户端信息。
# 3.2 验证入口
@Component("unauthorizedEntryPoint")
public class AppUnauthorizedEntryPoint implements AuthenticationEntryPoint {

    @Override
    public void commence(HttpServletRequest request, HttpServletResponse response, AuthenticationException e) throws IOException, ServletException {
        Map<String, String[]> paramMap = request.getParameterMap();
        StringBuilder param = new StringBuilder();
        paramMap.forEach((k, v) -> {
            param.append("&").append(k).append("=").append(v[0]);
        });

        param.deleteCharAt(0);
        String isRedirectValue = request.getParameter("isRedirect");

        if (!StringUtils.isEmpty(isRedirectValue) && Boolean.parseBoolean(isRedirectValue)) {
            response.sendRedirect("http://sso.xfg.com/authPage/#/login?" + param);
            return;
        }

        String authUrl = "http://sso.xfg.com/auth/oauth/authorize?" + param + "&isRedirect=true";

        Map<String, Object> result = new HashMap<>();
        result.put("code", 800);
        result.put("msg", "授权地址");
        result.put("data", authUrl);

        response.setContentType(MediaType.APPLICATION_JSON_VALUE);
        PrintWriter writer = response.getWriter();
        ObjectMapper mapper = new ObjectMapper();
        writer.print(mapper.writeValueAsString(result));
        writer.flush();
        writer.close();
    }

}
2
3
4
5
6
7
8
9
10
11
12
13
14
15
16
17
18
19
20
21
22
23
24
25
26
27
28
29
30
31
32
33
34
35
- 需要实现 AuthenticationEntryPoint 接口,配置一个转发的地址。
# 4. 客户端 - client1/client2
# 4.1 client1
server:
  port: 8001
  servlet:
    context-path: /client1

security:
  oauth2:
    client:
      client-id: client1
      preEstablishedRedirectUri:
      client-secret: client1_secret
      access-token-uri: http://sso.xfg.com/auth/oauth/token
      user-authorization-uri: http://sso.xfg.com/auth/oauth/authorize
    resource:
      user-info-uri: http://sso.xfg.com/auth/user
      token-info-uri: http://sso.xfg.com/auth/oauth/check_token
2
3
4
5
6
7
8
9
10
11
12
13
14
15
16
@RestController
public class Client01Controller {

    @GetMapping("/create_pay_order")
    public Result createPayOrder() {
        Result result = new Result();
        result.setCode(0);
        result.setData("下单完成");
        return result;
    }

    @GetMapping("/")
    public void callback(HttpServletResponse response) throws IOException {
        response.sendRedirect("http://client1.xfg.com/client1Page/#/home");
    }

}
2
3
4
5
6
7
8
9
10
11
12
13
14
15
16
17
- 模拟下单,和 callback 地址配置。
# 4.2 client2
server:
  port: 8002
  servlet:
    context-path: /client2

security:
  oauth2:
    client:
      client-id: client2
      client-secret: client2_secret
      preEstablishedRedirectUri:
      access-token-uri: http://sso.xfg.com/auth/oauth/token
      user-authorization-uri: http://sso.xfg.com/auth/oauth/authorize
    resource:
      user-info-uri: http://sso.xfg.com/auth/user
      token-info-uri: http://sso.xfg.com/auth/oauth/check_token
2
3
4
5
6
7
8
9
10
11
12
13
14
15
16
@RestController
public class Client02Controller {

    @GetMapping("/lottery")
    public Result lottery() {
        Result result = new Result();
        result.setCode(0);
        result.setData("下单红包,金额:" + RandomStringUtils.randomNumeric(10) + "元");
        return result;
    }

    @GetMapping("/")
    public void callback(HttpServletResponse response) throws IOException {
        response.sendRedirect("http://client2.xfg.com/client2Page/#/home");
    }

}
2
3
4
5
6
7
8
9
10
11
12
13
14
15
16
17
- 模拟另外一个微服务获取红包,以及 callback 地址服务。
# 5. 前端页面
# 5.1 校验
<div class="login-container">
    <h2>登录</h2>
    <input type="text" id="username" placeholder="用户名" required>
    <input type="password" id="password" placeholder="密码" required>
    <button id="login-btn">登录</button>
</div>

<script src="https://cdn.jsdelivr.net/npm/axios/dist/axios.min.js"></script>
<script>
    const base = 'http://sso.xfg.com'; // 设置你的基础URL

    document.getElementById('login-btn').addEventListener('click', function() {
        const loginForm = {
            username: document.getElementById('username').value,
            password: document.getElementById('password').value
        };

        postRequest('/auth/login', loginForm).then(resp => {
            if (resp.data.code === 0) {
                const pageUrl = window.location.href;
                const param = pageUrl.split('?')[1];
                window.location.href = '/auth/oauth/authorize?' + param;
            } else {
                console.log('登录失败:' + resp.data.msg);
            }
        });
    });

    function postRequest(url, params) {
        return axios({
            method: 'post',
            url: `${base}${url}`,
            data: params,
            transformRequest: [function (data) {
                let ret = '';
                for (let it in data) {
                    ret += encodeURIComponent(it) + '=' + encodeURIComponent(data[it]) + '&';
                }
                return ret;
            }],
            headers: {
                'Content-Type': 'application/x-www-form-urlencoded'
            }
        });
    }
</script>
2
3
4
5
6
7
8
9
10
11
12
13
14
15
16
17
18
19
20
21
22
23
24
25
26
27
28
29
30
31
32
33
34
35
36
37
38
39
40
41
42
43
44
45
46
- 登录跳转操作,这里会走到 Nginx 中进行转发。
# 5.2 客户端01
<div>
<button id="testButton">开始下单</button>
<p id="result">下单结果:</p>
</div>
<script src="https://cdn.jsdelivr.net/npm/axios/dist/axios.min.js"></script>
<script>
const base = 'http://client1.xfg.com';
function getRequest(url) {
return axios.get(`${base}${url}`);
}
document.getElementById('testButton').addEventListener('click', function() {
getRequest('/client1/create_pay_order').then(resp => {
const resultElement = document.getElementById('result');
if (resp.data.code === 0) {
const linkHtml = " <a href='http://client2.xfg.com/client2Page/#/home'>领红包</a>";
resultElement.innerHTML = resp.data.data + linkHtml;
} else if (resp.data.code === 800) {
window.location.href = resp.data.data;
} else {
console.log('失败:' + resp.data);
}
}).catch(error => {
console.log('请求失败:', error);
});
});
</script>
2
3
4
5
6
7
8
9
10
11
12
13
14
15
16
17
18
19
20
21
22
23
24
25
26
27
28
29
30
- 下单的时候会检查是否登录,否则会被调整到 auth 校验。
# 5.2 客户端02
<div>
    <button id="testButton">随机红包</button>
    <p id="result">红包结果:</p>
</div>

<script src="https://cdn.jsdelivr.net/npm/axios/dist/axios.min.js"></script>
<script>

const base = 'http://client2.xfg.com';
function getRequest(url) {
    return axios.get(`${base}${url}`);
}

document.getElementById('testButton').addEventListener('click', function() {
    getRequest('/client2/lottery').then(resp => {
        const resultElement = document.getElementById('result');
        if (resp.data.code === 0) {
            resultElement.textContent = resp.data.data;
        } else if (resp.data.code === 800) {
            window.location.href = resp.data.data;
        } else {
            console.log('失败:' + resp.data);
        }
    }).catch(error => {
        console.log('请求失败:', error);
    });
});

</script>
2
3
4
5
6
7
8
9
10
11
12
13
14
15
16
17
18
19
20
21
22
23
24
25
26
27
28
29
- 与 client1 的操作是一样的,但这里只要有一个登录了,另外一个就不会调整到 auth 页面登录了。
# 6. Nginx 配置
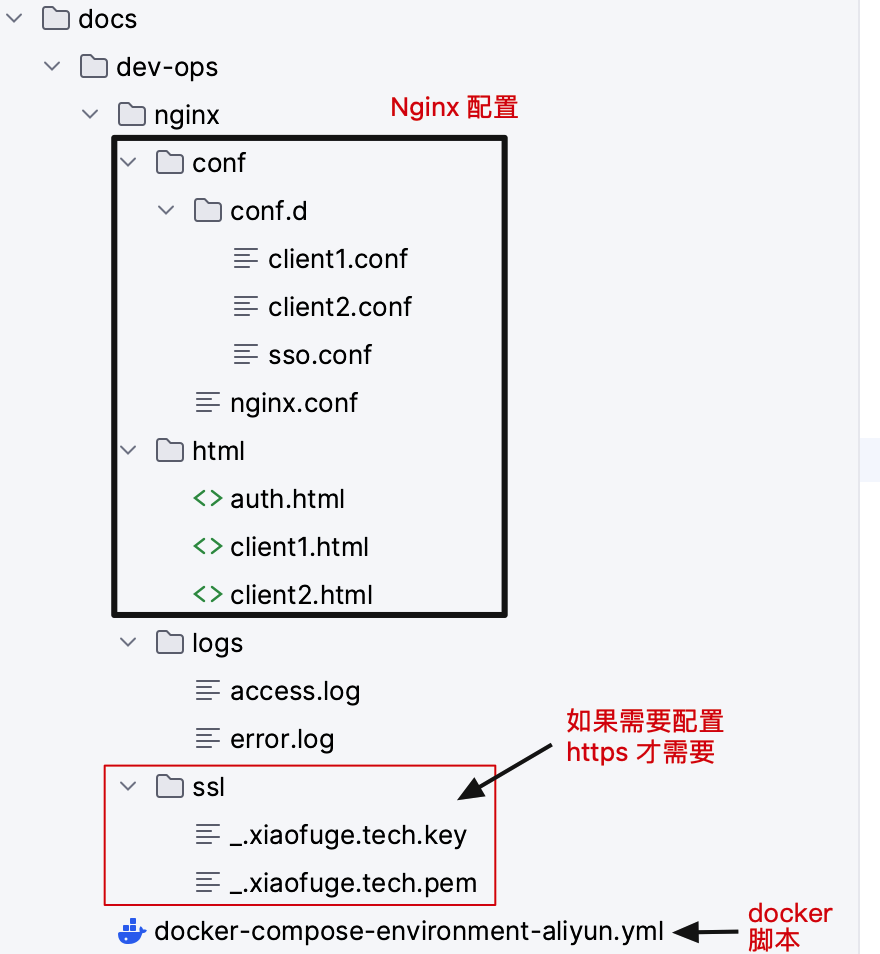
- Nginx 配置结构,docker compose 启动的时候会进行安装。
# 6.1 sso.conf
server {
    listen       80;
    server_name  sso.xfg.com;

    location /auth/ {
        proxy_set_header Host $host;
        proxy_set_header X-Forwarded-For $proxy_add_x_forwarded_for;
        proxy_pass http://192.168.1.107:8091/auth/;
    }

    location /authPage/ {
        alias /usr/share/nginx/html/;
        index auth.html;
    }

    location ~ .*\.(js|css)$ {
         alias /usr/share/nginx/html/;
         index auth.html;
    }

}
2
3
4
5
6
7
8
9
10
11
12
13
14
15
16
17
18
19
20
21
# 6.2 client1.conf
server {
    listen       80;
    server_name  client1.xfg.com;

    location /client1/ {
        proxy_set_header Host $host;
        proxy_set_header X-Forwarded-For $proxy_add_x_forwarded_for;
        proxy_pass http://192.168.1.107:8001/client1/;
    }

    location /client1Page/ {
        alias /usr/share/nginx/html/;
        index client1.html;
    }

    location ~ .*\.(js|css)$ {
        alias /usr/share/nginx/html/;
        index client1.html;
    }
}
2
3
4
5
6
7
8
9
10
11
12
13
14
15
16
17
18
19
20
# 6.3 client2.conf
server {
    listen       80;
    server_name  client2.xfg.com;

    location /client2/ {
        proxy_set_header Host $host;
        proxy_set_header X-Forwarded-For $proxy_add_x_forwarded_for;
        proxy_pass http://192.168.1.107:8002/client2/;
    }

    location /client2Page/ {
        alias /usr/share/nginx/html/;
        index client2.html;
    }

    location ~ .*\.(js|css)$ {
        alias /usr/share/nginx/html/;
        index client2.html;
    }
}
2
3
4
5
6
7
8
9
10
11
12
13
14
15
16
17
18
19
20
更多的代码从工程中阅读即可,复杂度不高。
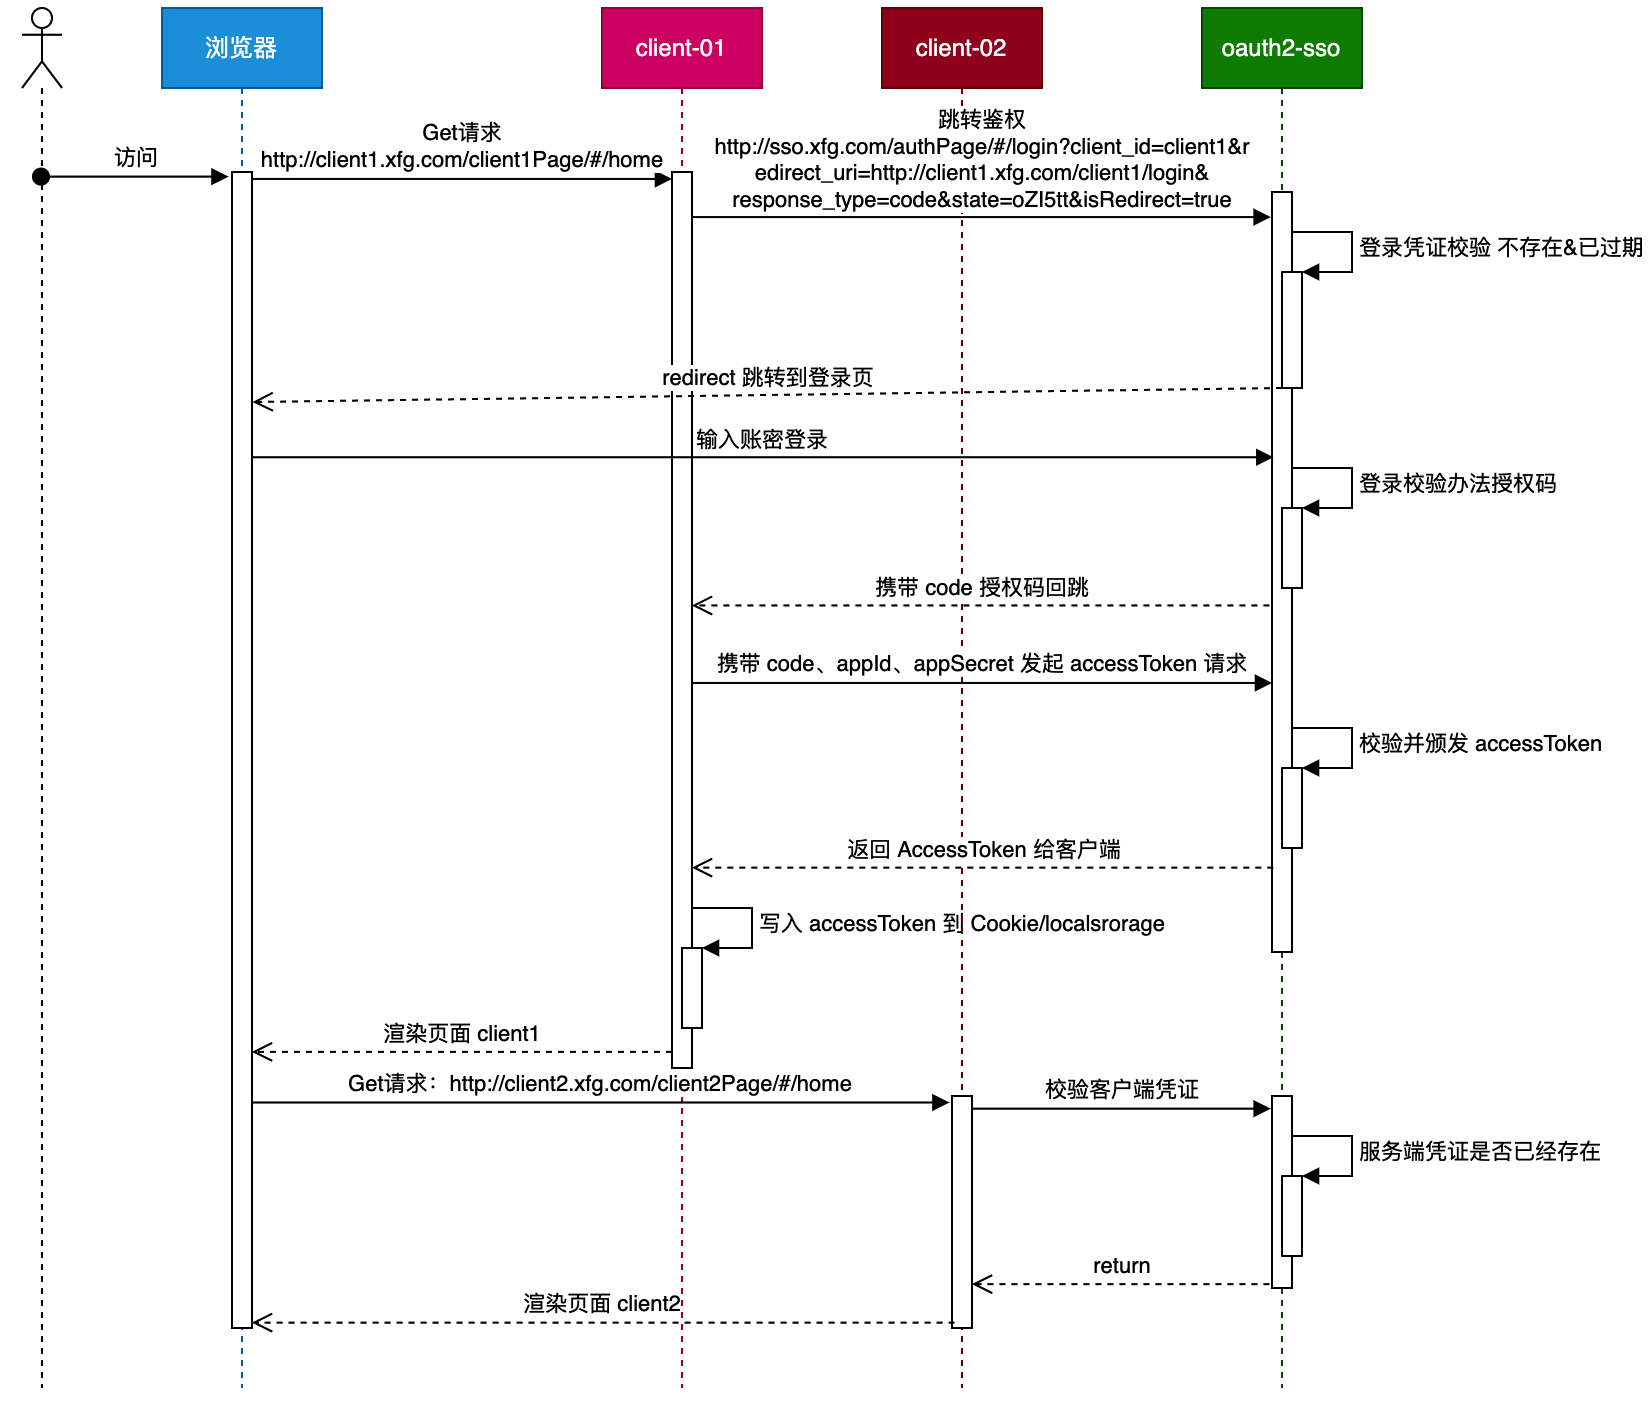
# 三、测试验证
# 1. 启动服务
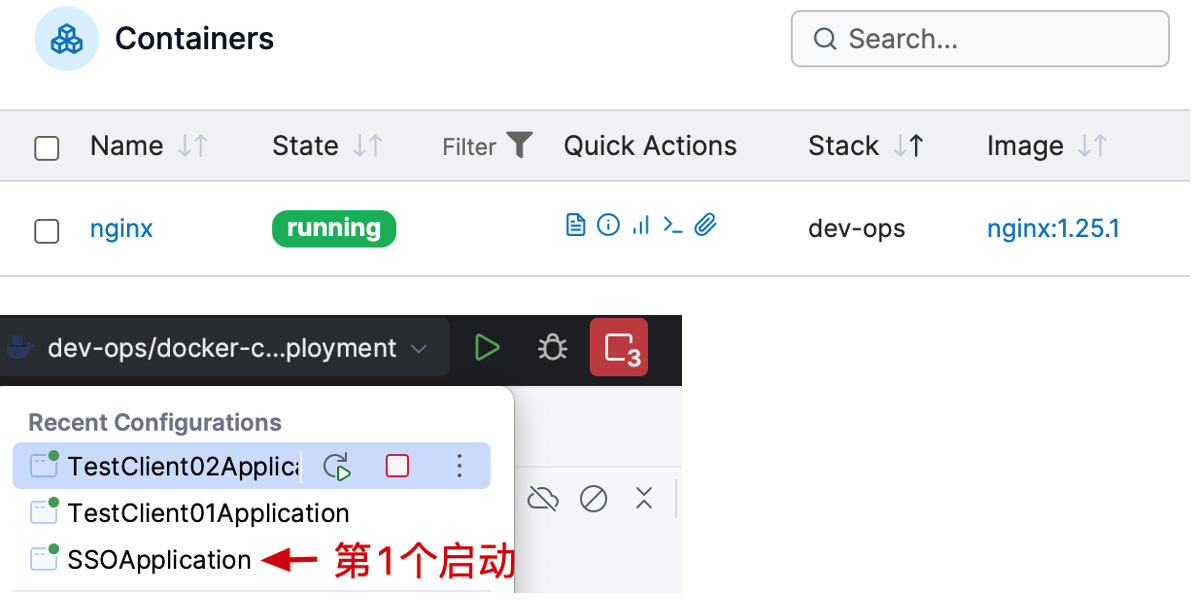
- 你需要启动 Docker 的 Nginx,之后顺序启动 SSO 服务和2个客户端服务。
- 另外要配置好 host,这样访问你的自定义域名地址,才会正确的跳转。(这东西在日常公司开发中会用到的很频繁)
# 2. 访问客户端
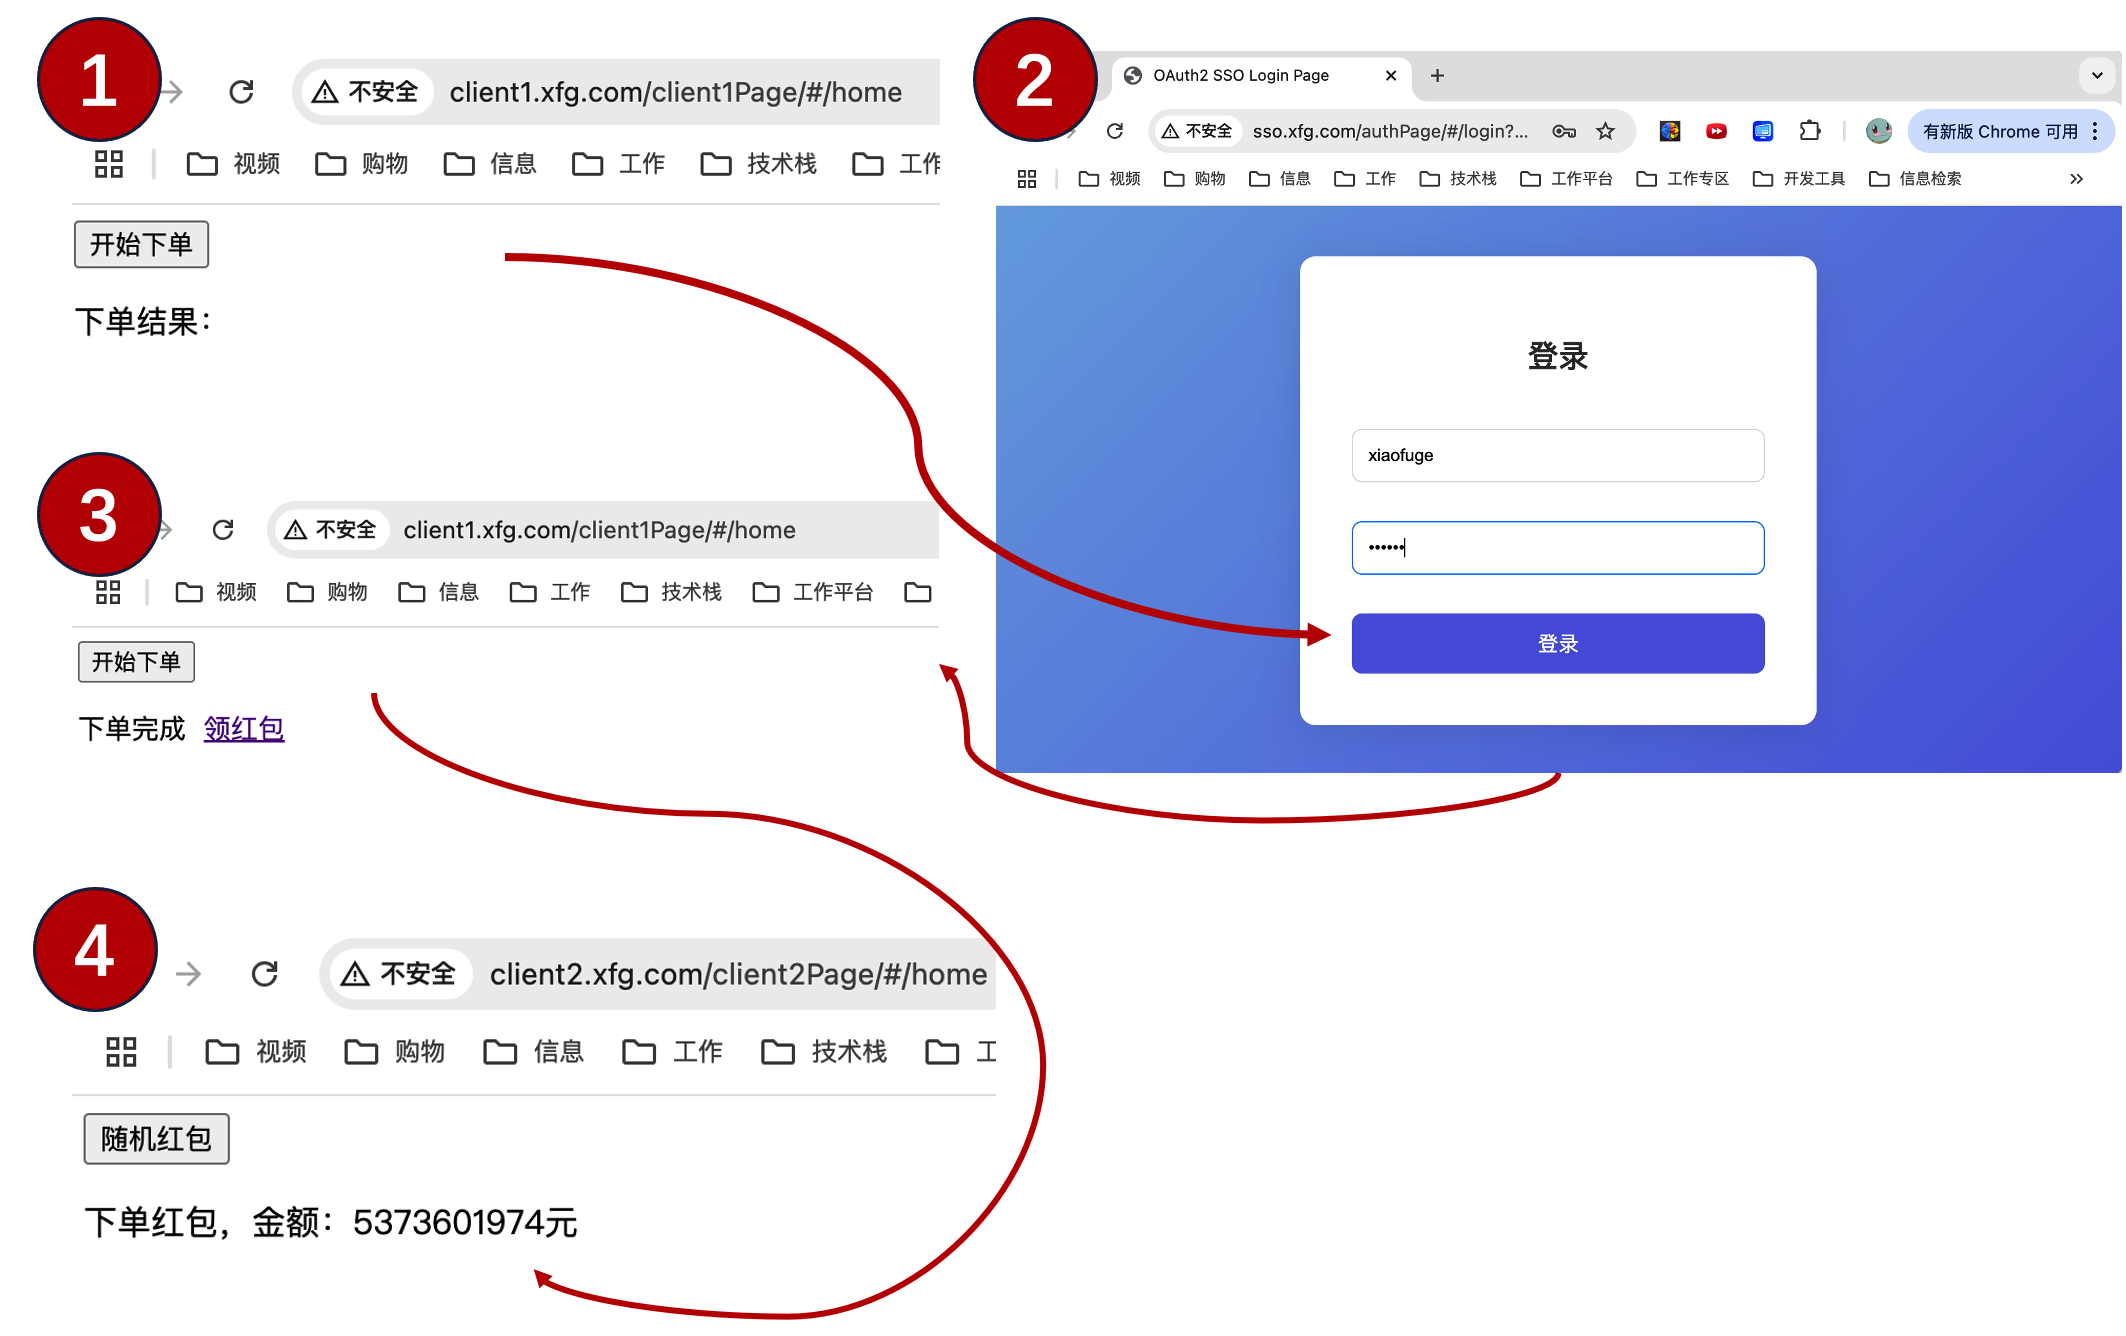
你可以访问地址1进行验证,登录之后也可以进入地址2进行验证;
- http://client1.xfg.com/client1Page/#/home (opens new window)
- http://client2.xfg.com/client2Page/#/home (opens new window)
测试过程:
- 首次登录,点击开始下单。会跳转登录,账密(xiaofuge/123456)。
- 登录后再点击开始下单,则会看到下单完成,领红包。
- 点击领红包,会跳转到 client2 的页面,点击随机红包,会进行服务端授权校验,之后就可以点击随机红包了。

京公网安备 11030102010881号
| GPL Licensed | Copyright © 2019 小傅哥,All rights reserved.