# Spring Security
作者:小傅哥
博客:https://bugstack.cn (opens new window)
沉淀、分享、成长,让自己和他人都能有所收获!😄
大家好,我是技术UP主小傅哥。
在互联网大厂这些年做研发这么多年,有一个非常指导性的开发原则就是;你做的这个东西是否能让整个大组内的其他系统使用。所以,从15年入职开始,我有的各种创新的想法都落地实现了,一直被使用到现在。那些组件也都成了一个个技术专利 👍🏻

但其实这样对通用逻辑的共性凝练,开发成统一的组件,在 Spring 框架中是有非常多的,这些东西也都在我们日常使用 Spring 时有所涉猎。包括我们本节要讲解的 Spring Security 组件。
当你想让系统实现登录校验的服务,那么你不可能在每个系统里都写认证和授权服务,那么这个时候就要做一套统一的认证框架。这里 Spring Security 就是专注于为 Java 应用程序提供身份验证和授权的框架。提供;验证、授权、防止会话固定、点击劫持、跨域请求等。
# 一、为啥需要安全框架
举个例子;SpringBoot 有一个 actuator 框架,可以配合普罗米修斯做系统监控。包括采集系统的接口运行数据、JVM 信息、负载等各项指标。
# 监控
management:
  endpoints:
    web:
      exposure:
        include: "*"
  endpoint:
    health:
      show-details: always
  metrics:
    export:
      prometheus:
        enabled: true
  prometheus:
    enabled: true
2
3
4
5
6
7
8
9
10
11
12
13
14
15
虽然很好用,但如果你一点安全都不加就直接在工程中配置,那么在网安人员的手里,基本就是一台肉鸡。一套 w13scan 正向代理,就能把你的工程底裤拔掉,拿出你的数据库账号密码。
操作教程:https://bugstack.cn/md/road-map/13scan-jdumpspider.html (opens new window)
/bin/zsh /xiaofuge/develop/github/xfg-dev-tech-w13scan-jdumpspider/docs/jdumpspider.sh
(base) xiaofuge@ZBMac-GV47H1GXD docs % /bin/zsh /Users/xiaofuge/Documents/develop/github/xfg-dev-tech-w13scan-jdumpspider/docs/jdumpspider.sh
===========================================
SpringDataSourceProperties
-------------
password = 123456
driverClassName = com.mysql.cj.jdbc.Driver
url = jdbc:mysql://127.0.0.1:13306/road_map?useUnicode=true&characterEncoding=utf8&autoReconnect=true&zeroDateTimeBehavior=convertToNull&serverTimezone=UTC&useSSL=true
username = root
2
3
4
5
6
7
8
9
所以,任何你暴漏出去对外使用的服务,都要做安全框架的认证和授权。
# 二、认证和授权的原理
有不少伙伴在初次使用 Spring Security 框架的时候,会觉得复杂度有些高。其实在之前没有 SpringBoot 之前,Security 这个框架使用是更复杂的。这也主要是因为 Security 支持的灵活性更高,所以抽象的也更复杂。但其实能做一个完整的小案例,也就不会觉得有多复杂了。
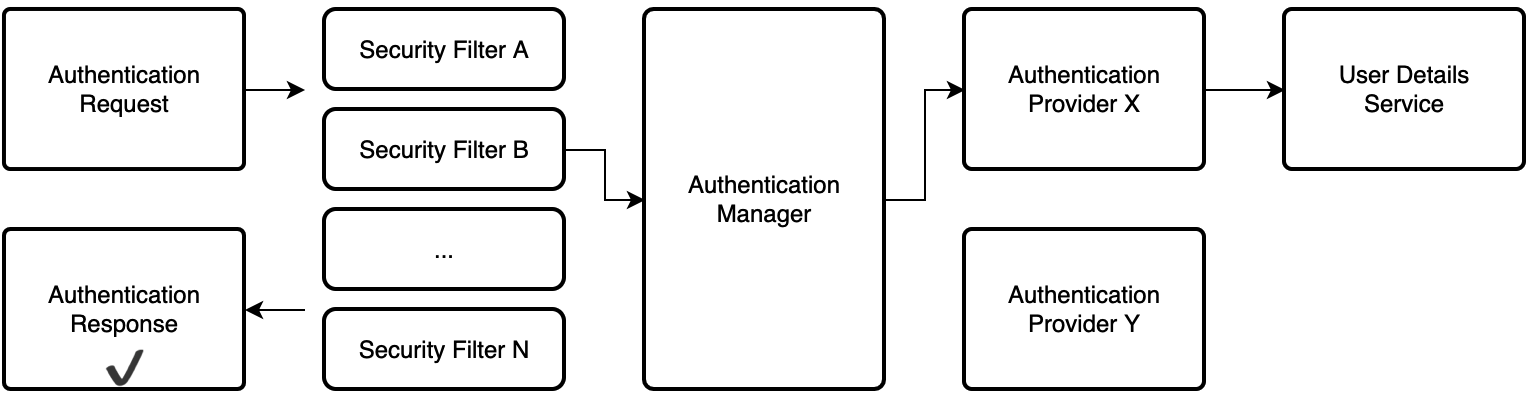
- 其实 Spring Security 要做也就2件事,认证(Authentication)你是谁,授权(Authorization)你干啥。其实就算你不使用 Spring Security 你自己做一个登录的功能,以及允许登录的用户可以操作的流程,也要做这样的事情。
- Spring Security 在内部维护一个过滤器链,其中每个过滤器都有特定的职责,并且根据所需的服务在配置中添加或删除过滤器。过滤器的顺序很重要,因为它们之间存在依赖关系。
- 文档:https://docs.spring.io/spring-security/site/docs/3.0.x/reference/security-filter-chain.html (opens new window) - Web 应用程序安全过滤链
# 三、一个简单的小案例
Spring Security 提供了最简单的登录访问校验配置,如果你只是想给一些页面添加一个登录页面。那么只需要配置下 pom 和 yml 中提供的用户账密就可以登录校验了。
源码:https://github.com/fuzhengwei/xfg-dev-tech-spring-security-demo (opens new window)
# 1. 引入 pom
<dependency>
    <groupId>org.springframework.boot</groupId>
    <artifactId>spring-boot-starter-security</artifactId>
</dependency>
2
3
4
# 2. 配置yml
server:
  port: 8099

spring:
  security:
    user:
      name: xiaofuge
      password: 123456
2
3
4
5
6
7
8
- security 的账号密码,就是你访问一个链接需要登录的账密。
- 如果不配置账号,它会有一个固定的 user 加上在启动程序时控制台会随机生成密码。
# 3. 测试接口
@RestController
@RequestMapping("/api/auth/")
public class TestController {

    @GetMapping("hi")
    public String hi(){
        return "hi security";
    }
}
2
3
4
5
6
7
8
9
# 4. 访问验证
地址:http://localhost:8099/api/test/hi (opens new window)
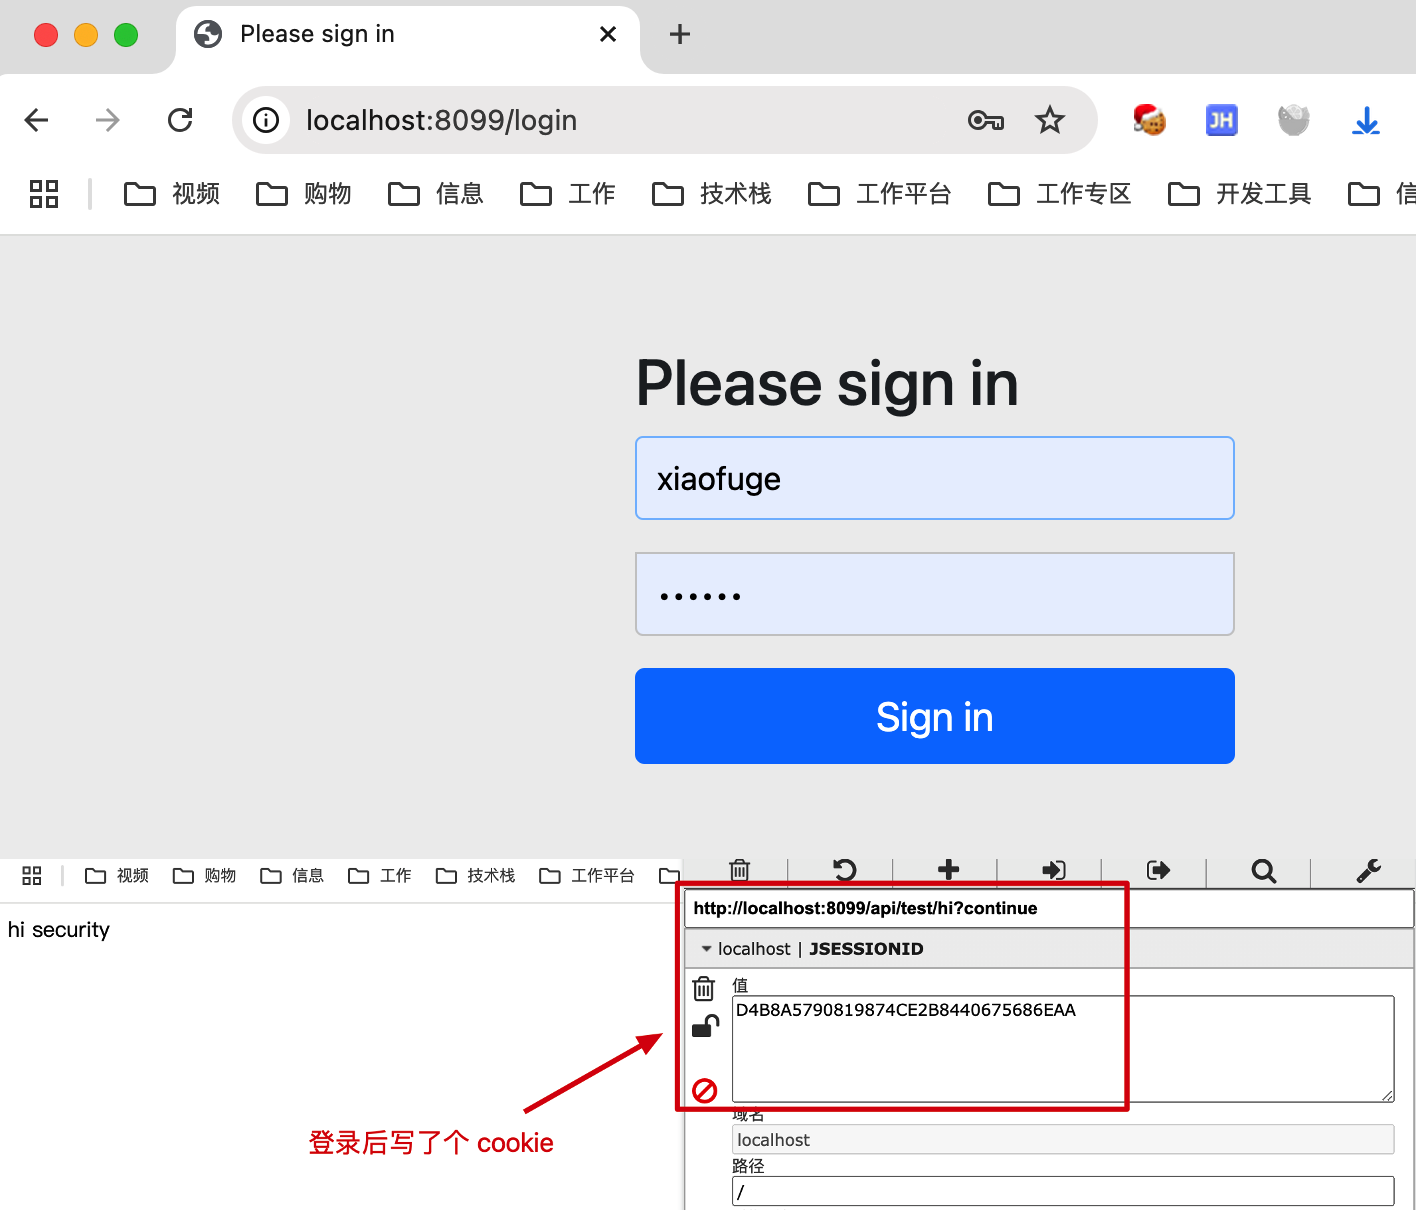
- 首次访问地址后,会自动跳转到一个登录页面。属于我们配置的账密进行登录。登录完成后,这里会写入一个 cookie,之后就可以访问我们的接口信息了。
# 四、正式工程案例对接
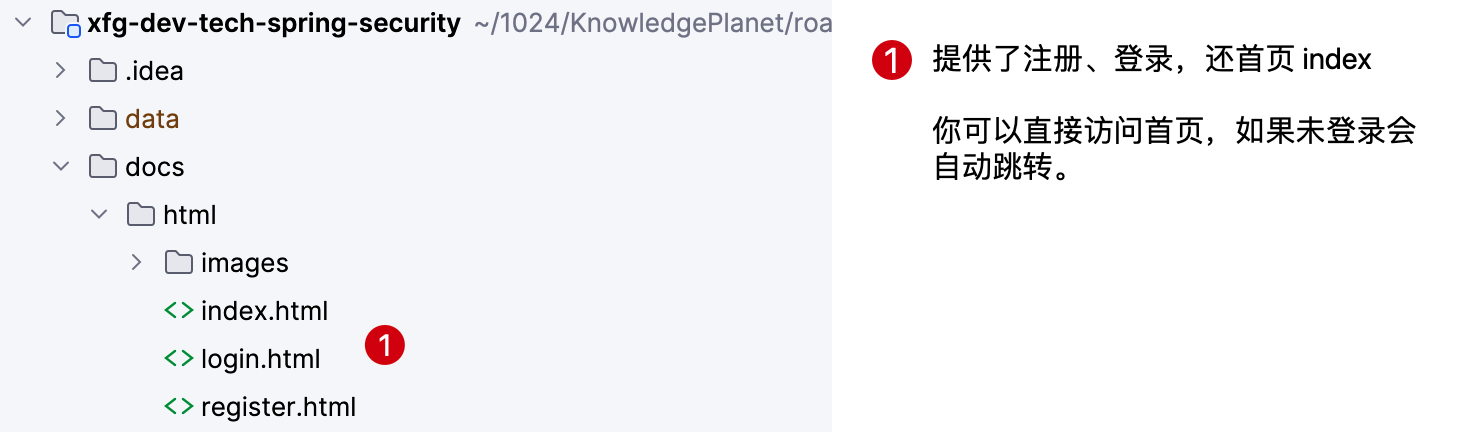
# 1. 工程结构
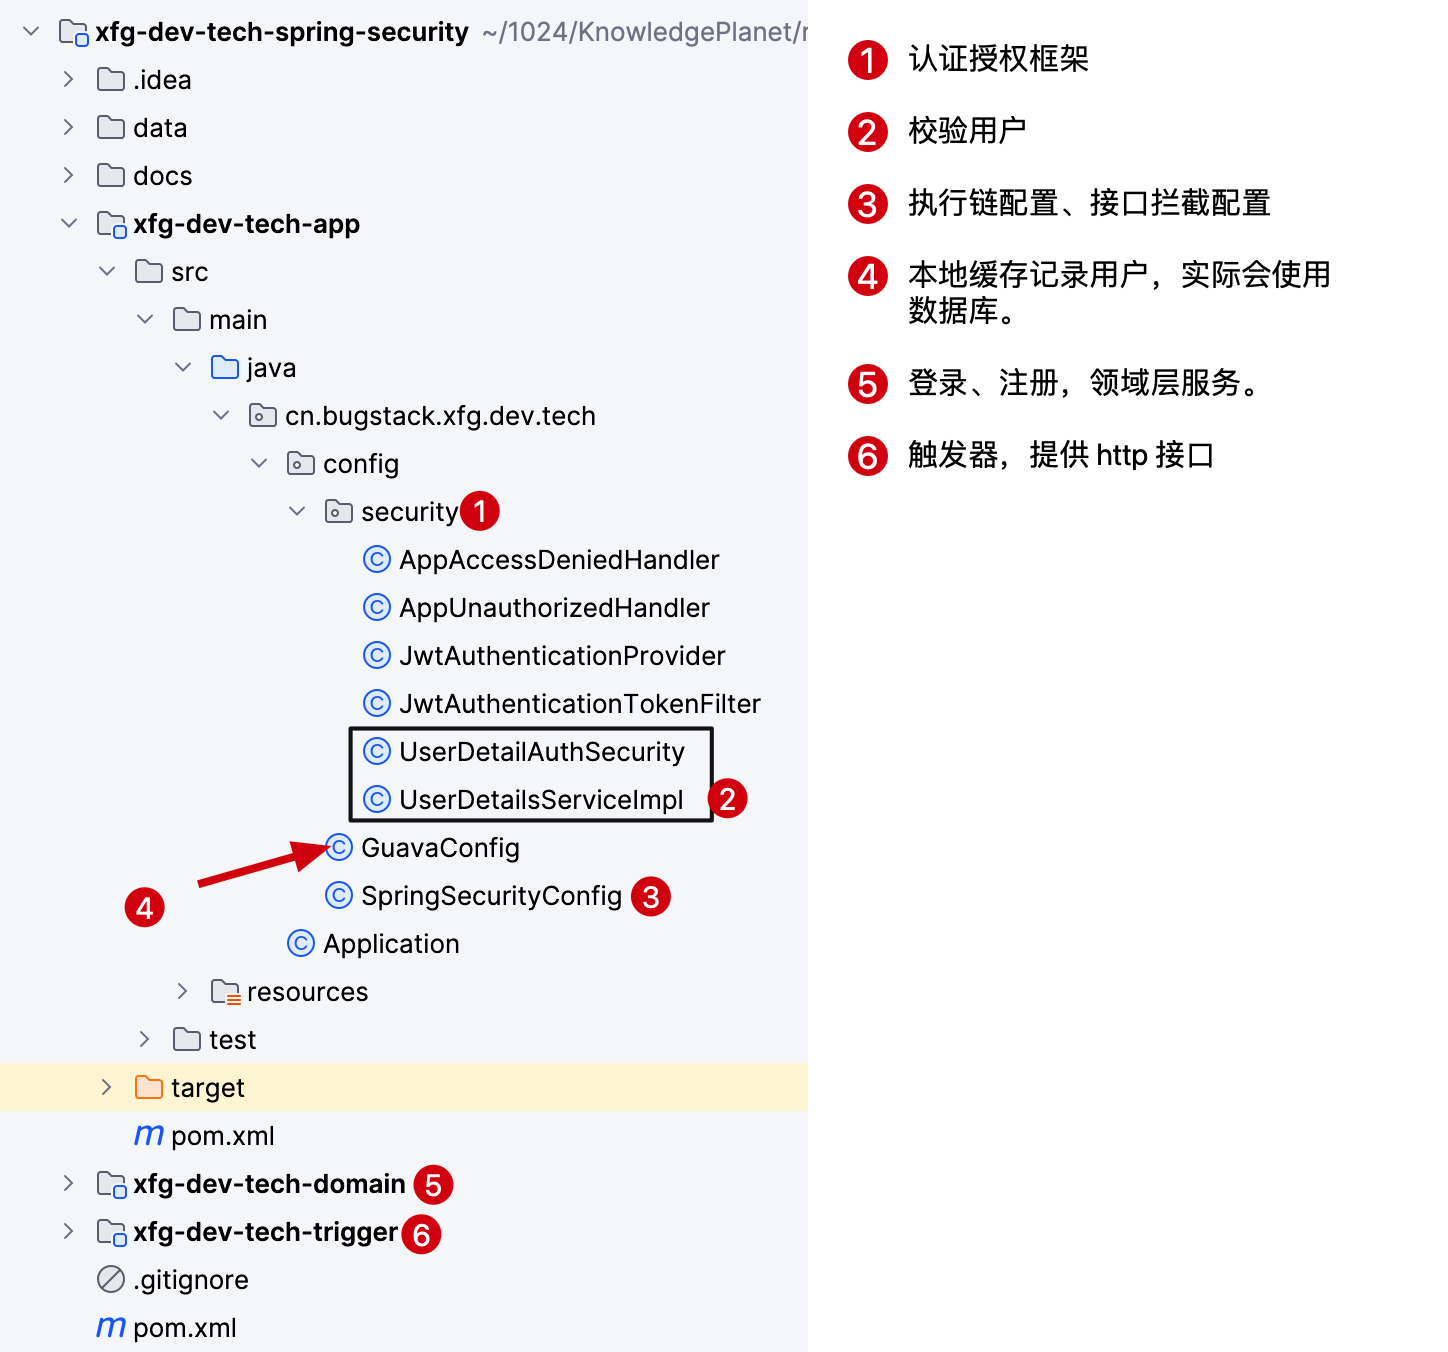
- 地址:https://github.com/fuzhengwei/xfg-dev-tech-spring-security (opens new window)
- 这是一套在 DDD 六边形分层结构中添加的 Spring Security 认证框架。如图,介绍了分层模块的使用。
- 接下来我们注册讲解这些代码块的用途。
# 2. GuavaConfig - 本地缓存模拟用户
@Slf4j
@Configuration
public class GuavaConfig {

    @Bean(name = "userCache")
    public Cache<String, UserEntity> userCache(PasswordEncoder passwordEncoder) {
        Cache<String, UserEntity> cache = CacheBuilder.newBuilder()
                .expireAfterWrite(365, TimeUnit.DAYS)
                .build();

        UserEntity userEntity01 = UserEntity.builder()
                .userName("xiaofuge")
                .password(passwordEncoder.encode("123456"))
                .roles(Arrays.asList(RoleTypeEnum.ADMIN))
                .build();

        UserEntity userEntity02 = UserEntity.builder()
                .userName("liergou")
                .password(passwordEncoder.encode("123456"))
                .roles(Arrays.asList(RoleTypeEnum.USER))
                .build();

        log.info("测试账密01 xiaofuge/123456 权限;admin");
        log.info("测试账密02 liergou/123456 权限;user");

        cache.put(userEntity01.getUserName(), userEntity01);
        cache.put(userEntity02.getUserName(), userEntity02);
        return cache;
    }

}
2
3
4
5
6
7
8
9
10
11
12
13
14
15
16
17
18
19
20
21
22
23
24
25
26
27
28
29
30
31
- 程序启动后,模拟注册完成的用户用户测试验证。用户也可以在测试中自己在注册用户。
# 3. UserDetails 用户身份信息
# 3.1 身份实现
public class UserDetailAuthSecurity implements UserDetails {

    @Serial
    private static final long serialVersionUID = 931859819772024712L;

    private final UserEntity userEntity;

    public UserDetailAuthSecurity(UserEntity userEntity) {
        this.userEntity = userEntity;
    }

    @Override
    public Collection<? extends GrantedAuthority> getAuthorities() {
        return userEntity.getRoles()
                .stream()
                .map(role -> new SimpleGrantedAuthority("ROLE_" + role.getCode()))
                .collect(Collectors.toList());
    }

    @Override
    public String getPassword() {
        return userEntity.getPassword();
    }

    @Override
    public String getUsername() {
        return userEntity.getUserName();
    }

    // ...

}
2
3
4
5
6
7
8
9
10
11
12
13
14
15
16
17
18
19
20
21
22
23
24
25
26
27
28
29
30
31
32
- 做授权校验是基于用户的 UserDetails 详细身份进行的。这东西就是一个依赖倒置,Spring 定义好接口标准,之后由使用方实现。
# 3.2 身份获取
@Service
public class UserDetailsServiceImpl implements UserDetailsService {

    @Resource
    private Cache<String, UserEntity> userCache;

    @Override
    public UserDetails loadUserByUsername(String username) throws UsernameNotFoundException {
        UserEntity userEntity = userCache.getIfPresent(username);
        if (null == userEntity) return null;
        return new UserDetailAuthSecurity(userEntity);
    }

}
2
3
4
5
6
7
8
9
10
11
12
13
14
- 这里还需要对 UserDetails 包装一层提供一个 UserDetailsService 接口的实现类。
# 4. 授权&校验处理
# 4.1 JwtAuthenticationProvider - 验证账密
public class JwtAuthenticationProvider implements AuthenticationProvider {

    private final PasswordEncoder passwordEncoder;
    private final UserDetailsService userDetailsService;

    public JwtAuthenticationProvider(PasswordEncoder passwordEncoder, UserDetailsService userDetailsService) {
        this.passwordEncoder = passwordEncoder;
        this.userDetailsService = userDetailsService;
    }

    @Override
    public Authentication authenticate(Authentication authentication) throws AuthenticationException {
        String username = String.valueOf(authentication.getPrincipal());
        String password = String.valueOf(authentication.getCredentials());

        UserDetails userDetails = userDetailsService.loadUserByUsername(username);
        if (passwordEncoder.matches(password, userDetails.getPassword())) {
            return new UsernamePasswordAuthenticationToken(username, password, userDetails.getAuthorities());
        }

        throw new BadCredentialsException("Auth Error!");
    }

    @Override
    public boolean supports(Class<?> authentication) {
        return UsernamePasswordAuthenticationToken.class.equals(authentication);
    }

}
2
3
4
5
6
7
8
9
10
11
12
13
14
15
16
17
18
19
20
21
22
23
24
25
26
27
28
29
- 这一部分是获取用户名和密码,通过 userDetailsService 获取信息进行密码比对。这个就和我们自己要做一个登录校验的方式是一样的。
# 4.2 JwtAuthenticationTokenFilter - 校验登录
@Slf4j
public class JwtAuthenticationTokenFilter extends OncePerRequestFilter {

    private final static String AUTH_HEADER = "Authorization";
    private final static String AUTH_HEADER_TYPE = "Bearer";

    private final UserDetailsService userDetailsService;

    public JwtAuthenticationTokenFilter(UserDetailsService userDetailsService) {
        this.userDetailsService = userDetailsService;
    }

    @Override
    protected void doFilterInternal(HttpServletRequest request, HttpServletResponse response, FilterChain filterChain) throws ServletException, IOException {
        String authHeader = request.getHeader(AUTH_HEADER);
        if (Objects.isNull(authHeader) || !authHeader.startsWith(AUTH_HEADER_TYPE)){
            filterChain.doFilter(request,response);
            return;
        }

        String authToken = authHeader.split(" ")[1];
        log.info("authToken:{}" , authToken);

        if (!JWTUtil.verify(authToken, "key".getBytes(StandardCharsets.UTF_8))) {
            filterChain.doFilter(request,response);
            return;
        }

        final String userName = (String) JWTUtil.parseToken(authToken).getPayload("username");
        UserDetails userDetails = userDetailsService.loadUserByUsername(userName);

        UsernamePasswordAuthenticationToken authentication =
                new UsernamePasswordAuthenticationToken(userDetails.getUsername(), userDetails.getPassword(), userDetails.getAuthorities());
        authentication.setDetails(new WebAuthenticationDetailsSource().buildDetails(request));

        SecurityContextHolder.getContext().setAuthentication(authentication);

        filterChain.doFilter(request, response);
    }

}
2
3
4
5
6
7
8
9
10
11
12
13
14
15
16
17
18
19
20
21
22
23
24
25
26
27
28
29
30
31
32
33
34
35
36
37
38
39
40
41
fetch(url, {
    method: 'POST',
    headers: {
        'Content-Type': 'application/json',
        'Authorization': `Bearer ${token}` // Include the token in the request headers
    }
})
2
3
4
5
6
7
- 这一部分是对 http 请求信息中的 Authorization Bearer 后面带有的 token 信息进行解析校验。如代码中提供了一部分前端请求代码,就是这里的 Token
# 5. 认证&授权配置
@Configuration
@EnableWebSecurity
@EnableMethodSecurity(prePostEnabled = true)
public class SpringSecurityConfig {

    // 不拦截的 URL
    private final String[] requestMatchers = {"/api/auth/login", "/api/auth/register", "/api/auth/query_user_name", "/test/**"};

    @Bean
    public AuthenticationManager authenticationManager(AuthenticationConfiguration authConfig) throws Exception {
        return authConfig.getAuthenticationManager();
    }

    @Bean
    public PasswordEncoder passwordEncoder() {
        return new BCryptPasswordEncoder();
    }

    @Bean
    public JwtAuthenticationTokenFilter jwtAuthenticationTokenFilter(UserDetailsService userDetailsService) {
        return new JwtAuthenticationTokenFilter(userDetailsService);
    }

    @Bean
    public JwtAuthenticationProvider jwtAuthenticationProvider(PasswordEncoder passwordEncoder, UserDetailsService userDetailsService) {
        return new JwtAuthenticationProvider(passwordEncoder, userDetailsService);
    }

    @Bean
    public SecurityFilterChain filterChain(HttpSecurity httpSecurity,
                                           JwtAuthenticationProvider jwtAuthenticationProvider,
                                           JwtAuthenticationTokenFilter jwtAuthenticationTokenFilter,
                                           AppUnauthorizedHandler appUnauthorizedHandler,
                                           AppAccessDeniedHandler appAccessDeniedHandler
    ) throws Exception {
        // 使用JWT,可屏蔽csrf防护
        httpSecurity.csrf(CsrfConfigurer::disable)
                // 基于token存储到浏览器,不需要session
                .sessionManagement(sessionManagementConfigurer -> sessionManagementConfigurer.sessionCreationPolicy(SessionCreationPolicy.STATELESS))
                .authorizeHttpRequests(authorizationRegistry -> authorizationRegistry
                        // 允许对于网站静态资源的无授权访问
                        .requestMatchers(HttpMethod.GET, "/", "/*.html").permitAll()
                        // 对登录注册允许匿名访问
                        .requestMatchers(requestMatchers).permitAll()
                        // 访问授权,所有 /user/** 路径下的请求需要 ADMIN 角色。注意;Spring Security在处理角色时,会自动为角色名添加"ROLE_"前缀。因此,"ADMIN"角色实际上对应权限"ROLE_ADMIN"。
                        .requestMatchers("/api/mall/**").permitAll()
                        // 跨域请求会先进行一次options请求
                        .requestMatchers(HttpMethod.OPTIONS).permitAll()
                        // 对所有请求开启授权保护
                        .anyRequest()
                        // 已认证的请求自动被授权
                        .authenticated()
                )
                // 禁用缓存
                .headers(headersConfigurer -> headersConfigurer
                        .cacheControl(HeadersConfigurer.CacheControlConfig::disable)
                )
                // 使用自定义 provider
                .authenticationProvider(jwtAuthenticationProvider)
                // 添加 JWT filter
                .addFilterBefore(jwtAuthenticationTokenFilter, UsernamePasswordAuthenticationFilter.class)
                // 添加自定义未授权和未登录结果返回
                .exceptionHandling(exceptionConfigure -> exceptionConfigure
                        .accessDeniedHandler(appAccessDeniedHandler)
                        .authenticationEntryPoint(appUnauthorizedHandler));

        return httpSecurity.build();
    }

}
2
3
4
5
6
7
8
9
10
11
12
13
14
15
16
17
18
19
20
21
22
23
24
25
26
27
28
29
30
31
32
33
34
35
36
37
38
39
40
41
42
43
44
45
46
47
48
49
50
51
52
53
54
55
56
57
58
59
60
61
62
63
64
65
66
67
68
69
70
- 那么这里所做的就是认证授权的配置,对哪些URL进行放行,哪些是要做拦截。
- appAccessDeniedHandler、appUnauthorizedHandler,是自定义的鉴权拦截,如果登录不通过,可以统一返回给前端一个固定的错误码,便于跳转登录。
# 6. 注册登录
@Service
public class AuthService implements IAuthService {

    @Autowired
    private PasswordEncoder passwordEncoder;

    @Resource
    private Cache<String, UserEntity> userCache;

    @Autowired
    private AuthenticationManager authenticationManager;

    @Override
    public void register(String userName, String password) {

        UserEntity userEntity = UserEntity.builder()
                .userName(userName)
                .password(passwordEncoder.encode(password))
                .roles(Arrays.asList(RoleTypeEnum.USER, RoleTypeEnum.ADMIN))
                .build();

        userCache.put(userName, userEntity);
    }

    @Override
    public String login(String userName, String password) {
        // 登录验证
        authenticationManager.authenticate(new UsernamePasswordAuthenticationToken(userName, password));
        // 验证通过,获取 token
        String token = JWT.create()
                .setExpiresAt(new Date(System.currentTimeMillis() + (1000 * 30)))
                .setPayload("username", userName)
                .setKey("key".getBytes(StandardCharsets.UTF_8))
                .sign();

        return token;
    }

}
2
3
4
5
6
7
8
9
10
11
12
13
14
15
16
17
18
19
20
21
22
23
24
25
26
27
28
29
30
31
32
33
34
35
36
37
38
39
- 在 domain 模块中提供了一个简单的注册&登录服务。注册就是简单的像本地缓存 Guava 写入数据。登录校验会调用登录密码校验处理。在登录成功后返回 JWT 生成的 token 信息。
# 7. 访问拦截
# 1. 认证授权
@Slf4j
@CrossOrigin("*")
@RestController
@RequestMapping("/api/auth/")
public class AuthController {

    @Resource
    private IAuthService authService;

    @Autowired
    private AuthenticationManager authenticationManager;

    @PostMapping("query_user_name")
    public Response<String> queryUserName() {
        try {
            // 获取当前认证的用户信息
            Authentication authentication = SecurityContextHolder.getContext().getAuthentication();
            Object principal = authentication.getPrincipal();
            return Response.<String>builder()
                    .code(Response.ResponseCode.SUCCESS.getCode())
                    .info(Response.ResponseCode.SUCCESS.getInfo())
                    .data(principal.toString())
                    .build();
        } catch (Exception e) {
            return Response.<String>builder()
                    .code(Response.ResponseCode.UN_ERROR.getCode())
                    .info(Response.ResponseCode.UN_ERROR.getInfo())
                    .build();
        }
    }

    @PostMapping("register")
    public Response<Boolean> register(@RequestParam String userName, @RequestParam String password) {
        try {
            log.info("注册用户:{}", userName);
            authService.register(userName, password);
            return Response.<Boolean>builder()
                    .code(Response.ResponseCode.SUCCESS.getCode())
                    .info(Response.ResponseCode.SUCCESS.getInfo())
                    .data(true)
                    .build();
        } catch (Exception e) {
            log.info("注册用户失败:{}", userName);
            return Response.<Boolean>builder()
                    .code(Response.ResponseCode.UN_ERROR.getCode())
                    .info(Response.ResponseCode.UN_ERROR.getInfo())
                    .build();
        }
    }

    @PostMapping("login")
    public Response<String> login(@RequestParam String userName, @RequestParam String password) {
        try {
            log.info("登录用户:{}", userName);
            // 登录获取 token
            String token = authService.login(userName, password);

            return Response.<String>builder()
                    .code(Response.ResponseCode.SUCCESS.getCode())
                    .info(Response.ResponseCode.SUCCESS.getInfo())
                    .data(token)
                    .build();
        } catch (Exception e) {
            log.info("登录用户失败:{}", userName);
            return Response.<String>builder()
                    .code(Response.ResponseCode.UN_ERROR.getCode())
                    .info(Response.ResponseCode.UN_ERROR.getInfo())
                    .build();
        }
    }

}
2
3
4
5
6
7
8
9
10
11
12
13
14
15
16
17
18
19
20
21
22
23
24
25
26
27
28
29
30
31
32
33
34
35
36
37
38
39
40
41
42
43
44
45
46
47
48
49
50
51
52
53
54
55
56
57
58
59
60
61
62
63
64
65
66
67
68
69
70
71
72
- 提供注册、登录和查询用户信息接口。
- 查询用户有些场景是会通过路径地址获取用户id,再根据用户id查询。但一些安全级别较高的,甚至不会透彻用户id,而是校验登录token,之后缓存用户id在使用。
# 2. 角色权限
@Slf4j
@CrossOrigin("*")
@RestController
@RequestMapping("/api/mall/")
public class MallController {

    @PreAuthorize("hasRole('ADMIN')")
//    @PreAuthorize("hasRole('USER')")
    @RequestMapping(value = "create_pay_order", method = RequestMethod.POST)
    public Response<String> createPayOrder(@RequestBody CreatePayRequestDTO createPayRequestDTO) {
        try {
            // 获取当前认证的用户信息
            Authentication authentication = SecurityContextHolder.getContext().getAuthentication();
            Object principal = authentication.getPrincipal();

            String userName = (String) principal;
            String productId = createPayRequestDTO.getProductId();

            log.info("商品下单,根据商品ID创建支付单开始 userName:{} productId:{}", userName, productId);

            return Response.<String>builder()
                    .code(Response.ResponseCode.SUCCESS.getCode())
                    .info(Response.ResponseCode.SUCCESS.getInfo())
                    .data(userName + " 下单成功。单号:" + RandomStringUtils.randomAlphabetic(12))
                    .build();
        } catch (Exception e) {
            log.error("商品下单,根据商品ID创建支付单开始 productId:{}", createPayRequestDTO.getProductId(), e);
            return Response.<String>builder()
                    .code(Response.ResponseCode.UN_ERROR.getCode())
                    .info(Response.ResponseCode.UN_ERROR.getInfo())
                    .build();
        }
    }

}
2
3
4
5
6
7
8
9
10
11
12
13
14
15
16
17
18
19
20
21
22
23
24
25
26
27
28
29
30
31
32
33
34
35
- 用户登录完成后,提供一个下单接口。
- 注意,接口上有;ADMIN、USER 权限注解,我们在配置默认账号的时候,给xiaofuge是 ADMIN权限,liergou 是USER权限。配置不同的注解,会导致下单成功或者失败。
# 五、通过页面验证逻辑
这里小傅哥提供了一套前端简单的验证页面,方便大家学习;
- 如果感兴趣前端代码的调用,也可以进入源码学习。
  .   ____          _            __ _ _
 /\\ / ___'_ __ _ _(_)_ __  __ _ \ \ \ \
( ( )\___ | '_ | '_| | '_ \/ _` | \ \ \ \
 \\/  ___)| |_)| | | | | || (_| |  ) ) ) )
  '  |____| .__|_| |_|_| |_\__, | / / / /
 =========|_|==============|___/=/_/_/_/
 :: Spring Boot ::                (v3.1.6)

24-12-15.11:22:10.786 [main            ] INFO  Application            - Starting Application using Java 17.0.12 with PID 3656 (/Users/fuzhengwei/1024/KnowledgePlanet/road-map/xfg-dev-tech-spring-security/xfg-dev-tech-app/target/classes started by fuzhengwei in /Users/fuzhengwei/1024/KnowledgePlanet/road-map/xfg-dev-tech-spring-security)
24-12-15.11:22:10.789 [main            ] INFO  Application            - The following 1 profile is active: "dev"
24-12-15.11:22:12.330 [main            ] INFO  TomcatWebServer        - Tomcat initialized with port(s): 8091 (http)
24-12-15.11:22:12.340 [main            ] INFO  Http11NioProtocol      - Initializing ProtocolHandler ["http-nio-8091"]
24-12-15.11:22:12.343 [main            ] INFO  StandardService        - Starting service [Tomcat]
24-12-15.11:22:12.343 [main            ] INFO  StandardEngine         - Starting Servlet engine: [Apache Tomcat/10.1.16]
24-12-15.11:22:12.466 [main            ] INFO  [/]                    - Initializing Spring embedded WebApplicationContext
24-12-15.11:22:12.466 [main            ] INFO  ServletWebServerApplicationContext - Root WebApplicationContext: initialization completed in 1615 ms
24-12-15.11:22:12.705 [main            ] INFO  GuavaConfig            - 测试账密01 xiaofuge/123456 权限;admin
24-12-15.11:22:12.705 [main            ] INFO  GuavaConfig            - 测试账密02 liergou/123456 权限;user
24-12-15.11:22:13.188 [main            ] INFO  DefaultSecurityFilterChain - Will secure any request with [org.springframework.security.web.session.DisableEncodeUrlFilter@1e225820, org.springframework.security.web.context.request.async.WebAsyncManagerIntegrationFilter@8aeab9e, org.springframework.security.web.context.SecurityContextHolderFilter@3332c7a5, org.springframework.security.web.header.HeaderWriterFilter@5099c59b, org.springframework.security.web.authentication.logout.LogoutFilter@6ac4c3f7, cn.bugstack.xfg.dev.tech.config.security.JwtAuthenticationTokenFilter@65eb76cd, org.springframework.security.web.savedrequest.RequestCacheAwareFilter@3e39baf0, org.springframework.security.web.servletapi.SecurityContextHolderAwareRequestFilter@25a94b55, org.springframework.security.web.authentication.AnonymousAuthenticationFilter@2a2dc0a, org.springframework.security.web.session.SessionManagementFilter@3635099, org.springframework.security.web.access.ExceptionTranslationFilter@5eb5da12, org.springframework.security.web.access.intercept.AuthorizationFilter@654e6a90]
24-12-15.11:22:13.372 [main            ] INFO  Http11NioProtocol      - Starting ProtocolHandler ["http-nio-8091"]
24-12-15.11:22:13.419 [main            ] INFO  TomcatWebServer        - Tomcat started on port(s): 8091 (http) with context path ''
24-12-15.11:22:13.432 [main            ] INFO  Application            - Started Application in 3.597 seconds (process running for 4.098)
2
3
4
5
6
7
8
9
10
11
12
13
14
15
16
17
18
19
20
21
22
- 测试前启动 SpringBoot 服务。
# 1. 首次登录
地址:login.html
function login() {
        const username = document.getElementById('username').value;
        const password = document.getElementById('password').value;

        fetch('http://127.0.0.1:8091/api/auth/login', {
            method: 'POST',
            headers: {
                'Content-Type': 'application/x-www-form-urlencoded'
            },
            body: new URLSearchParams({
                userName: username,
                password: password
            })
        })
        .then(response => response.json())
        .then(data => {
            if (data.code === '0000') {
                // Store token in localStorage on successful login
                localStorage.setItem('xfg-dev-tech-spring-security-token', data.data);
                window.location.href = 'index.html'; // 假设登录成功后跳转到首页
            } else {
                alert('登录失败: ' + data.info);
            }
        })
        .catch(error => {
            console.error('Error during login:', error);
            alert('登录失败');
        });
}
2
3
4
5
6
7
8
9
10
11
12
13
14
15
16
17
18
19
20
21
22
23
24
25
26
27
28
29
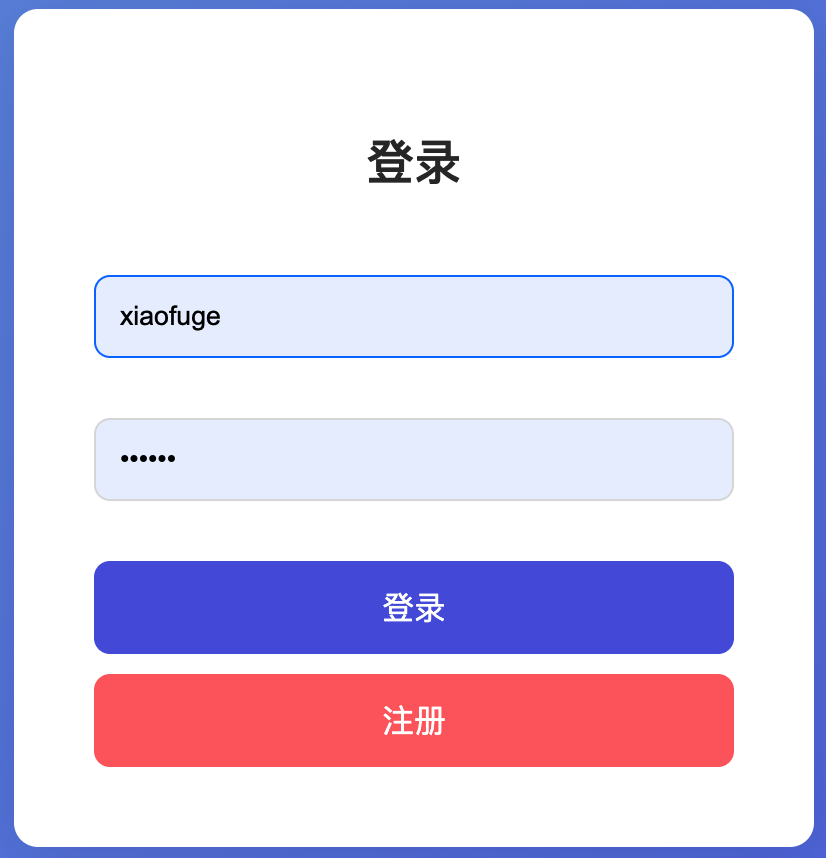
- 测试账号;
xiaofuge/123456、liergou/123456,xiaofuge 是 admin 权限,liergou 是 user 权限,你可以分别测试验证。 - 你还可以自己注册新的账号进行验证。
# 2. 首页下单
document.addEventListener("DOMContentLoaded", function () {
        var token = localStorage.getItem('xfg-dev-tech-spring-security-token');
        if (!token) {
            window.location.href = "login.html"; // Redirect to the login page
            return;
        }

        var productId = "100010090091";
        var url = 'http://127.0.0.1:8091/api/auth/query_user_name';

        fetch(url, {
            method: 'POST',
            headers: {
                'Content-Type': 'application/json',
                'Authorization': `Bearer ${token}` // Include the token in the request headers
            }
        })
        .then(response => response.json()) // Parse the JSON response
        .then(json => {
            const userNameDisplay = document.getElementById('userNameDisplay');
            if (json.code === "0000") {
                userNameDisplay.textContent = json.data;
            } else {
                userNameDisplay.textContent = '未登录';
            }
        })
        .catch(error => {
            console.error('Error fetching user name:', error);
            document.getElementById('userNameDisplay').textContent = '未登录';
        });

    });

document.getElementById('orderButton').addEventListener('click', function() {
    var token = localStorage.getItem('xfg-dev-tech-spring-security-token');
    if (!token) {
        window.location.href = "login.html"; // Redirect to the login page
        return;
    }

    var productId = "100010090091";
    var url = 'http://127.0.0.1:8091/api/mall/create_pay_order';

    var requestBody = {
        productId: productId
    };

    fetch(url, {
        method: 'POST',
        headers: {
            'Content-Type': 'application/json',
            'Authorization': `Bearer ${token}` // Include the token in the request headers
        },
        body: JSON.stringify(requestBody) // Convert the request body to a JSON string
    })
    .then(response => response.json()) // Parse the JSON response
    .then(json => {
        if (json.code === "0000") { // Assume success code is "0000"
            alert(json.data);
        } else {
            alert("code:"+json.code +" "+json.info)
            console.error('Error:', json.info); // Output error information
        }
    })
    .catch(error => console.error('Error:', error));
});
2
3
4
5
6
7
8
9
10
11
12
13
14
15
16
17
18
19
20
21
22
23
24
25
26
27
28
29
30
31
32
33
34
35
36
37
38
39
40
41
42
43
44
45
46
47
48
49
50
51
52
53
54
55
56
57
58
59
60
61
62
63
64
65
66
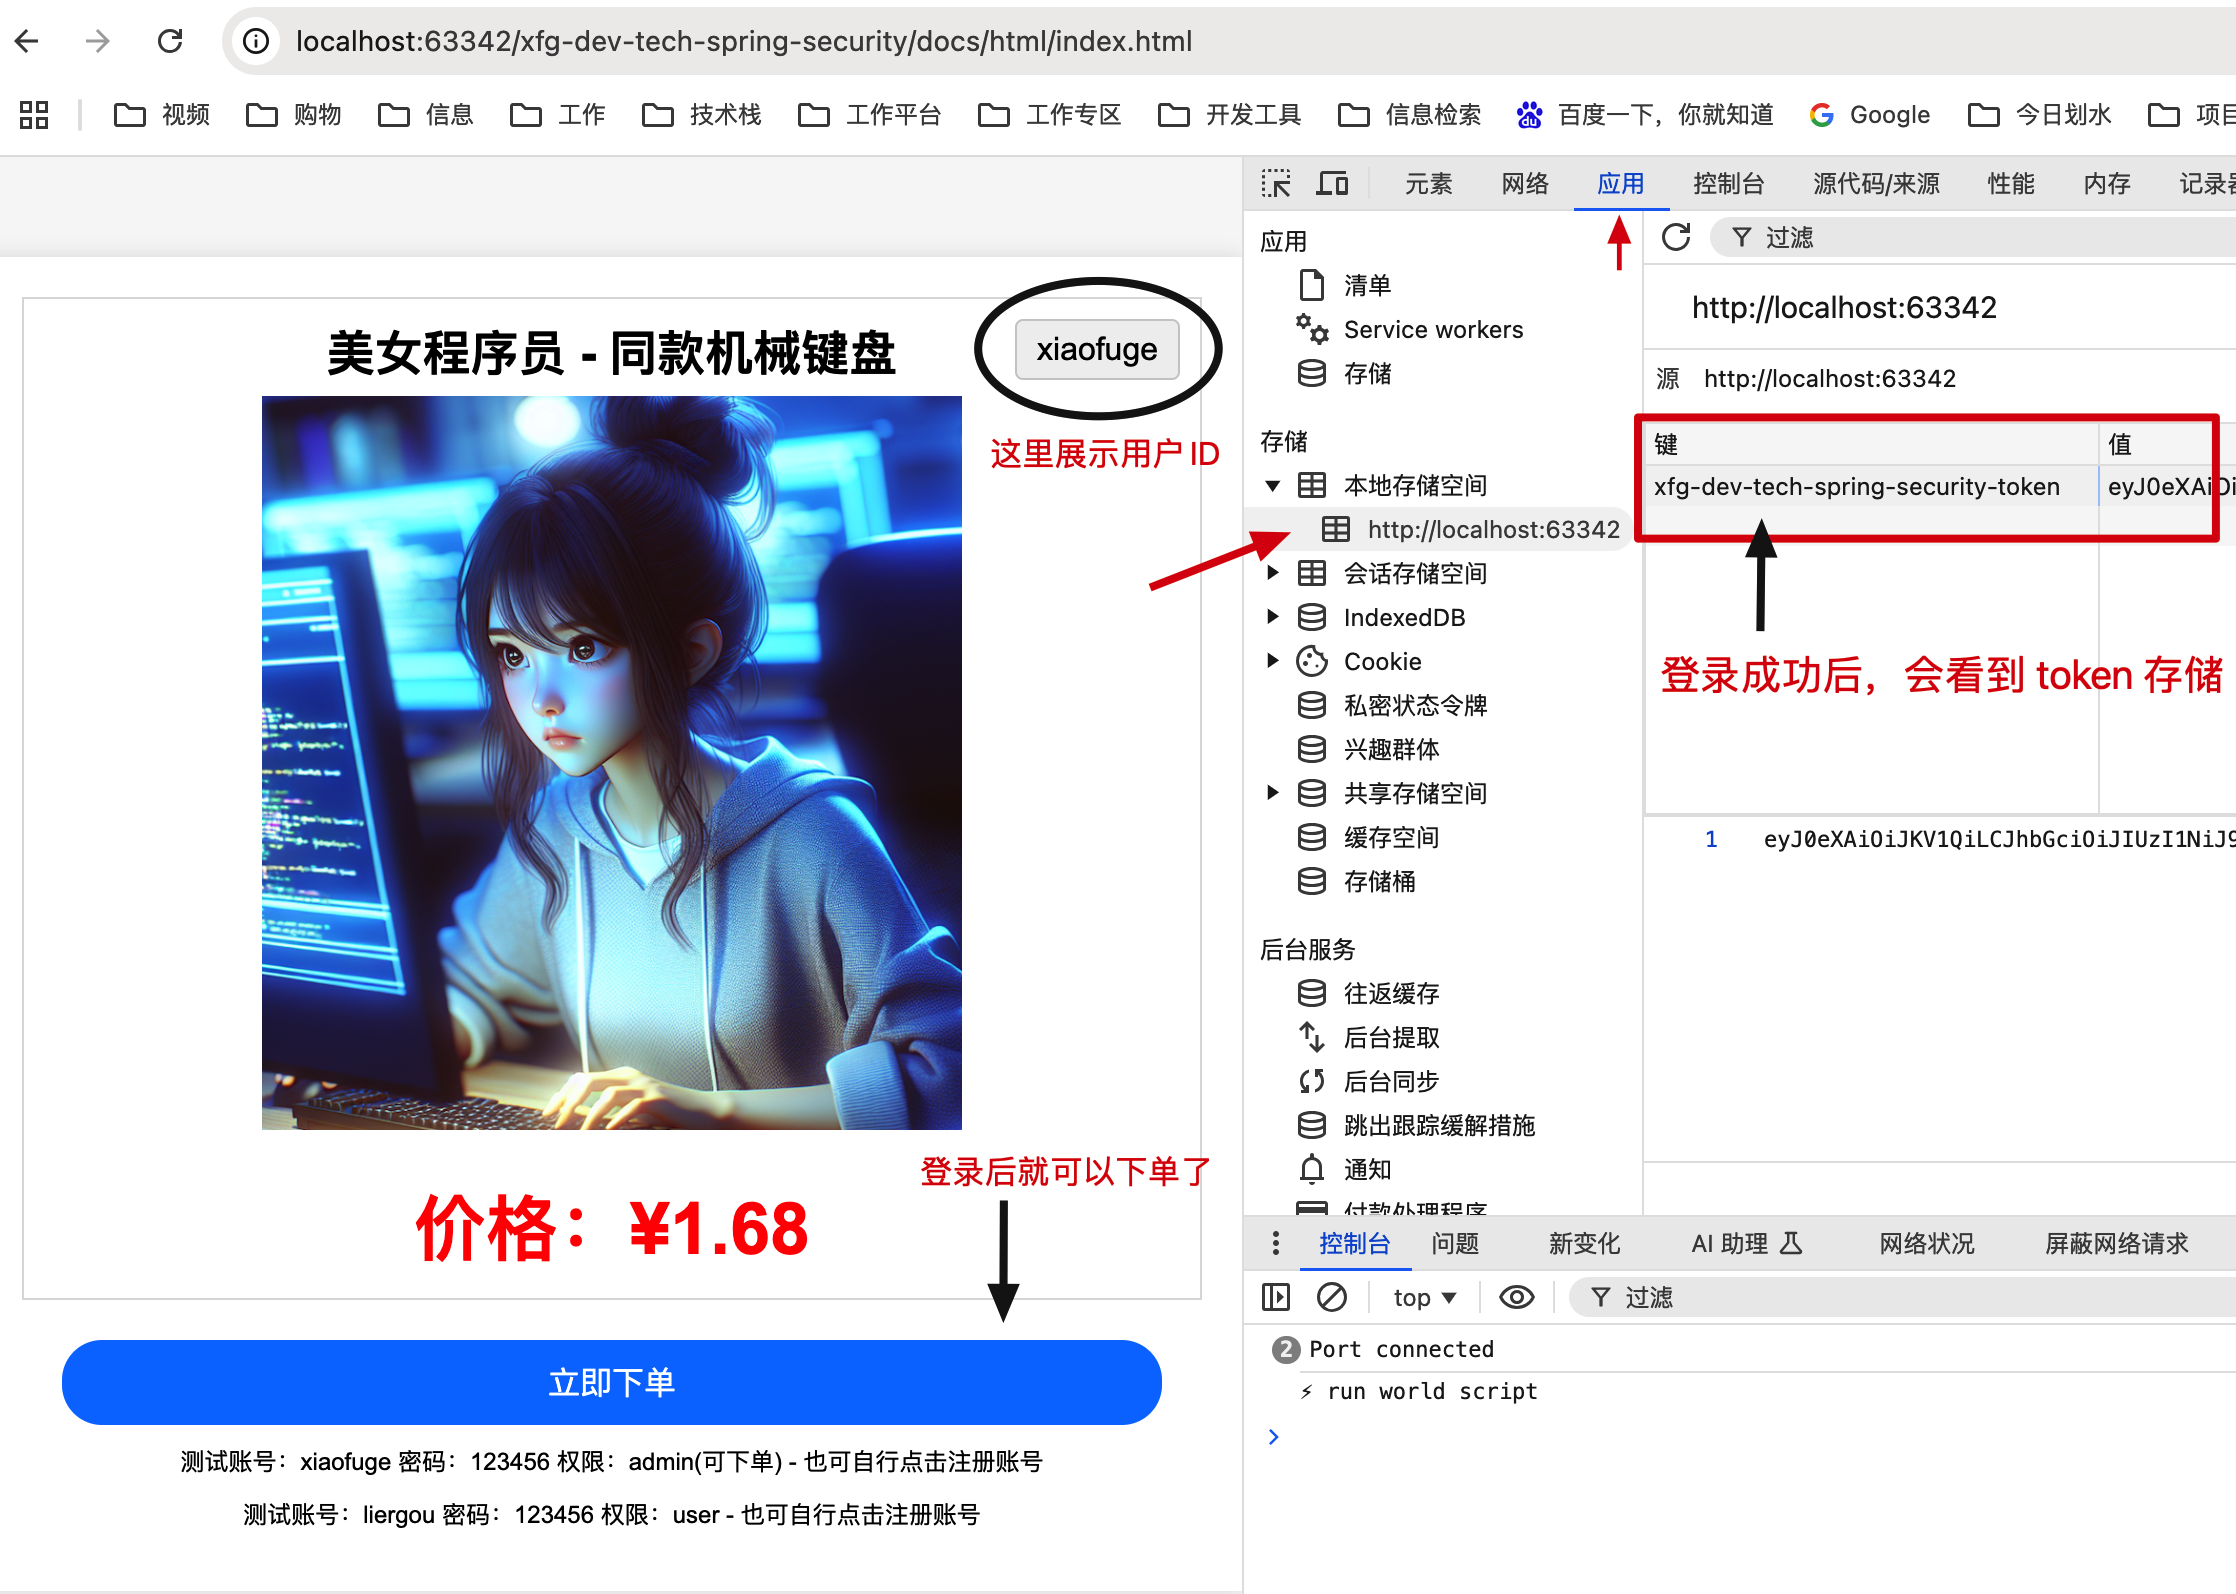
- 登录成功后可以通过浏览器 F12 查看到登录的 Token,如果要取消登录,可以操作代码把 Token 删掉。
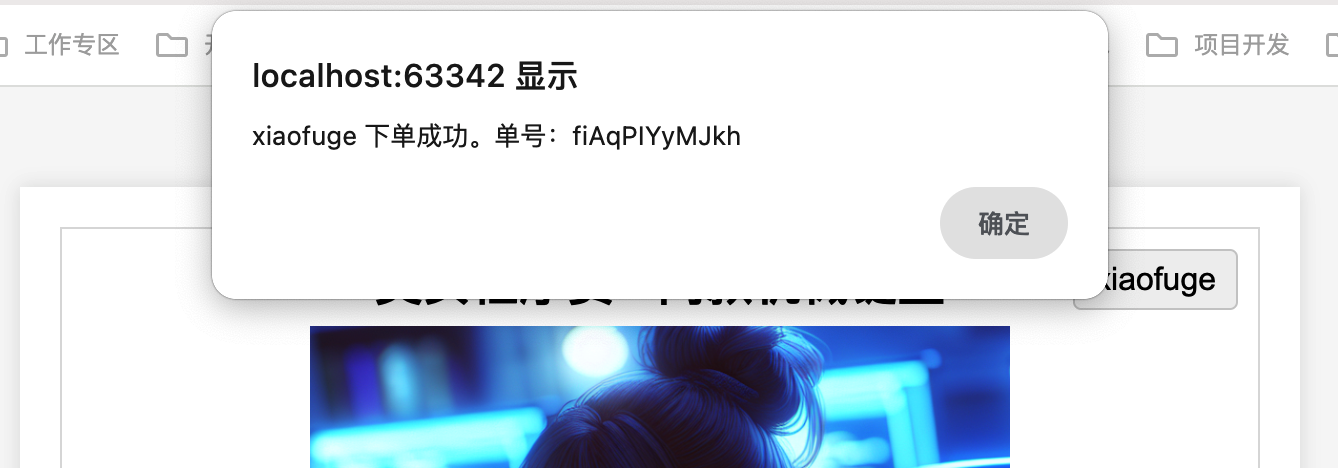
- 登录成功后就可以点击下单了。默认代码的权限配置的是只有 xiaofuge 可以下单,liergou不能下单。
# 2.1 下单通过
24-12-15.11:26:48.606 [http-nio-8091-exec-6] INFO  MallController         - 商品下单,根据商品ID创建支付单开始 userName:xiaofuge productId:100010090091
24-12-15.11:26:57.721 [http-nio-8091-exec-7] INFO  JwtAuthenticationTokenFilter - authToken:eyJ0eXAiOiJKV1QiLCJhbGciOiJIUzI1NiJ9.eyJleHAiOjE3MzQyMzMwMDYsInVzZXJuYW1lIjoieGlhb2Z1Z2UifQ.Dm1Mi_lmm-O9MTte77252ATzNca_2s5bZG_90mdq-48
24-12-15.11:26:59.069 [http-nio-8091-exec-8] INFO  JwtAuthenticationTokenFilter - authToken:eyJ0eXAiOiJKV1QiLCJhbGciOiJIUzI1NiJ9.eyJleHAiOjE3MzQyMzMwMDYsInVzZXJuYW1lIjoieGlhb2Z1Z2UifQ.Dm1Mi_lmm-O9MTte77252ATzNca_2s5bZG_90mdq-48
2
3
# 2.2 下单拒绝
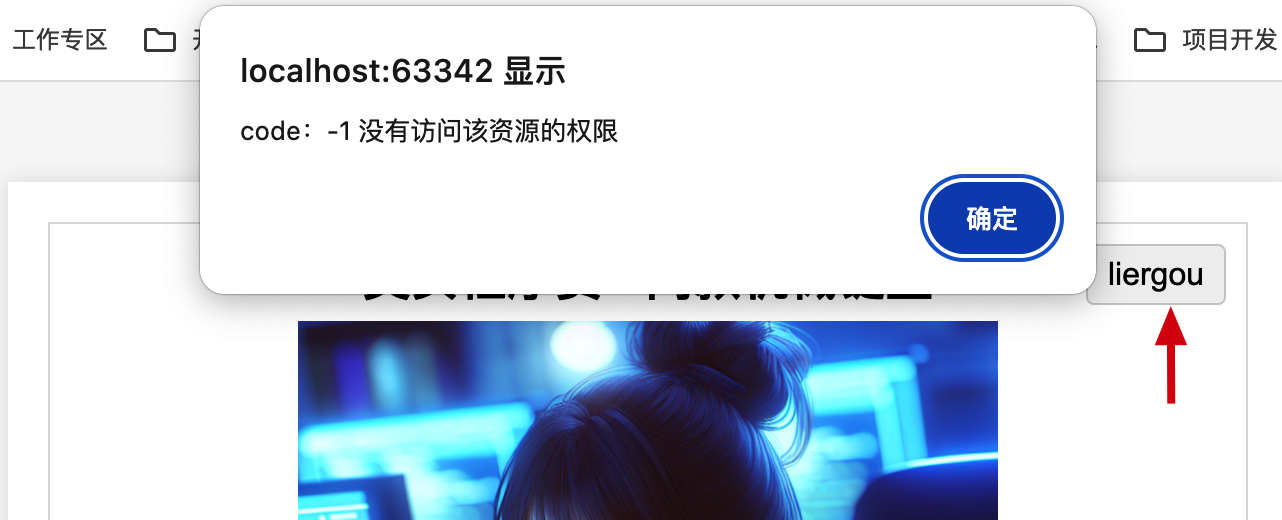
24-12-15.11:26:59.074 [http-nio-8091-exec-8] INFO  MallController         - 商品下单,根据商品ID创建支付单开始 userName:xiaofuge productId:100010090091
24-12-15.11:27:50.157 [http-nio-8091-exec-9] INFO  AuthController         - 登录用户:liergou
24-12-15.11:27:50.393 [http-nio-8091-exec-1] INFO  JwtAuthenticationTokenFilter - authToken:eyJ0eXAiOiJKV1QiLCJhbGciOiJIUzI1NiJ9.eyJleHAiOjE3MzQyMzMzMDAsInVzZXJuYW1lIjoibGllcmdvdSJ9.mVRzMx9tLj6A-oEDRElZwfRslhmP5AE0gQGeA6oI0N4
24-12-15.11:27:51.438 [http-nio-8091-exec-3] INFO  JwtAuthenticationTokenFilter - authToken:eyJ0eXAiOiJKV1QiLCJhbGciOiJIUzI1NiJ9.eyJleHAiOjE3MzQyMzMzMDAsInVzZXJuYW1lIjoibGllcmdvdSJ9.mVRzMx9tLj6A-oEDRElZwfRslhmP5AE0gQGeA6oI0N4
24-12-15.11:27:51.449 [http-nio-8091-exec-3] ERROR AppAccessDeniedHandler - access error
org.springframework.security.access.AccessDeniedException: Access Denied
2
3
4
5
6
- 如日志,当权限拦截后,就会弹出指定的错误码信息。
- 权限拦截是在 AppAccessDeniedHandler 实现类中指定的错误码。

京公网安备 11030102010881号
| GPL Licensed | Copyright © 2019 小傅哥,All rights reserved.