# Google Agent ADK,20分钟,帮你搭建一个简单智能体
作者:小傅哥
博客:https://bugstack.cn (opens new window)
沉淀、分享、成长,让自己和他人都能有所收获!😄
大家好,我是技术UP主小傅哥。
💐 从22年至今,小傅哥已经带着大家做了5个AI类项目,包括;(22年)问答助手、(23年)OpenAI应用(含支付、敏感词过滤)、(24年)AI 代码自动评审、(25年)Ai Agent 智能体、(25年)Ai MCP Gateway 网关。
这些项目也都是结合这,AI 这一年最新的技术动向和应用方向,而做的设计和落地。所以,每次小傅哥都给大家讲了,接下来 AI 将影响的一些场景,也都陆续的发生了。就像,24年11月发布 MCP 协议后,我给大家说,所有互联网企业都将大量的落地 MCP 服务,并开始 Ai Agent 智能体实现(别看市面有 dify、扣子,各个且用还是要做自己的业务智能体)。
随后,25年年初,小傅哥就带着大家开始了 RAG、MCP、Ai Agent 智能体的开发,并告诉大家,以后 Ai Agent 智能体也会出标准的框架,让开发更加容易。这不,谷歌的 ADK 就来了。并且这哥们👬🏻还定义A2A协议。这会让不是那么大型的互联网公司,也会具备 Ai Agent 智能体开发的能力。
接下来的几年,所有的业务项目,都会以 Ai Agent 智能体翻一遍,程序员新增的岗位和工作量仍然会很多。因为在咱们这,你做的越快,你就得做的越多!
接下来,小傅哥就带着大家做一下 Google ADK 搭建 AI Agent。如果你感兴趣 AI 类项目,还可以在文末获取全部实战项目源码,深度积累此类技术内容。文末有Google ADK 运行效果,交互式对话智能体,对 ELK 进行巡检分析。
# 一、官网资料
- 官网:https://google.github.io/adk-docs/ (opens new window)
- 搭建:https://google.github.io/adk-docs/get-started/ (opens new window)

- ADK 以轻便化构建 Ai Agent 智能体,解决智能体开发的复杂流程而设计。目前支持 Python、Java、Go 3种语言对应的技术框架。
- 整个文档完整的描述了,智能体的创建和运行、工具的调用(tools、function、mcp)、可观测性以及 A2A 协议等。
- Agent Development Kit (ADK) is designed to empower developers to quickly build, manage, evaluate and deploy AI-powered agents. These quick start guides get you set up and running a simple agent in less than 20 minutes.
# 二、工程实践
# 1. 前置说明
本次的 Ai Agent 实践,是以 Google ADK 框架为基础,配和 Github system-prompts-and-models-of-ai-tools (opens new window) 开源提示词项目中的 claude-code-system-prompt 作为必要描述。来实验,ELK 系统日志智能分析场景。
- API Key:https://ai.google.dev/gemini-api (opens new window) 需要申请开发 API 秘钥,是免费的。
- Docker 环境,本项目部署了一套 ELK 日志服务,基于 Docker 部署,之后对 ELK 模拟写入日志,让 Ai Agent 智能体进行分析。
如果暂时配置不了,可以在测试的时候去掉这部分 mcp 服务 JDK 17+、Maven 3.8.x
# 2. 工程说明
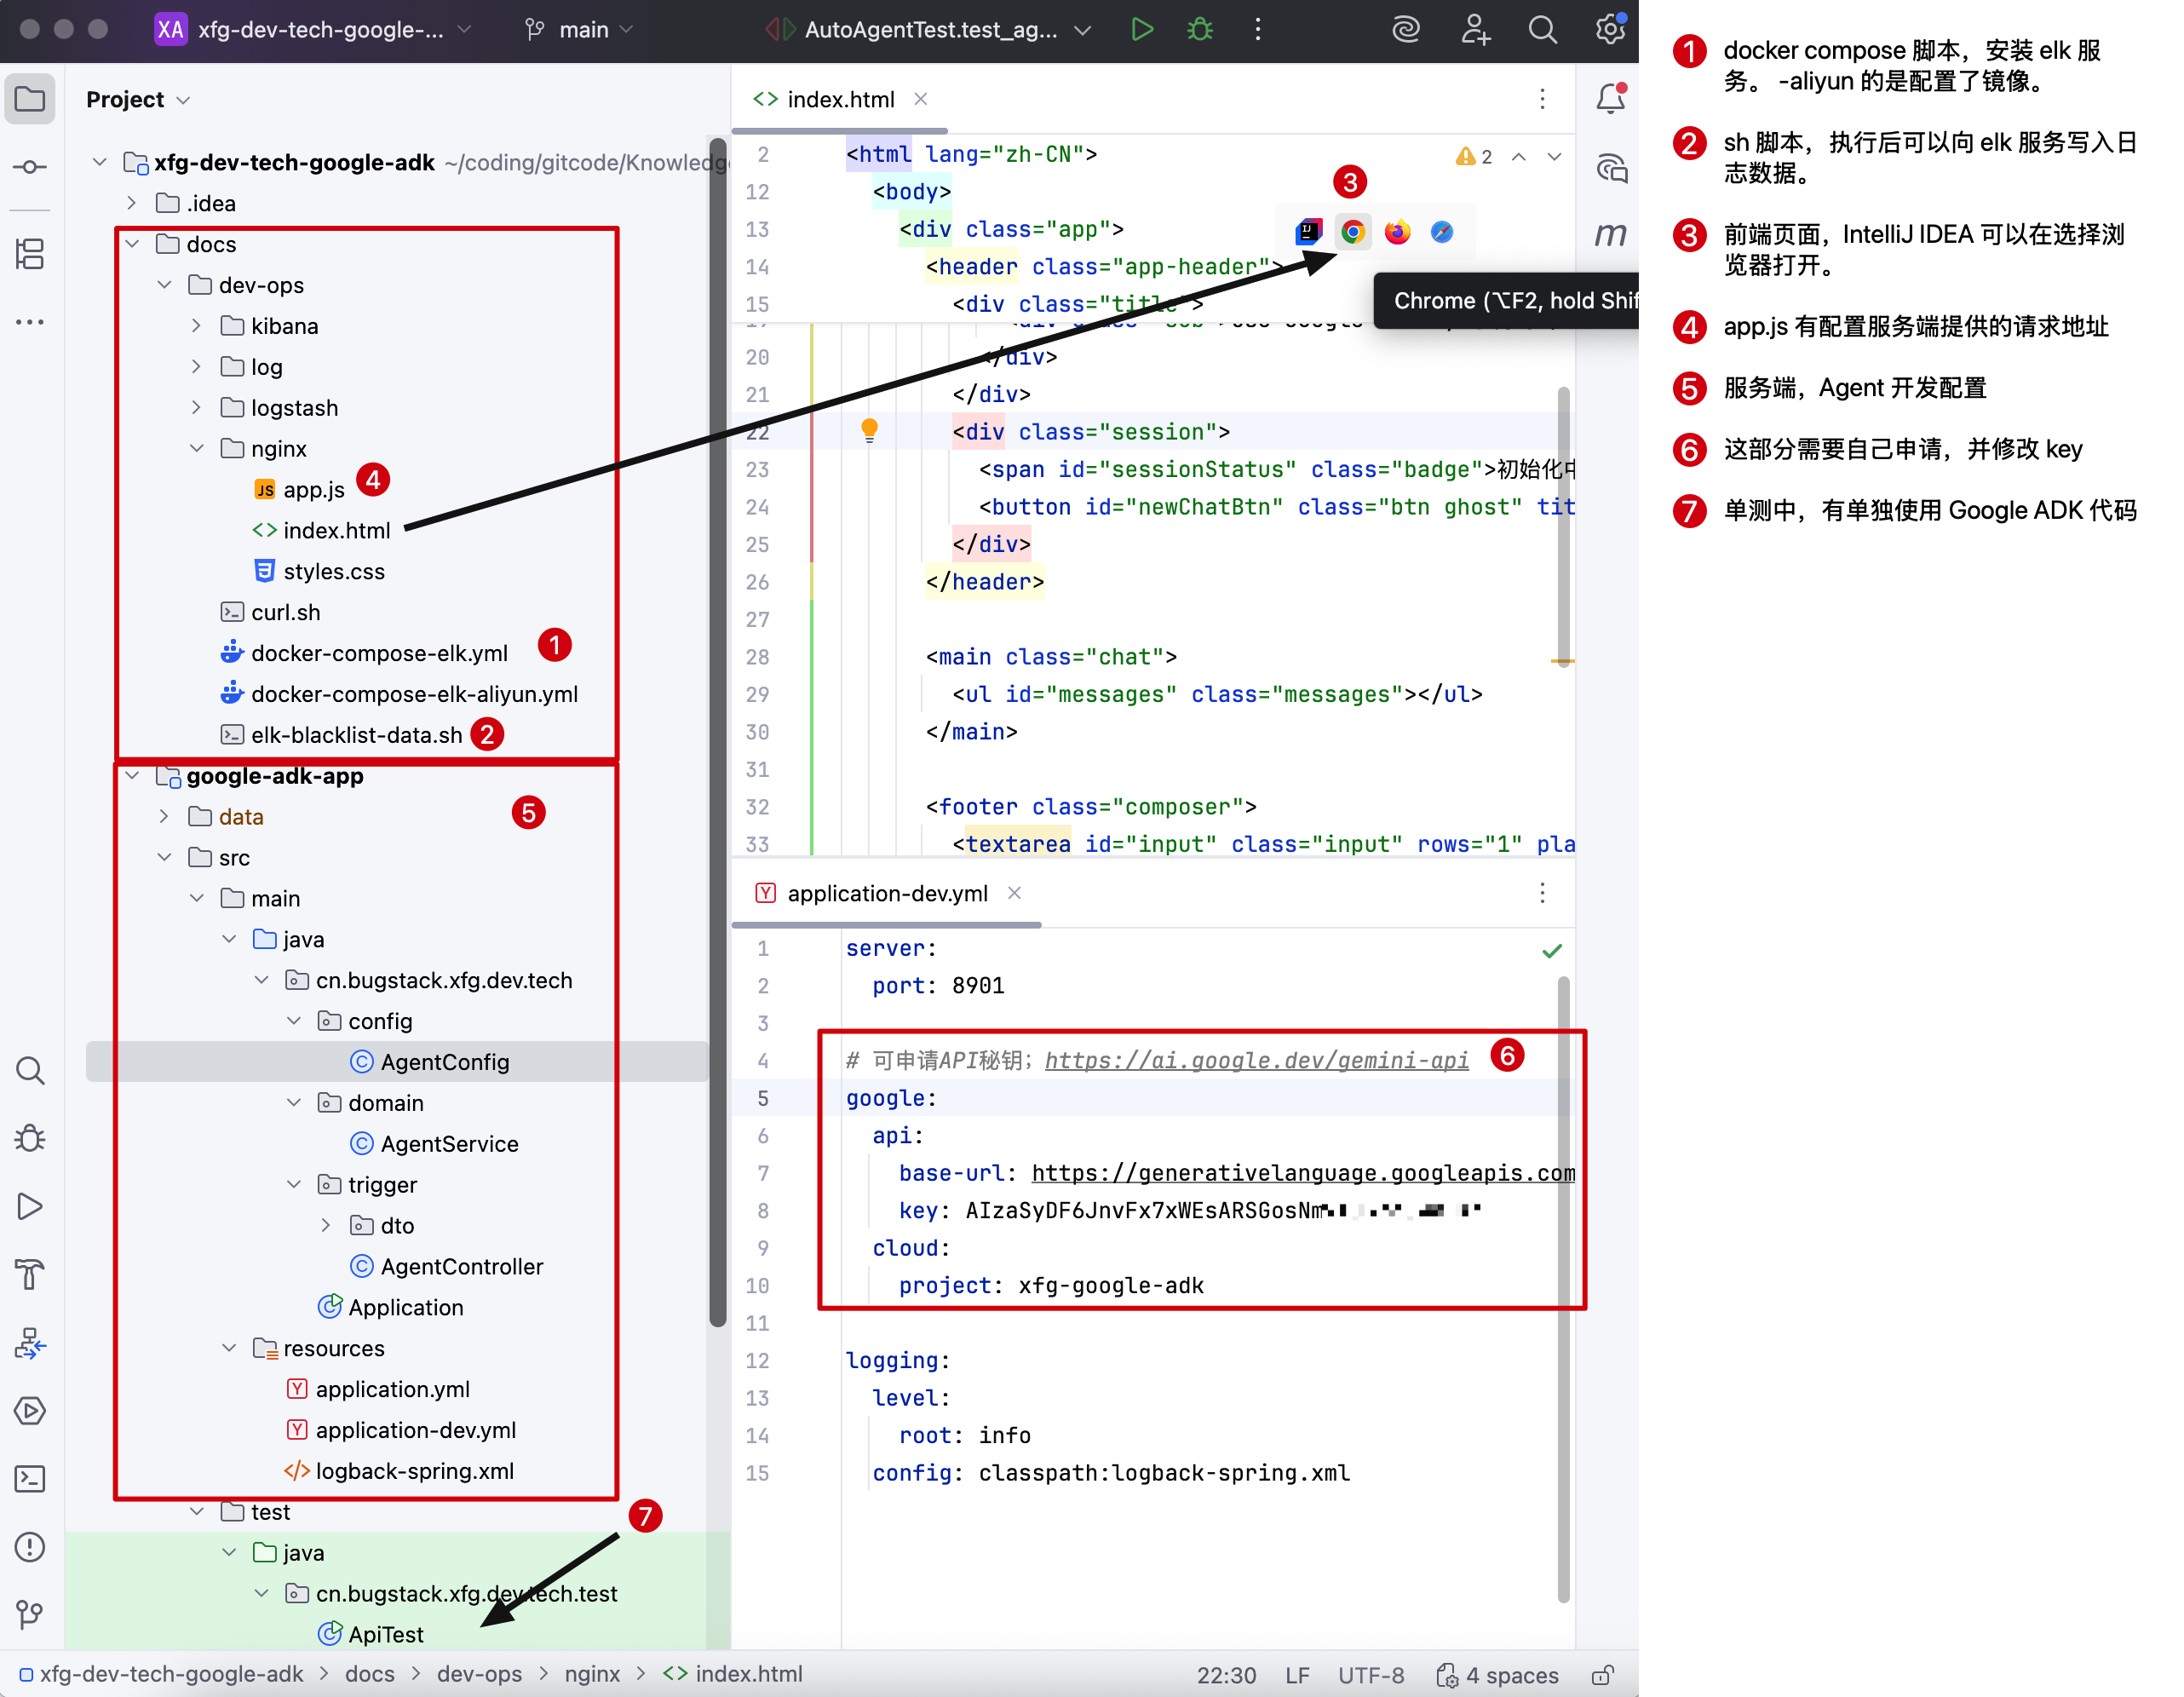
- 工程地址:https://github.com/fuzhengwei/xfg-dev-tech-google-adk (opens new window)
- 这是一套引入了 Google ADK 0.1.0 版本的 Agent 最基础智能体测试。如果需要扩展,还要额外增加很多东西,可以参考 《Ai Agent 智能体项目》 (opens new window)
# 2.1 YML 配置
server:
  port: 8901

# 可申请API秘钥;https://ai.google.dev/gemini-api
google:
  api:
    base-url: https://generativelanguage.googleapis.com
    key: AIzaSyDF6JnvFx7xWEsARS*******可以自己申请免费的
  cloud:
    project: xfg-google-adk

logging:
  level:
    root: info
  config: classpath:logback-spring.xml
2
3
4
5
6
7
8
9
10
11
12
13
14
15
- 在
application-dev.yml修改你的参数配置,配置你的 Google api key
# 2.2 ADK 单测
import com.google.adk.agents.LlmAgent;
import com.google.adk.events.Event;
import com.google.adk.models.Gemini;
import com.google.adk.runner.InMemoryRunner;
import com.google.adk.sessions.Session;
import com.google.genai.Client;
import com.google.genai.types.Content;
import com.google.genai.types.HttpOptions;
import com.google.genai.types.Part;
import io.reactivex.rxjava3.core.Flowable;

public class ApiTest {

    /**
     * 可申请免费测试api
     * https://ai.google.dev/gemini-api/docs/quickstart?hl=zh-cn#apps-script
     */
    public static void main(String[] args) {
        LlmAgent agent = LlmAgent.builder()
                .name("test")
                .description("test agent help user do work")
                .model(Gemini.builder()
                        .apiClient(Client.builder()
                                .apiKey("AIzaSyDF6JnvFx7xWEsARSGosNmvTU3ZoCwo-mc")
                                .httpOptions(HttpOptions
                                        .builder()
                                        .baseUrl("https://generativelanguage.googleapis.com")
                                        .timeout(500000)
                                        .build())
                                .build())
                        .modelName("gemini-2.0-flash")
                        .build())
                .build();

        InMemoryRunner runner = new InMemoryRunner(agent);

        Session session = runner
                .sessionService()
                .createSession("test", "xiaofuge")
                .blockingGet();

        Flowable<Event> events = runner.runAsync("xiaofuge", session.id(), Content.fromParts(Part.fromText("hi agent can you help me")));

        System.out.print("\nAgent > ");
        events.blockingForEach(event -> System.out.println(event.stringifyContent()));

    }

}
2
3
4
5
6
7
8
9
10
11
12
13
14
15
16
17
18
19
20
21
22
23
24
25
26
27
28
29
30
31
32
33
34
35
36
37
38
39
40
41
42
43
44
45
46
47
48
49
Agent > Hi there! Yes, I'm here to help. To best assist you, could you tell me what you need help with? The more information you give me, the better I can understand your request and provide a useful response.
- 这是一套最基础的 Ai Agent 智能体 ADK 的测试使用代码。其实它的配置和调用与 Spring AI 框架是有类似之处的,基本上这类框架也都是这样的使用模式。
- LlmAgent 提供了一整套构建智能体的方式,可以设置客户端(Gemini),并设置相关的 baseUrl、apiKey 参数,以及模型和超时时间等。
- InMemoryRunner 的用途是把 Agent 放入一个记忆执行里,让一整个 Session 会话下的执行都被记录下,这样才能记录上下文。
- 之后就是放到响应框架进行之后和拿到最后结果啦。
# 2.3 Agent 智能体测试
@Slf4j
@RunWith(SpringRunner.class)
@SpringBootTest
public class AutoAgentTest {

    @Value("${google.api.base-url}")
    private String baseUrl;

    @Value("${google.api.key}")
    private String apiKey;

    private static final String USER_ID = "xiaofuge";
    private static final String NAME = "multi_tool_agent";

    public static BaseAgent agent;

    @Before
    public void init() {
        List<McpTool> mcpTools = new ArrayList<>();
        mcpTools.addAll(mcp_elk());
        mcpTools.addAll(mcp_filesystem());

        agent = LlmAgent.builder()
                .name(NAME)
                .model(Gemini.builder()
                        .apiClient(Client.builder()
                                .apiKey(apiKey)
                                .httpOptions(HttpOptions
                                        .builder()
                                        .baseUrl(baseUrl)
                                        .timeout(500000)
                                        .build())
                                .build())
                        .modelName("gemini-2.0-flash")
                        .build())
                .description("You are an interactive CLI tool that helps users with software engineering tasks. Use the instructions below and the tools available to you to assist the user.")
                .instruction(
                        """
                                 You are an interactive CLI tool that helps users with software engineering tasks. Use the instructions below and the tools available to you to assist the user.

                                 可以在这里复制全部提示词;https://github.com/x1xhlol/system-prompts-and-models-of-ai-tools/blob/main/Claude%20Code/claude-code-system-prompt.txt
                                """)
                .tools(mcpTools)
                .build();
    }

    /**
     * - 需要配置后,才能在单测控制台输入内容
     * IntelliJ IDEA Help -> Edit Custom VM Options -> -Deditable.java.test.console=true
     * <br/>
     * - <a href="https://ai.google.dev/api">ai.google.dev/api</a>
     */
    @Test
    public void test_agent() {
        InMemoryRunner runner = new InMemoryRunner(agent);

        Session session =
                runner
                        .sessionService()
                        .createSession(NAME, USER_ID)
                        .blockingGet();

        try (Scanner scanner = new Scanner(System.in, StandardCharsets.UTF_8)) {
            while (true) {
                System.out.print("\nYou > ");
                String userInput = scanner.nextLine();

                if ("quit".equalsIgnoreCase(userInput)) {
                    break;
                }

                Content userMsg = Content.fromParts(Part.fromText(userInput));
                Flowable<Event> events = runner.runAsync(USER_ID, session.id(), userMsg);

                System.out.print("\nAgent > ");
                events.blockingForEach(event -> System.out.println(event.stringifyContent()));
            }
        }

    }

    private List<McpTool> mcp_elk() {
        Map<String, String> env = new HashMap<>();
        env.put("ES_HOST", "http://127.0.0.1:9200");
        env.put("ES_API_KEY", "none");

        ServerParameters mcp_elk = ServerParameters.builder("npx")
                .args(List.of(
                        "-y",
                        "@awesome-ai/elasticsearch-mcp"
                ))
                .env(env)
                .build();

        CompletableFuture<McpToolset.McpToolsAndToolsetResult> futureResult =
                McpToolset.fromServer(mcp_elk, JsonBaseModel.getMapper());

        McpToolset.McpToolsAndToolsetResult result = futureResult.join();

        return result.getTools();
    }

    private List<McpTool> mcp_filesystem() {
        ServerParameters mcp_filesystem = ServerParameters.builder("npx")
                .args(List.of(
                        "-y",
                        "@modelcontextprotocol/server-filesystem",
                        "/Users/fuzhengwei/Desktop"
                ))
                .build();

        CompletableFuture<McpToolset.McpToolsAndToolsetResult> futureResult =
                McpToolset.fromServer(mcp_filesystem, JsonBaseModel.getMapper());

        McpToolset.McpToolsAndToolsetResult result = futureResult.join();

        return result.getTools();
    }

}
2
3
4
5
6
7
8
9
10
11
12
13
14
15
16
17
18
19
20
21
22
23
24
25
26
27
28
29
30
31
32
33
34
35
36
37
38
39
40
41
42
43
44
45
46
47
48
49
50
51
52
53
54
55
56
57
58
59
60
61
62
63
64
65
66
67
68
69
70
71
72
73
74
75
76
77
78
79
80
81
82
83
84
85
86
87
88
89
90
91
92
93
94
95
96
97
98
99
100
101
102
103
104
105
106
107
108
109
110
111
112
113
114
115
116
117
118
119
120
- AutoAgentTest 智能体,配置了两个 mcp,mcp_elk、mcp_filesystem 服务。其实 AI Agent 智能体,都少不了 MCP 服务的加持,这样才能让这个大脑有手脚可以行动起来。
- init 初始化阶段,instruction 配置了对应的智能体提示词,这部分很重要,有点像智能体的神经。https://github.com/x1xhlol/system-prompts-and-models-of-ai-tools/blob/main/Claude%20Code/claude-code-system-prompt.txt (opens new window) - 可以选择这里的提示词配置到智能体进行测试。
- 这部分也可以运行测试,之后会你可以进行提问。注意,如果你没有配置 elk,那么可以删掉
mcpTools.addAll(mcp_elk());代码。 - mcp_filesystem() 配置了,
/Users/fuzhengwei/Desktop你需要修改为你的本地的有权限访问的地址。
# 2.4 Agent 智能体服务
有了前面的案例测试基础,就可以把服务配置成对应的接口,以及开发个简单的页面进行对接验证了。
# 2.4.1 服务接口
@Slf4j
@RestController
@RequestMapping("/trigger")
@CrossOrigin(origins = "*")
public class AgentController {

    private final AgentService agentService;

    public AgentController(AgentService agentService) {
        this.agentService = agentService;
    }

    @PostMapping(path = "/session", consumes = MediaType.APPLICATION_JSON_VALUE, produces = MediaType.APPLICATION_JSON_VALUE)
    public CreateSessionResponse createSession(@RequestBody CreateSessionRequest req) {
        String sessionId = agentService.createOrGetSession(req.getUserId());
        log.info("创建会话ID:{}", sessionId);
        return new CreateSessionResponse(sessionId);
    }

    @PostMapping(path = "/chat", consumes = MediaType.APPLICATION_JSON_VALUE, produces = MediaType.APPLICATION_JSON_VALUE)
    public ChatResponse chat(@RequestBody ChatRequest req) {
        String sessionId = req.getSessionId();
        if (sessionId == null || sessionId.isEmpty()) {
            sessionId = agentService.createOrGetSession(req.getUserId());
        }
        log.info("使用会话ID:{}", sessionId);
        List<String> outputs = agentService.chat(req.getUserId(), sessionId, req.getMessage());
        return new ChatResponse(sessionId, String.join("\n", outputs));
    }
}
2
3
4
5
6
7
8
9
10
11
12
13
14
15
16
17
18
19
20
21
22
23
24
25
26
27
28
29
30
- 这里就是把单测的服务,包装成接口。详细的部分可以直接看工程代码。
# 2.4.2 页面对接
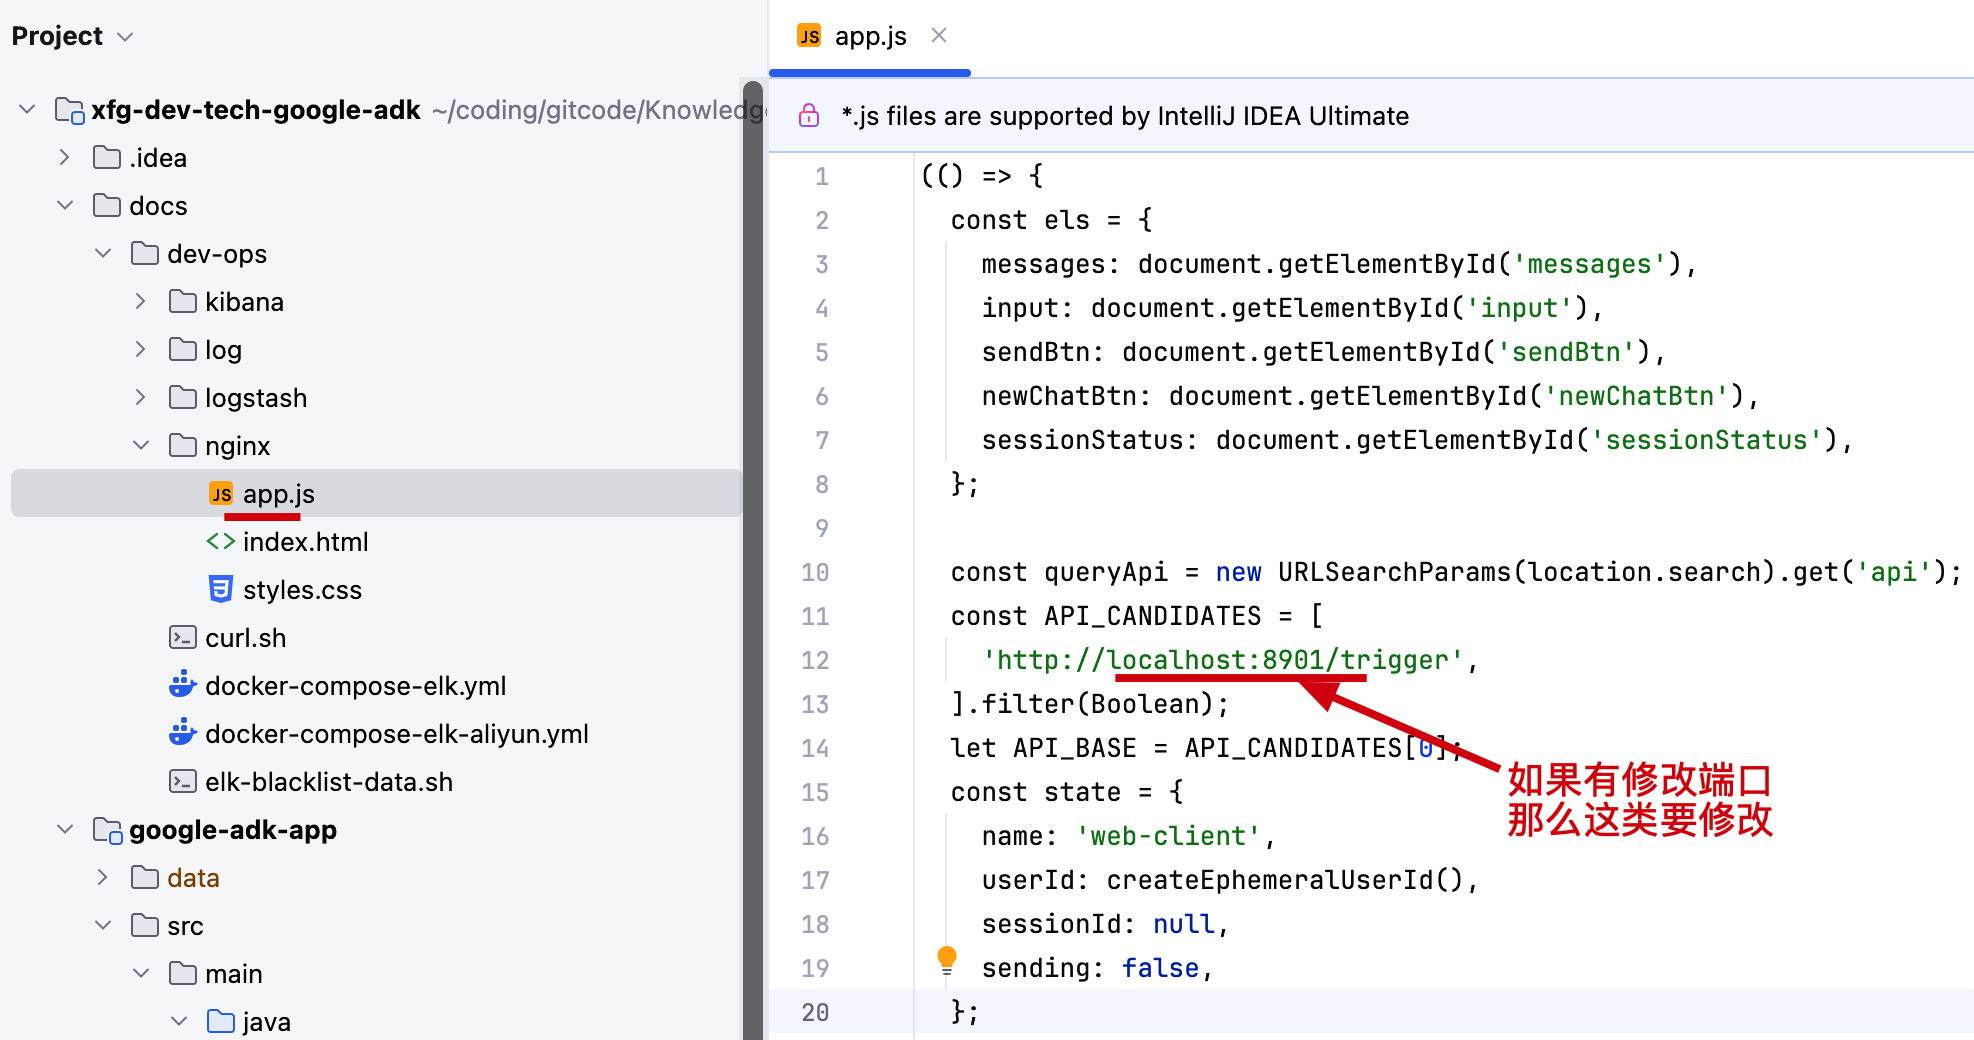
- 把服务端的接口对接到页面。
# 三、功能测试
# 1. 部署 elk 日志服务
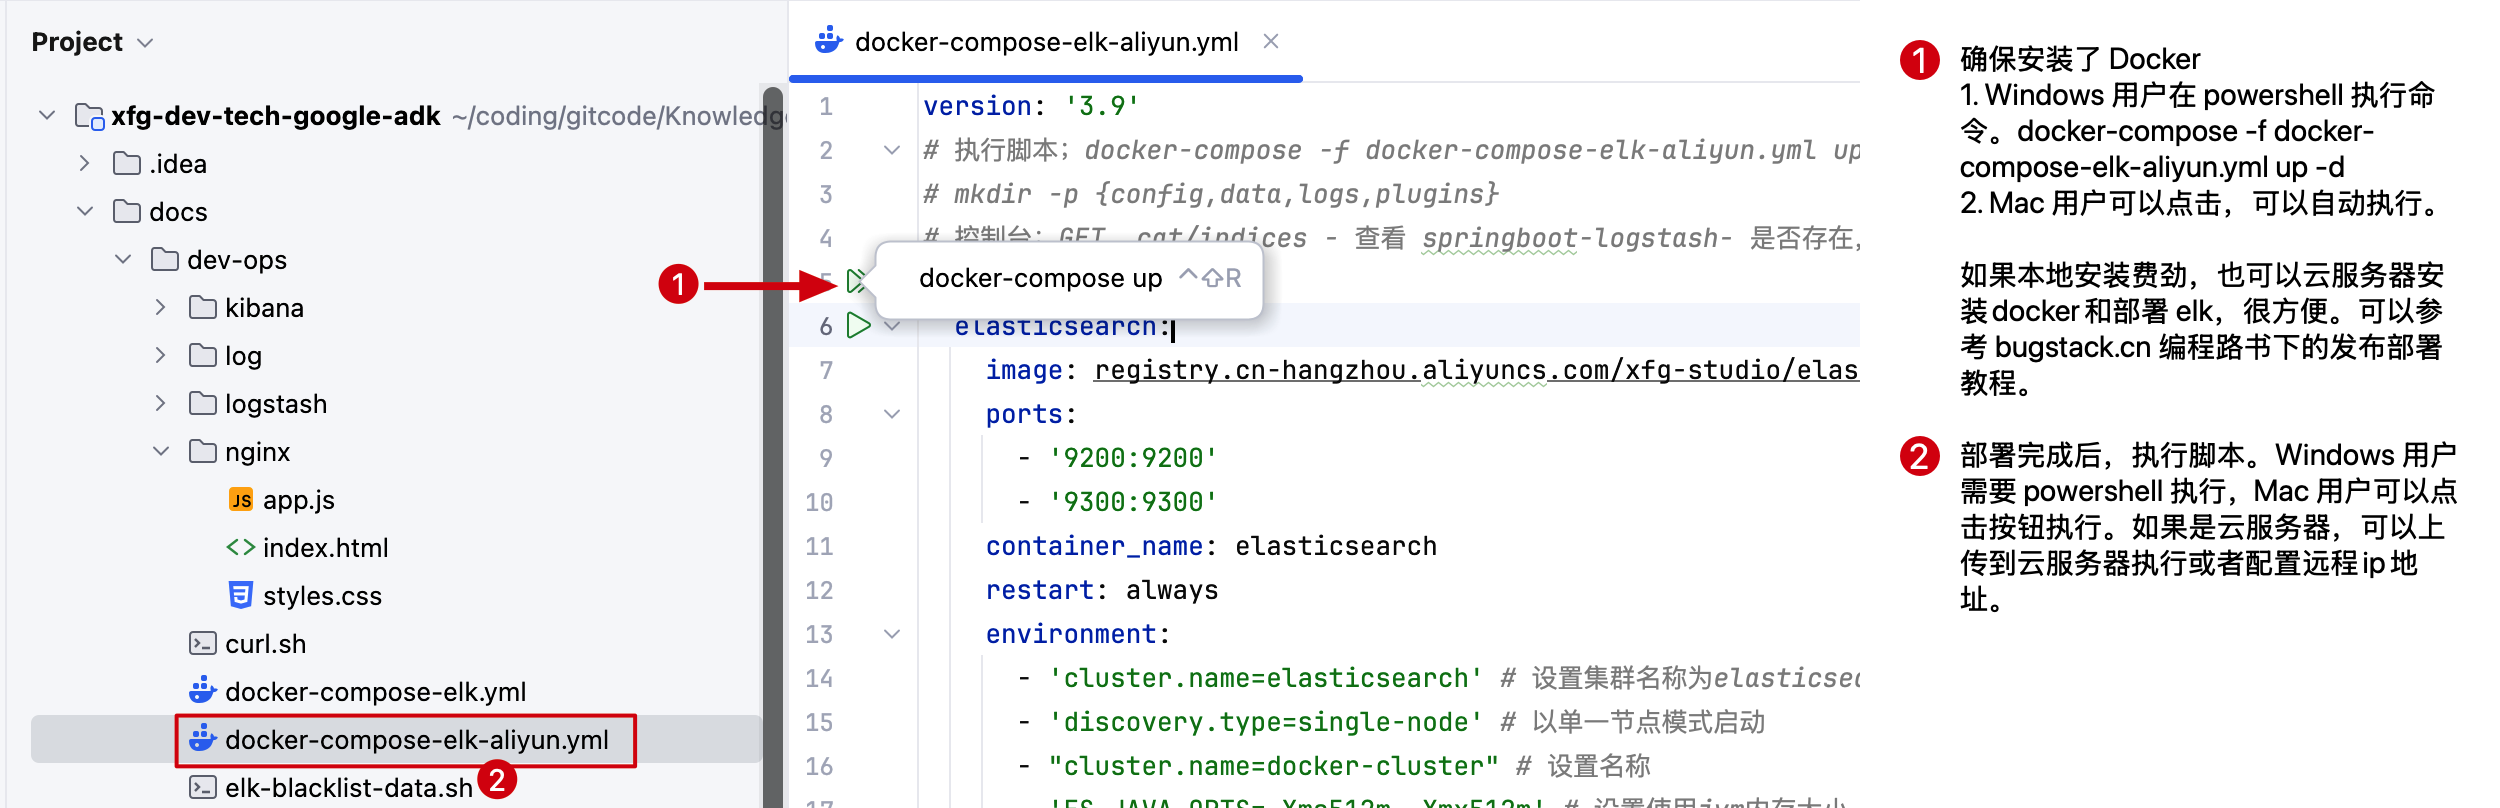
- 整个 Ai Agent 案例,配置了 ELK 作为日志分析的基础,所以最好配置下。
- 这里也有云服务器的部署操作,也可以参考教程来部署。教程:https://bugstack.cn/md/road-map/docker-install.html (opens new window)
- 注意配置完成后,要执行
elk-blacklist-data.sh模拟的写入进去一些日志,这样才能用于分析使用。
# 2. 启动服务访问页面
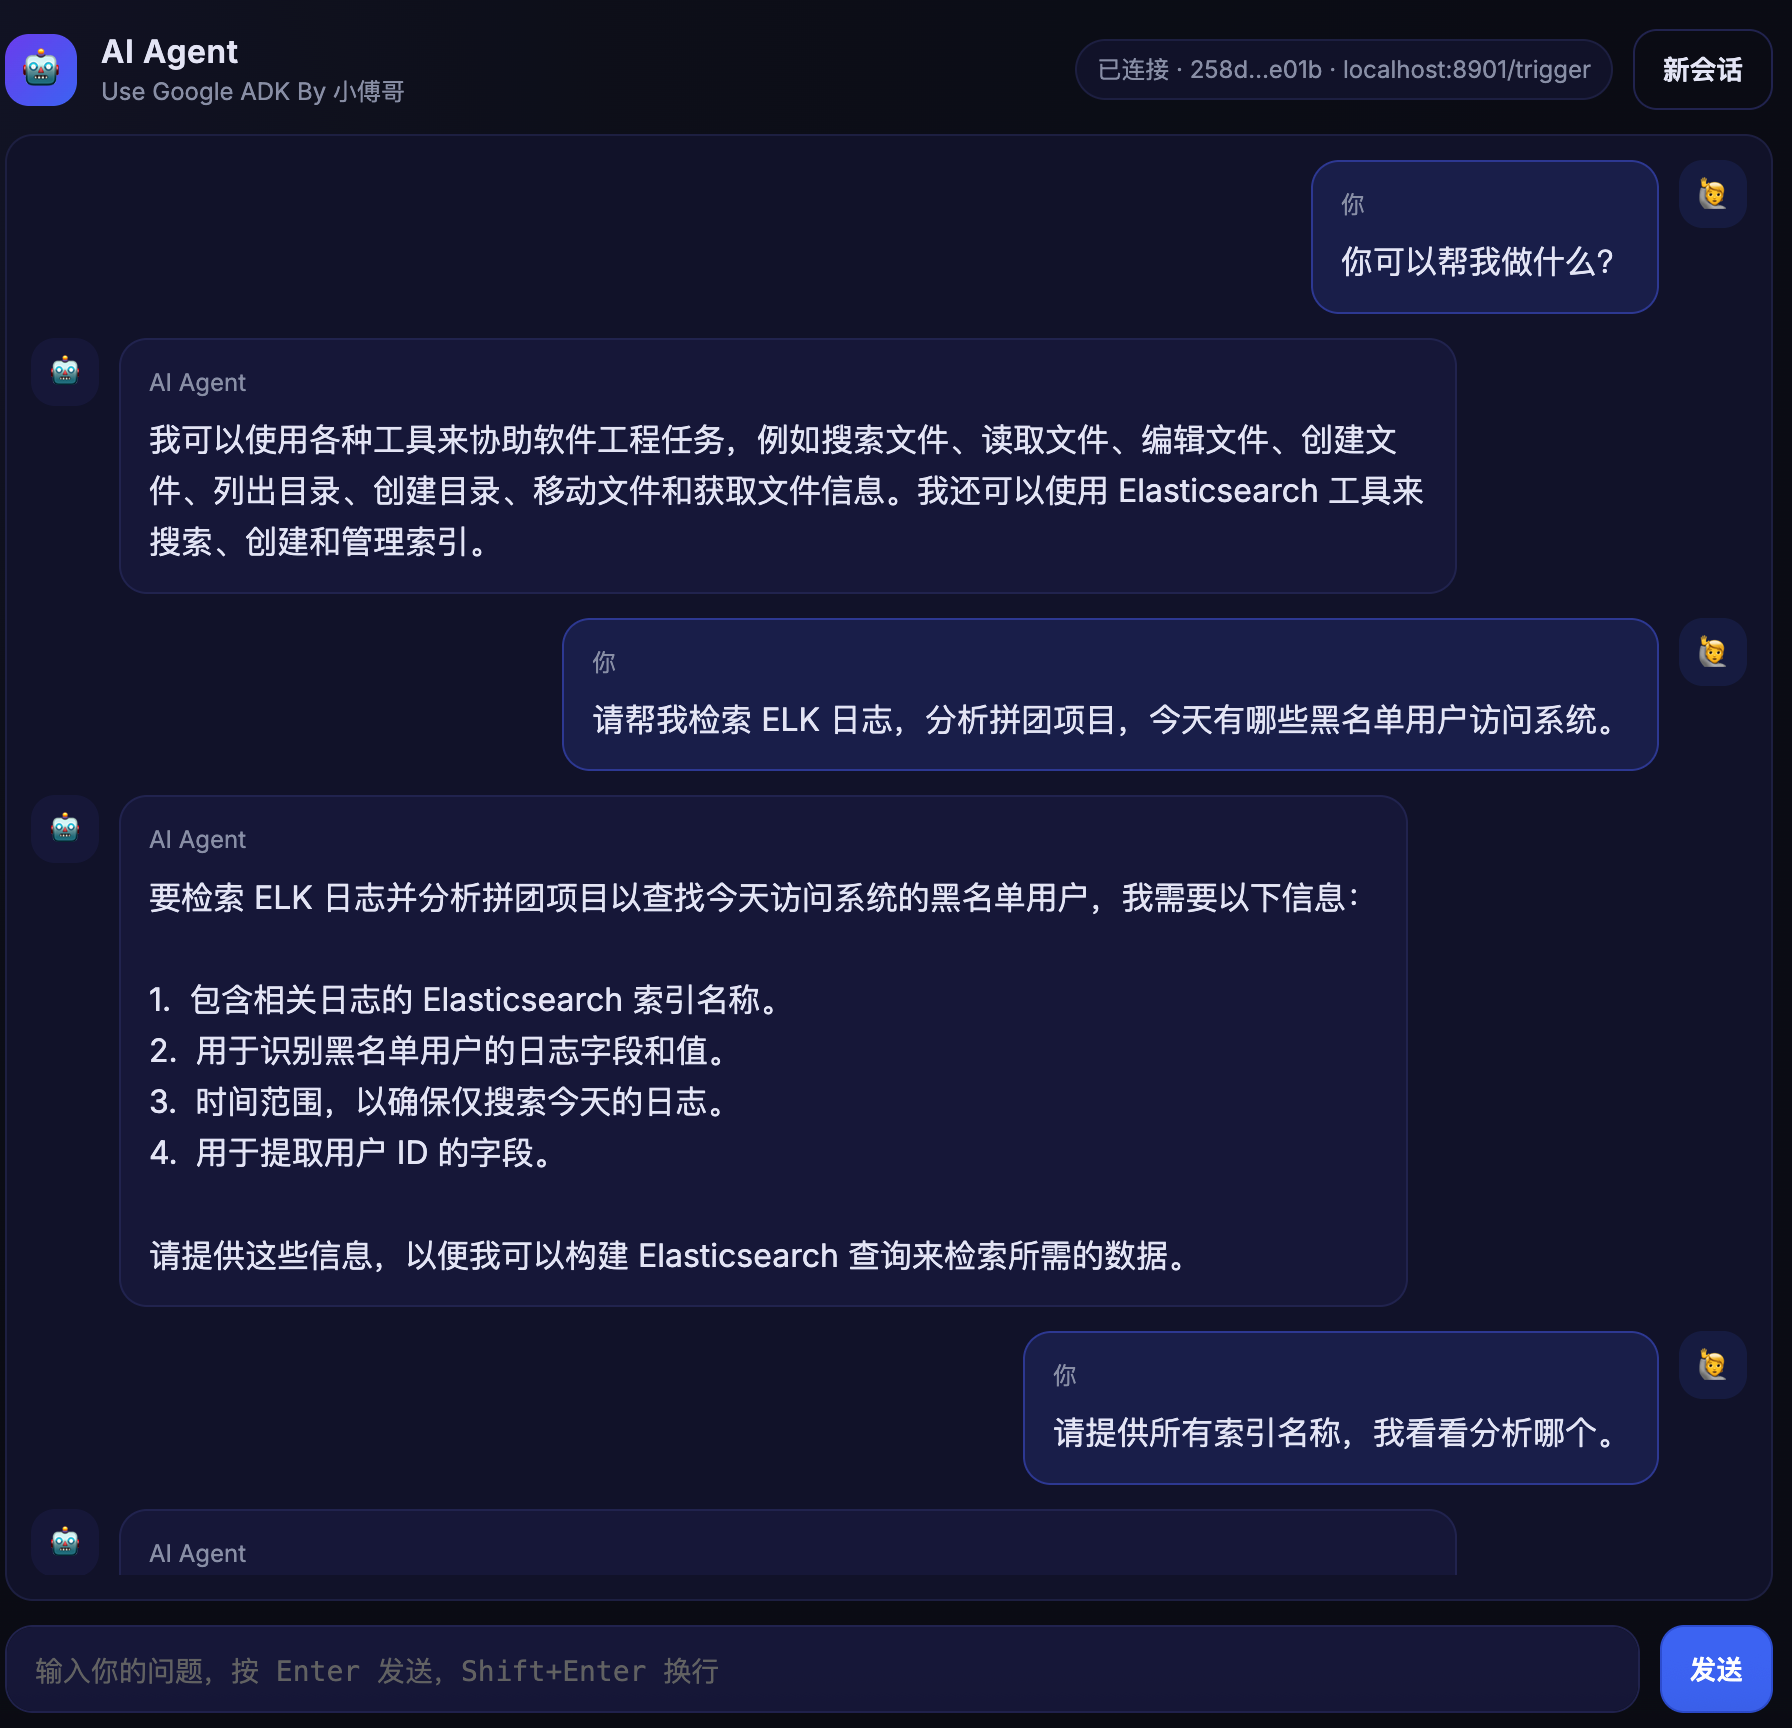
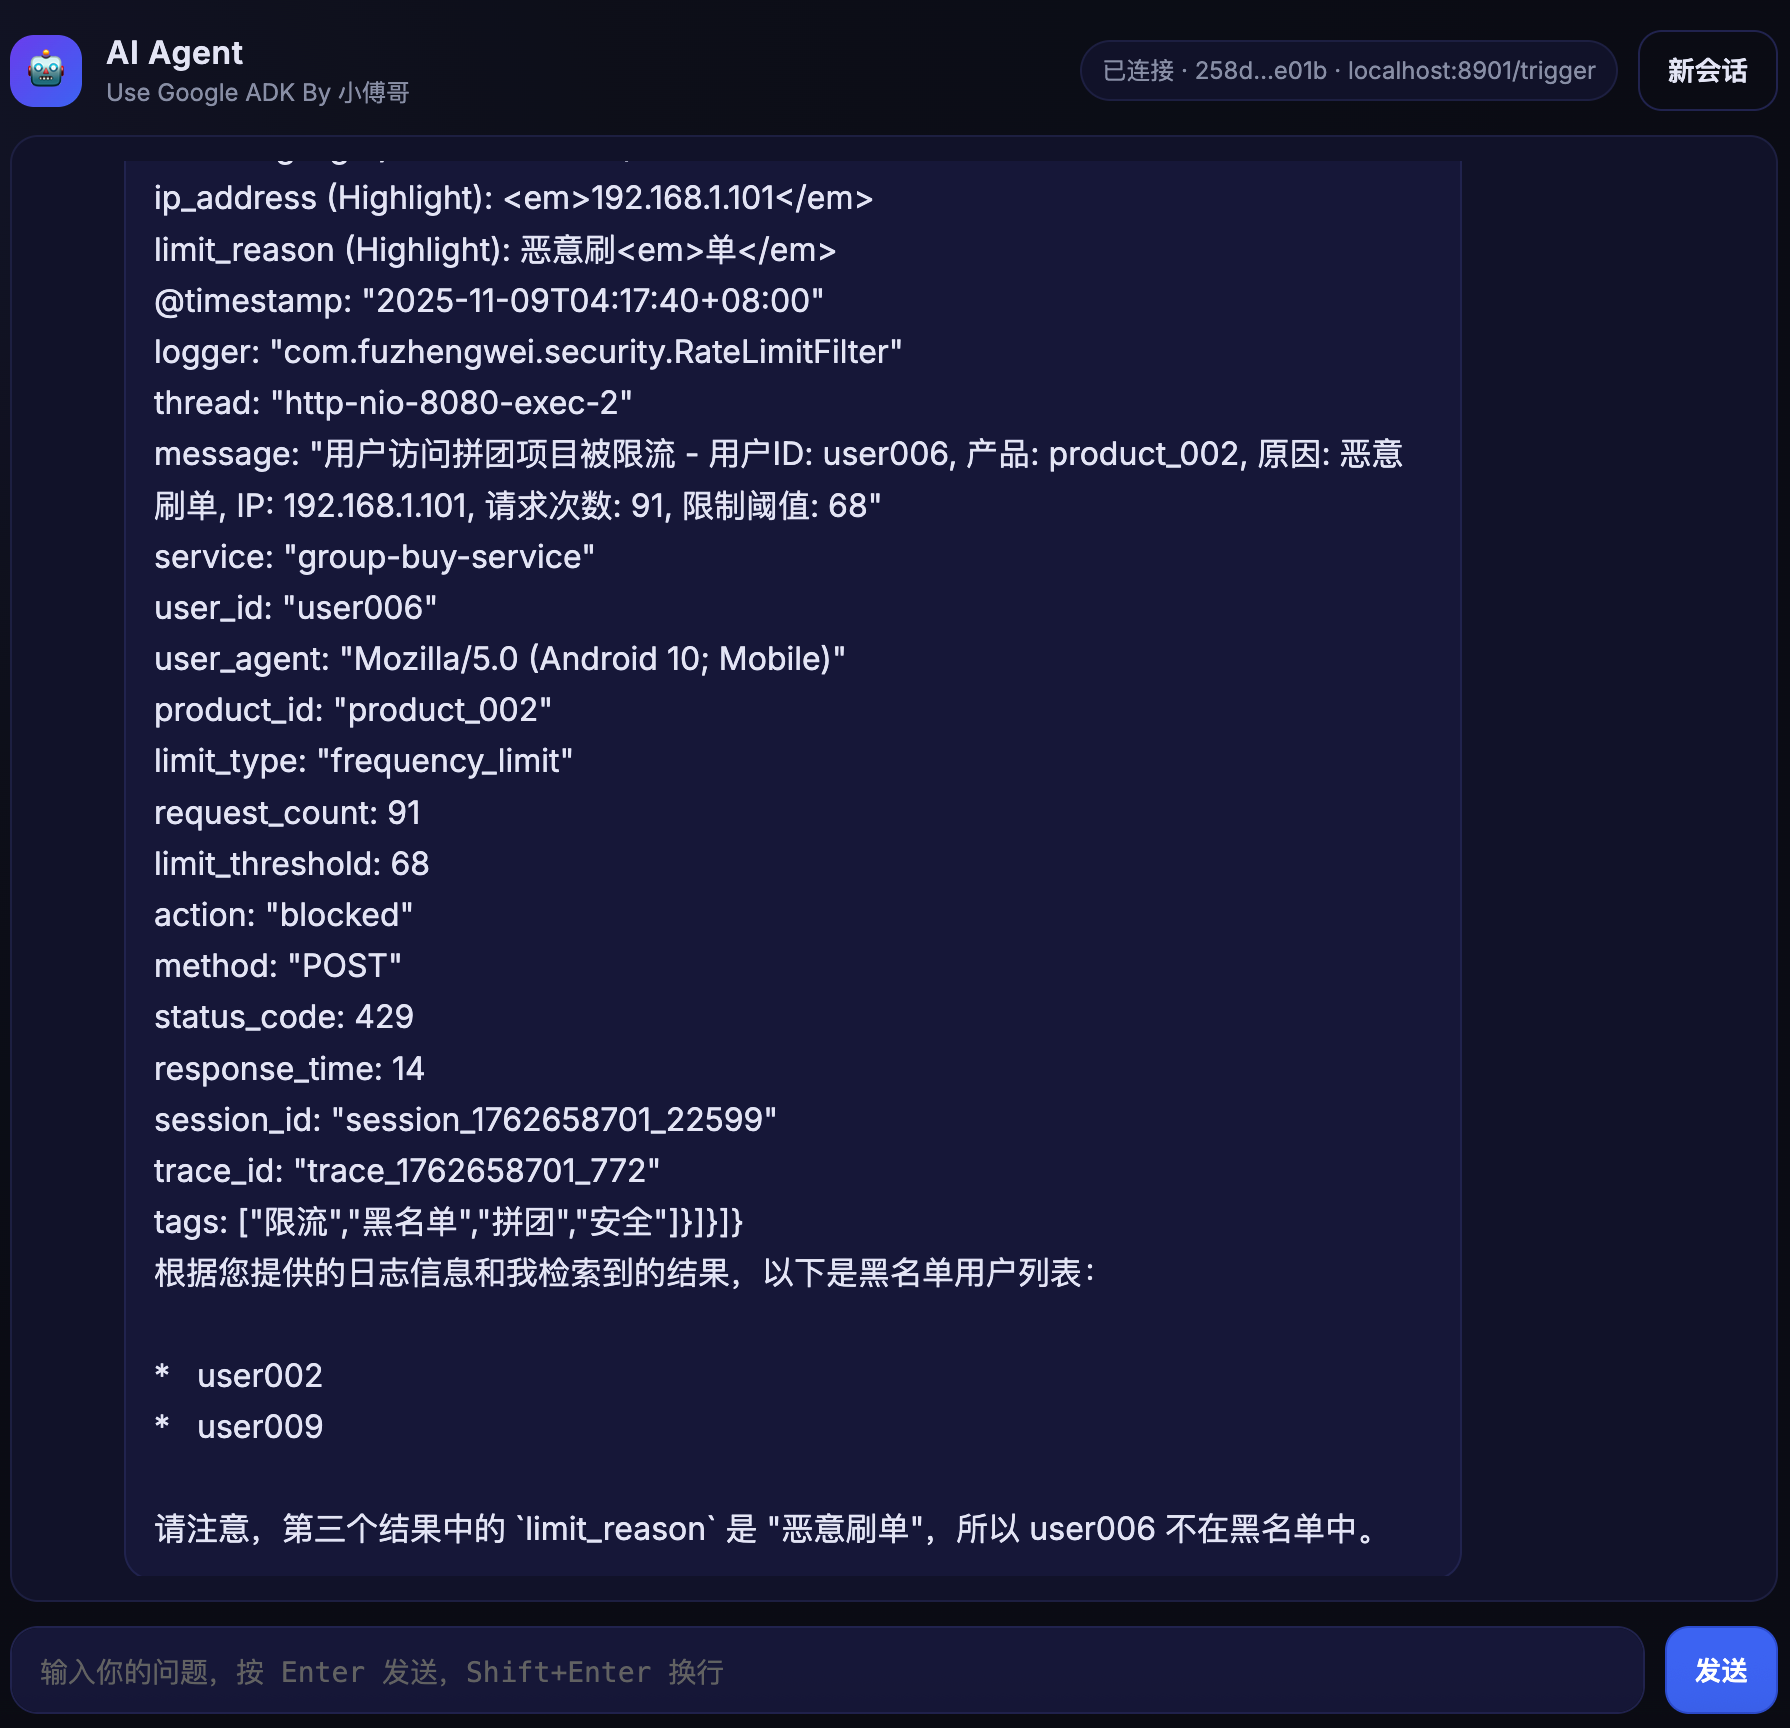
- 以上演示了,使用 Ai Agent 进行 ELK 日志分析,通过对话可以看到,最终我们可以拿到系统的日志数据。
- 你还可以尝试配置其他的 MCP 服务,之后验证各种场景功能。担任如果你希望更细化的做 Ai Agent,还是要看下 《Ai Agent 智能体项目》 (opens new window) 这样可以更细腻的做出这样的系统,以及对应的可视化编排操作。

京公网安备 11030102010881号
| GPL Licensed | Copyright © 2019 小傅哥,All rights reserved.