# sharding-jdbc 使用教程和模型结构
作者:小傅哥
博客:https://bugstack.cn (opens new window)
沉淀、分享、成长,让自己和他人都能有所收获!😄
本文的宗旨在于通过简单干净实践的方式教会读者,快速 Easy 的使用上 sharding-jdbc 这个笨重的大家伙!
之所以说笨重,是因为 Apache ShardingSphere (opens new window) 不只是简单意义上的路由组件,而是一款分布式 SQL 事务和查询引擎,可通过数据分片、弹性伸缩、加密等能力对任意数据库进行增强。同时它又在迭代过程中,衍生出了很多的版本,以及对应了不同的使用方式。并在 ShardingSphere 5.3 以后又做了不小的架构调整。所以很多伙伴在使用的时候,经常是找了一上午的资料,到下午下班还没对接上。
本文涉及的工程:
- xfg-dev-tech-shardingjdbc:https://gitcode.net/KnowledgePlanet/road-map/xfg-dev-tech-shardingjdbc (opens new window)
- 官网:https://shardingsphere.apache.org/index_zh.html (opens new window)
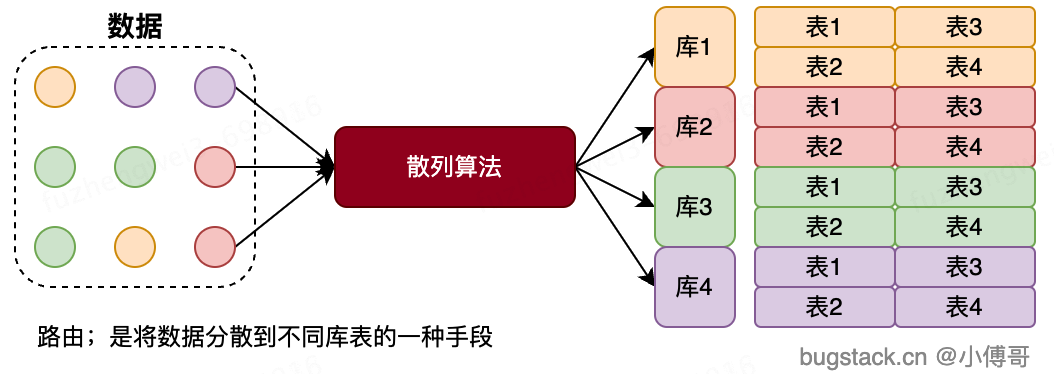
# 一、路由本质
分库分表的本质是数据的散列,分摊数据库资源压力。如把原本在一台机器上的数据库存放1000万数据,分摊到n台机上,拆分这1000万的数据和后续的增量。让每个数据库资源来分摊原本需要一台数据库所提供的服务。
- 当使用分库分表以后,并确定如使用
用户ID作为路由分片键。那么所做的CRUD操作,都是需要使用到这个用户ID,并根据ID做路由库表计算。 - 在大厂中,开发项目。并不会说目前这个业务需求规模不大,就不使用分库分表,而是分库分表都是非常成熟的方案,并不会因为使用了就降低很大的开发效率。所以基本就是默认就使用了。
- 那么使用了分库分表,就会很占用资源吗。也不会,因为刚开始业务体量不大的时候,都是虚拟机交叉使用,你的1台物理机虚出来10个虚拟机,大家交叉使用主备。这样你只是使用了分库分表,但库表的实际资源没占用那么多。
# 二、使用案例
- jdk 1.8 +
- ShardingSphere 5.3+
<!-- https://mvnrepository.com/artifact/org.apache.shardingsphere/shardingsphere-jdbc-core -->
<dependency>
    <groupId>org.apache.shardingsphere</groupId>
    <artifactId>shardingsphere-jdbc-core</artifactId>
    <version>5.4.1</version>
</dependency>
 <!-- https://mvnrepository.com/artifact/org.yaml/snakeyaml -->
<dependency>
    <groupId>org.yaml</groupId>
    <artifactId>snakeyaml</artifactId>
    <version>1.33</version>
</dependency>
1
2
3
4
5
6
7
8
9
10
11
12
2
3
4
5
6
7
8
9
10
11
12
- 因为需要解析 yaml 但默认的 SpringBoot 提供版本不支持 shardingsphere-jdbc-core 使用。
# 1. 工程结构
- 工程中,提供了 docker 配置数据库环境操作,并提供了对应的建表测试语句。如果你本机已经安装了数据库,那么只做库表语句导入以及 yml 配置数据库连接信息就可以。
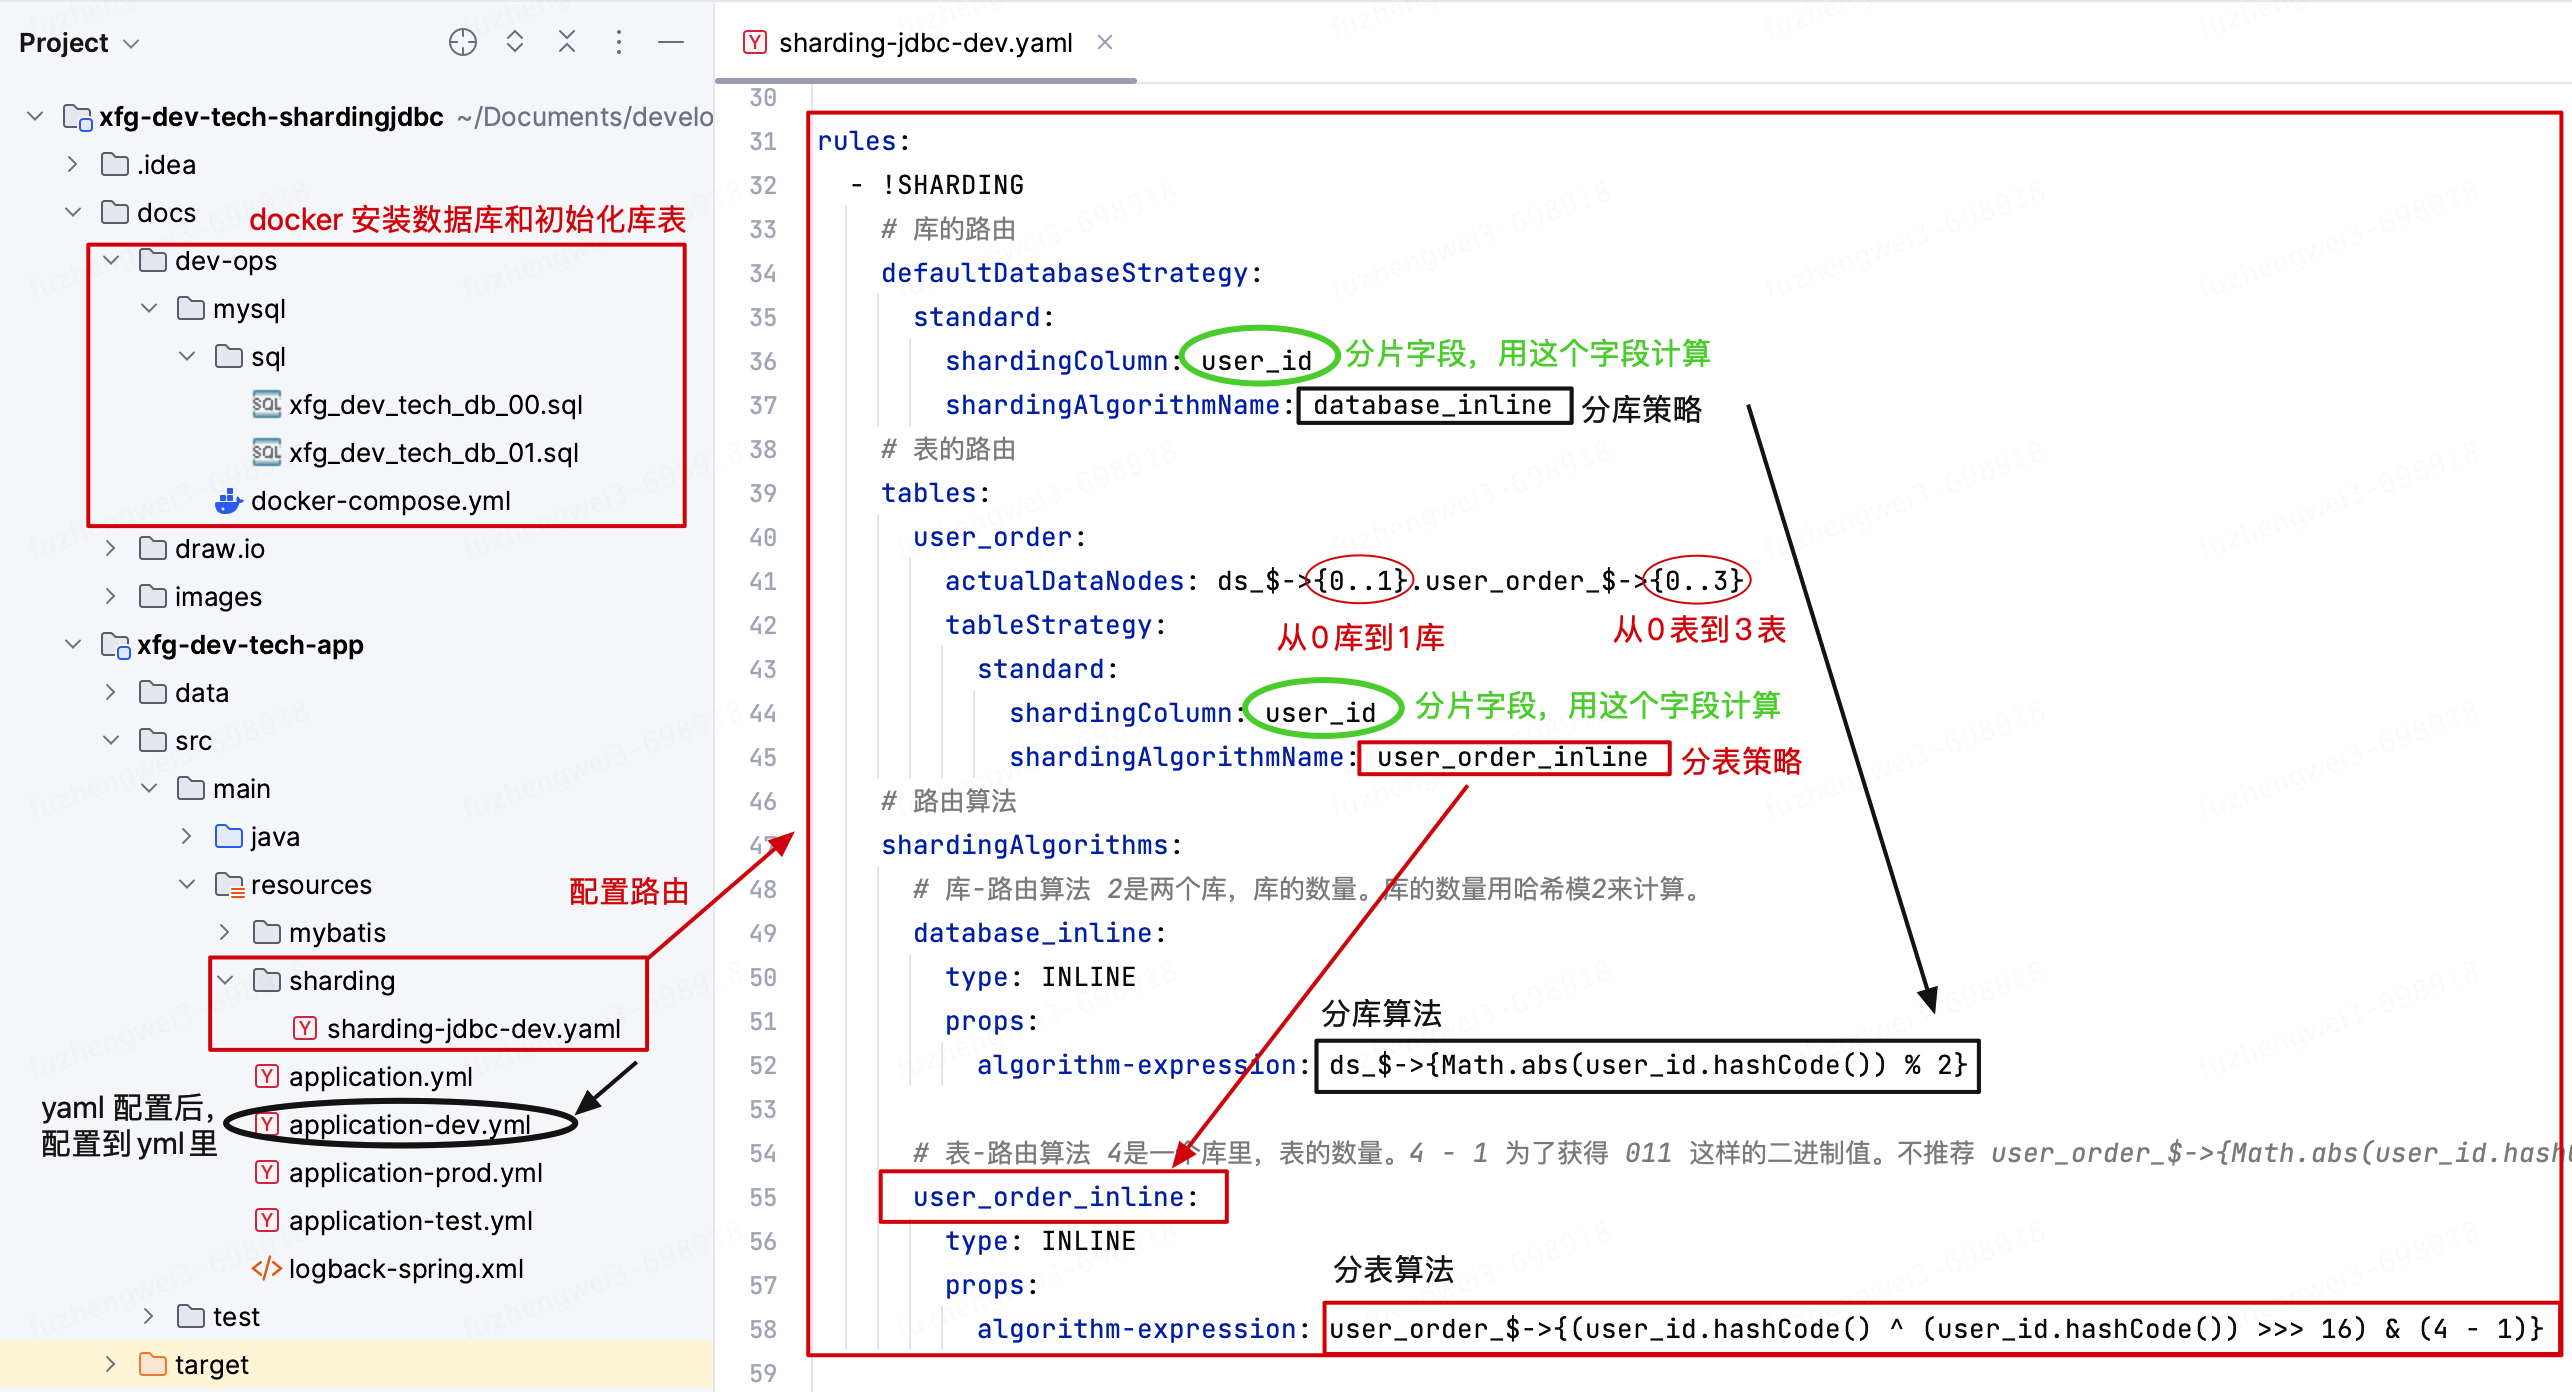
- sharding-jdbc-dev.yaml 配置了详细的分库分表路由信息,在 algorithms 下配置的是库表的路由算法。这里的算法要根据实际自己使用中库表数量来设置&设计,避免发生较大的数据偏移。
- 配置完 sharding-jdbc-dev.yaml 需要在 application-dev.yml 中配置上 sharding-jdbc-dev.yaml 路径,这样才能正确加载。
- 如果你还需要定义出自己特定的路由算法,它还支持自己写个实现类的方式处理。
# 2. 算法配置
sharding/sharding-jdbc-dev.yaml
# https://shardingsphere.apache.org/index_zh.html
mode:
  # 运行模式类型。可选配置:内存模式 Memory、单机模式 Standalone、集群模式 Cluster - 目前为单机模式
  type: Standalone

dataSources:
  ds_0:
    dataSourceClassName: com.zaxxer.hikari.HikariDataSource
    driverClassName: com.mysql.cj.jdbc.Driver
    jdbcUrl: jdbc:mysql://127.0.0.1:13306/xfg_dev_tech_db_00?useUnicode=true&characterEncoding=utf8&autoReconnect=true&zeroDateTimeBehavior=convertToNull&serverTimezone=UTC&useSSL=true
    username: root
    password: 123456
    connectionTimeoutMilliseconds: 30000
    idleTimeoutMilliseconds: 60000
    maxLifetimeMilliseconds: 1800000
    maxPoolSize: 15
    minPoolSize: 5

  ds_1:
    dataSourceClassName: com.zaxxer.hikari.HikariDataSource
    driverClassName: com.mysql.cj.jdbc.Driver
    jdbcUrl: jdbc:mysql://127.0.0.1:13306/xfg_dev_tech_db_01?useUnicode=true&characterEncoding=utf8&autoReconnect=true&zeroDateTimeBehavior=convertToNull&serverTimezone=UTC&useSSL=true
    username: root
    password: 123456
    connectionTimeoutMilliseconds: 30000
    idleTimeoutMilliseconds: 60000
    maxLifetimeMilliseconds: 1800000
    maxPoolSize: 15
    minPoolSize: 5

rules:
  - !SHARDING
    # 库的路由
    defaultDatabaseStrategy:
      standard:
        shardingColumn: user_id
        shardingAlgorithmName: database_inline
    # 表的路由
    tables:
      user_order:
        actualDataNodes: ds_$->{0..1}.user_order_$->{0..3}
        tableStrategy:
          standard:
            shardingColumn: user_id
            shardingAlgorithmName: user_order_inline
    # 路由算法
    shardingAlgorithms:
      # 库-路由算法 2是两个库,库的数量。库的数量用哈希模2来计算。
      database_inline:
        type: INLINE
        props:
          algorithm-expression: ds_$->{Math.abs(user_id.hashCode()) % 2}

      # 表-路由算法 4是一个库里,表的数量。4 - 1 为了获得 011 这样的二进制值。不推荐 user_order_$->{Math.abs(user_id.hashCode()) % 2} 作为表的路由
      user_order_inline:
        type: INLINE
        props:
          algorithm-expression: user_order_$->{(user_id.hashCode() ^ (user_id.hashCode()) >>> 16) & (4 - 1)}

props:
  # 是否在日志中打印 SQL。
  # 打印 SQL 可以帮助开发者快速定位系统问题。日志内容包含:逻辑 SQL,真实 SQL 和 SQL 解析结果。
  # 如果开启配置,日志将使用 Topic ShardingSphere-SQL,日志级别是 INFO。 false
  sql-show: true
  # 是否在日志中打印简单风格的 SQL。false
  sql-simple: true
  # 用于设置任务处理线程池的大小。每个 ShardingSphereDataSource 使用一个独立的线程池,同一个 JVM 的不同数据源不共享线程池。
  executor-size: 20
  # 查询请求在每个数据库实例中所能使用的最大连接数。1
  max-connections-size-per-query: 1
  # 在程序启动和更新时,是否检查分片元数据的结构一致性。
  check-table-metadata-enabled: false
  # 在程序启动和更新时,是否检查重复表。false
  check-duplicate-table-enabled: false
1
2
3
4
5
6
7
8
9
10
11
12
13
14
15
16
17
18
19
20
21
22
23
24
25
26
27
28
29
30
31
32
33
34
35
36
37
38
39
40
41
42
43
44
45
46
47
48
49
50
51
52
53
54
55
56
57
58
59
60
61
62
63
64
65
66
67
68
69
70
71
72
73
74
2
3
4
5
6
7
8
9
10
11
12
13
14
15
16
17
18
19
20
21
22
23
24
25
26
27
28
29
30
31
32
33
34
35
36
37
38
39
40
41
42
43
44
45
46
47
48
49
50
51
52
53
54
55
56
57
58
59
60
61
62
63
64
65
66
67
68
69
70
71
72
73
74
- mode:运行模式,默认就单机模式。
- dataSources:数据库连接信息。
- rules:路由算法。defaultDatabaseStrategy 库的路由、tables 表的路由。之后在 shardingAlgorithms 中配置具体的路由算法。这里的名称都是关联的,不要配置错。
- props:一些属性信息,包括是否打印日志等。
# 3. 配置引入
application-dev.yml
spring:
  datasource:
    driver-class-name: org.apache.shardingsphere.driver.ShardingSphereDriver
    url: jdbc:shardingsphere:classpath:sharding/sharding-jdbc-dev.yaml
1
2
3
4
2
3
4
- 和之前的一些 sharding 版本不同,这里是需要使用具体的 ShardingSphereDriver 和 url 地址,才能加载上我们配置的路由信息。
# 三、测试验证
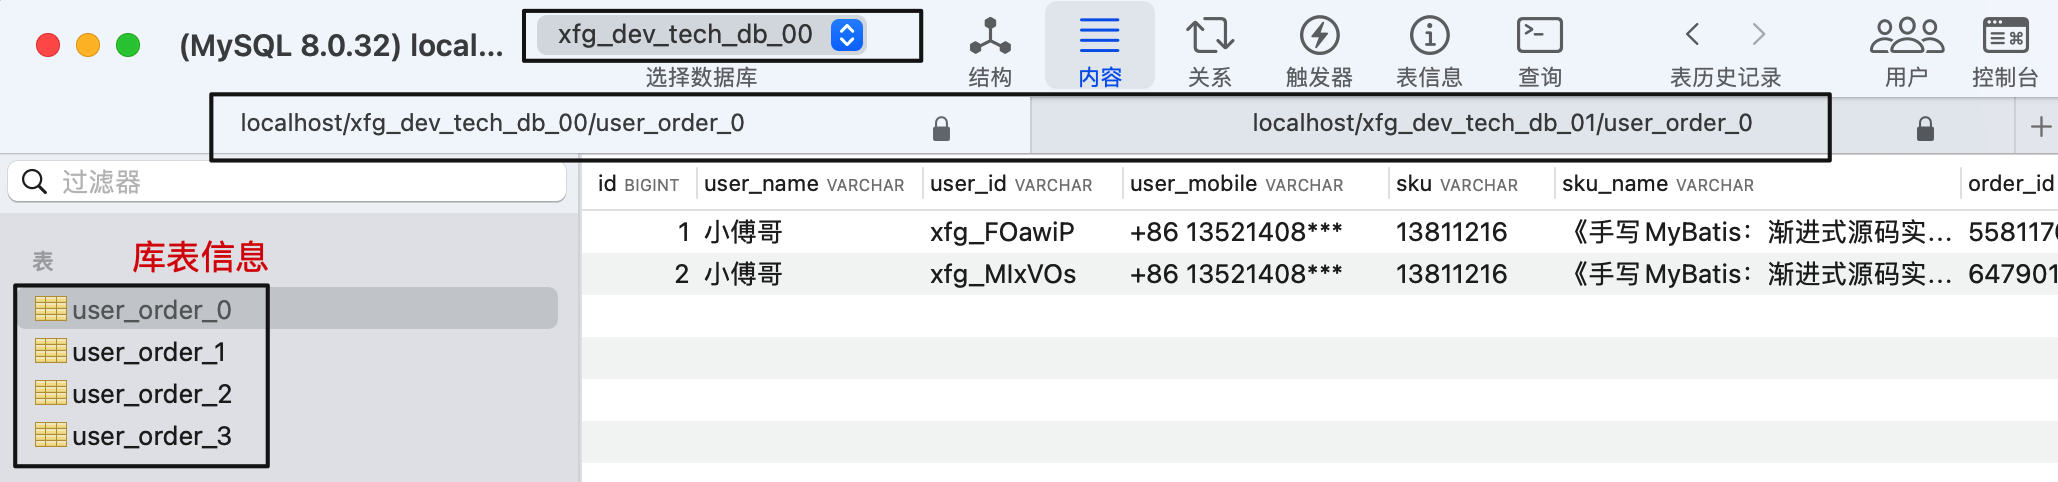
- 基于工程中 docs/dev-ops/mysql/sql 创建库表。已经提供了库名、表和测试数据。
- 无论你使用哪种方式,都可以安装MySql 并使用可视化工具链接。这里小傅哥用的是 Sequel Ace (opens new window)
# 1. 写入数据
@Test
public void test_insert() {
    for (int i = 0; i < 1000; i++) {
        UserOrderPO userOrderPO = UserOrderPO.builder()
                .userName("小傅哥")
                .userId("xfg_" + RandomStringUtils.randomAlphabetic(6))
                .userMobile("+86 13521408***")
                .sku("13811216")
                .skuName("《手写MyBatis:渐进式源码实践》")
                .orderId(RandomStringUtils.randomNumeric(11))
                .quantity(1)
                .unitPrice(BigDecimal.valueOf(128))
                .discountAmount(BigDecimal.valueOf(50))
                .tax(BigDecimal.ZERO)
                .totalAmount(BigDecimal.valueOf(78))
                .orderDate(new Date())
                .orderStatus(0)
                .isDelete(0)
                .uuid(UUID.randomUUID().toString().replace("-", ""))
                .ipv4("127.0.0.1")
                .ipv6("2001:0db8:85a3:0000:0000:8a2e:0370:7334".getBytes())
                .extData("{\"device\": {\"machine\": \"IPhone 14 Pro\", \"location\": \"shanghai\"}}")
                .build();
        userOrderDao.insert(userOrderPO);
    }
}
1
2
3
4
5
6
7
8
9
10
11
12
13
14
15
16
17
18
19
20
21
22
23
24
25
26
2
3
4
5
6
7
8
9
10
11
12
13
14
15
16
17
18
19
20
21
22
23
24
25
26
- 测试数据写入,你可以写入1000条数据,观察散列效果。并可以在这个过程中,调试修改 sharding-jdbc-dev.yaml 文件对库表路由的计算方式。
# 2. 查询数据
@Test
public void test_selectByUserId() {
    List<UserOrderPO> list = userOrderDao.selectByUserId("xfg_PrmgwQ");
    log.info("测试结果:{}", JSON.toJSONString(list));
}
1
2
3
4
5
2
3
4
5
- 查询的用户ID是已经写入到数据库表里的数据,查询的时候会根据用户ID继续路由计算。
# 3. 散列算法
@Test
public void test_idx() {
    for (int i = 0; i < 50; i++) {
        String user_id = "xfg_" + RandomStringUtils.randomAlphabetic(6);
        log.info("测试结果 {}", (user_id.hashCode() ^ (user_id.hashCode()) >>> 16) & 3);
    }
}
1
2
3
4
5
6
7
2
3
4
5
6
7
- 你可以尝试验证和编写新的散列算法,最终目的都是让数据尽可能散列到库表。
- 此外,关于算法的好坏,可以基于雪崩测试 (opens new window)计算
京ICP备19031103号 | 
京公网安备 11030102010881号
| GPL Licensed | Copyright © 2019 小傅哥,All rights reserved.