# SpringCloud Feign
作者:小傅哥
博客:https://bugstack.cn (opens new window)
沉淀、分享、成长,让自己和他人都能有所收获!😄
大家好,我是技术UP主小傅哥。
在过往几年中在帮助大家学习编程中,我会看到不少新人伙伴在项目的时候会纠结,这个是RPC(Dubbo)的、这个是 SpringCloud(Feign)的,这个是 MVC 的、这个是 DDD 的。但其实不用纠结一点都。

其实这些东西都是一通百通
一个能把 Dubbo 用的透彻的人,换成 Feign 就是小儿科。一个能把 MVC 搞的明明白白的人,换成 DDD 那就是手到擒来。之所以有人会觉得换一下就不会了,是因为原本另外一个就没用明白。各类的工具、框架、组件,在编程中都有非常多的同类替代品。就算即使是 RPC 也是有非常多的产品,尤其中大厂中还有很多自研的组件。
那么今天小傅哥就再分享下 SpringCloud Feign 结合到 DDD 战术设计六边形架构中的使用方式。
# 一、组件介绍
官网:https://spring.io/projects/spring-cloud (opens new window)
Spring Cloud 为开发人员提供了一系列工具,用于快速构建分布式系统中的一些常见模式(例如配置管理、服务发现、断路器、智能路由、微代理、控制总线、微服务和契约测试)。分布式系统的协调产生了样板模式,使用 Spring Cloud,开发人员可以快速建立实现这些模式的服务和应用程序。它们可以在任何分布式环境中很好地工作,包括开发人员自己的笔记本电脑、裸机数据中心和 Cloud Foundry 等托管平台。
本节会涉及到 Eureka 注册中心、Feign 简化微服务 HTTP 调用组件;

- Eureka 是一个由 Netflix 开发的服务发现工具,主要用于云端分布式系统中。它允许各个服务在启动时注册自己的信息,并能够动态地发现其他服务的位置和状态,从而实现负载均衡和故障转移。Eureka 在微服务架构中扮演着重要角色,帮助提高系统的可用性和弹性。其易于集成的特性使其成为许多企业在构建复杂分布式应用时的首选工具之一。
- Feign 是一个受欢迎的 Java HTTP 客户端库,主要用于简化服务间的 HTTP 通信。它通过使用注解来定义 HTTP 请求接口,使得开发者可以更直观地调用远程服务。Feign 提供了可插拔的编码器和解码器,支持多种数据格式,并且可以与 Spring Cloud 集成,方便地实现负载均衡和服务发现。其简洁的 API 和高度的可扩展性,使得 Feign 成为微服务架构中常用的工具之一。
# 二、测试工程
小傅哥这里给搭建了一套测试 Feign 案例的六边形系统架构;

工程:https://github.com/fuzhengwei/xfg-dev-tech-springcloud-feign (opens new window)
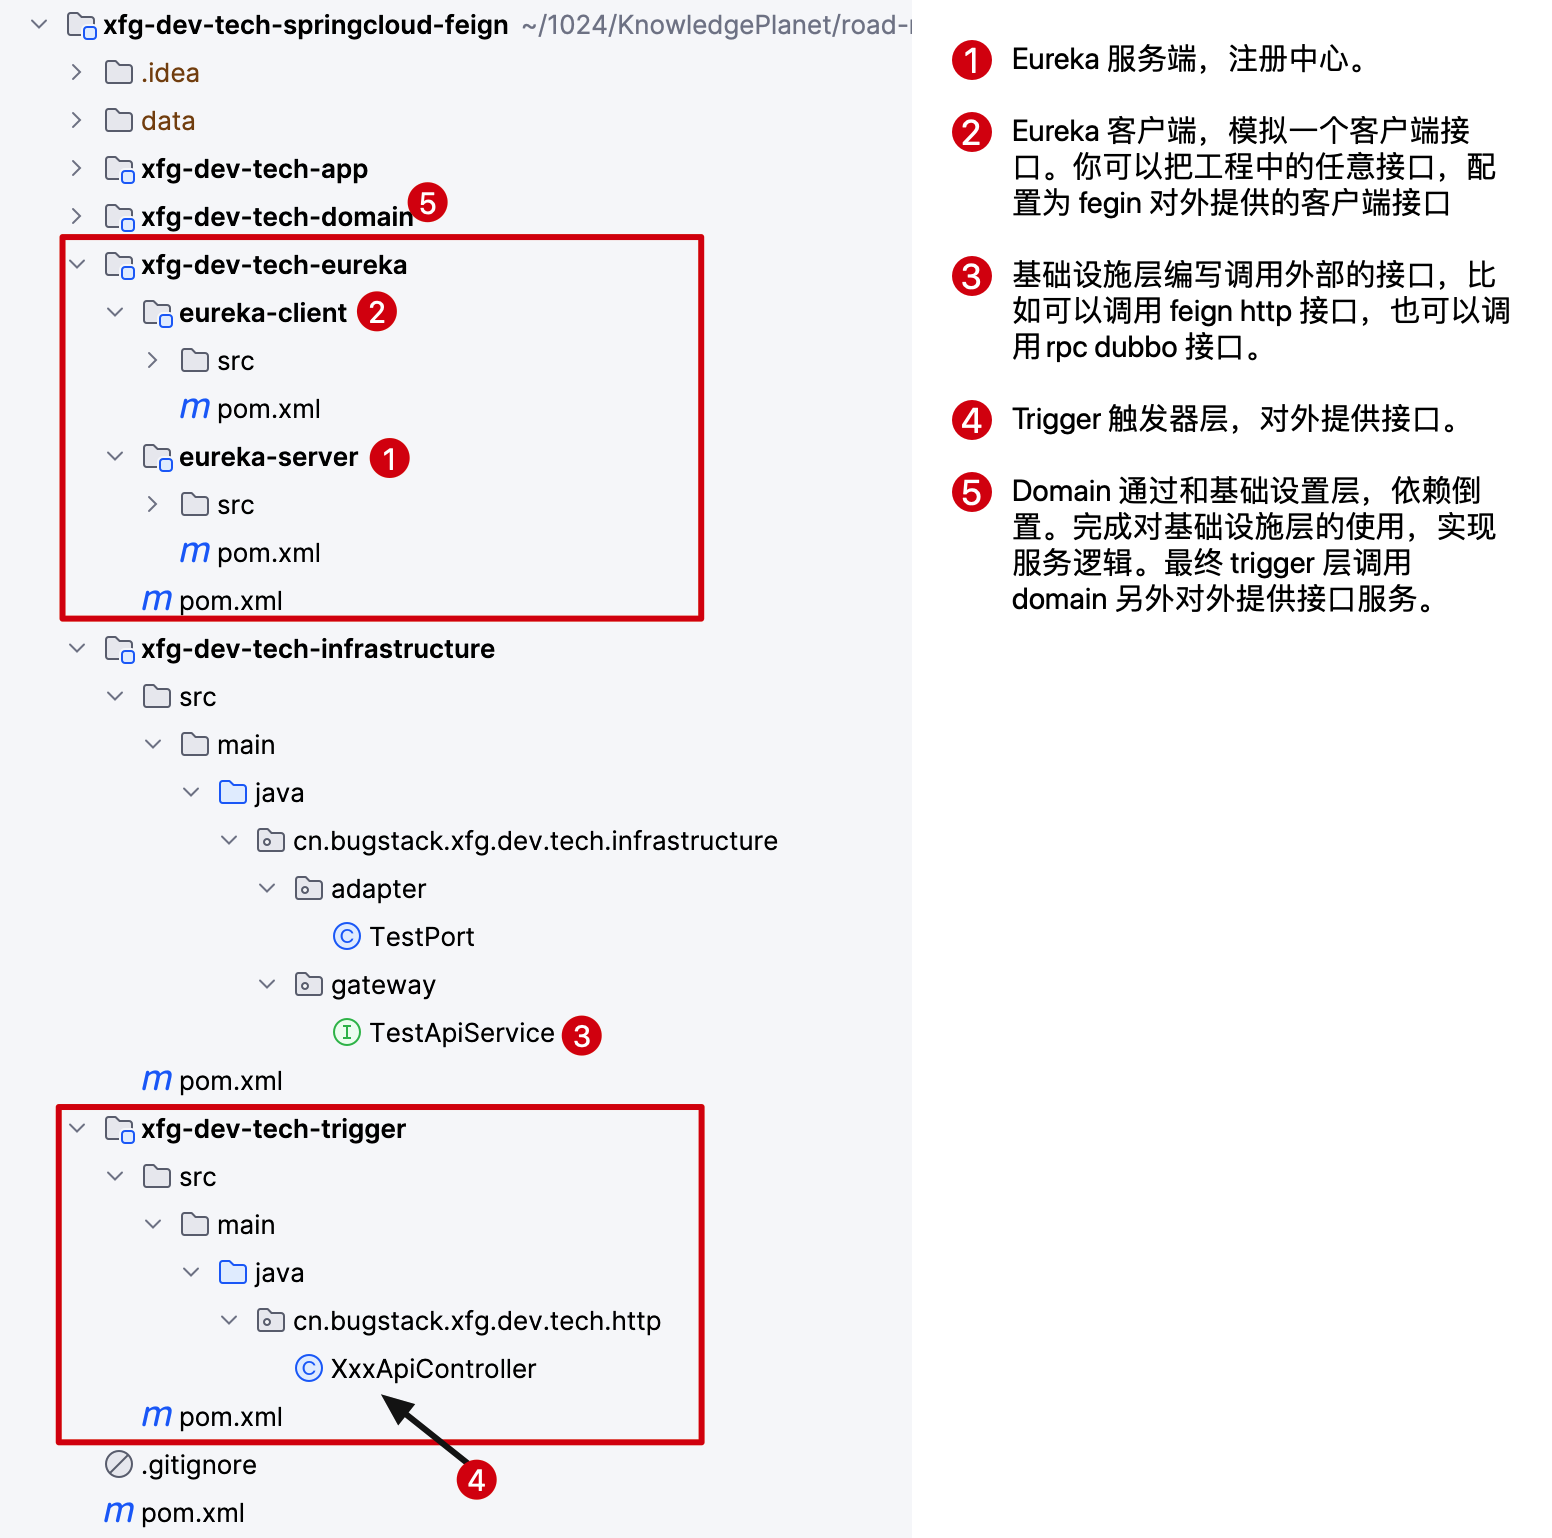
- eureka 模块,包括;server、client 端,server 端是注册中心,用于接收注册上来的服务接口,统一管理负载。client 端是为了模拟提供一个服务接口。你可以任何其他工程来提供 feign 客户端接口,也就是接口的提供方。这样消费方就可以通过注册中心调用了。
- infrastructure 是基础设施层,在六边形架构中,用于处理调用外部的接口,内部的数据库,缓存等这样的基础功能。在 DDD 的软件设计方法中,会把这部分基础的东西从功能实现中拆分出来。
- domain 和 infrastructure 是依赖倒置关系,所有 domain 要实现的服务需要的基础数据,都可以通过依赖倒置方式处理。也就是 domain 领域层定义接口,之后由基础设置层做功能实现。在通过 Spring 注入到 domain 领域中 service 具体的类中,这样就可以使用。
- trigger 名词为触发器,用于承载给外部提供的服务能力,包括;http接口、rpc接口、job任务等,这些要调用我们服务能力的方式,都可以通过 trigger 层来实现。
更多的关于 DDD 六边形架构,可以从编程路书中学习;https://bugstack.cn/md/road-map/ddd-guide-03.html (opens new window)
# 三、功能实现
# 1. 引入 spring cloud
<parent>
    <groupId>org.springframework.boot</groupId>
    <artifactId>spring-boot-starter-parent</artifactId>
    <version>2.0.6.RELEASE</version>
    <relativePath/>
</parent>

<dependencyManagement>
    <dependencies>
        <dependency>
            <groupId>org.springframework.cloud</groupId>
            <artifactId>spring-cloud-dependencies</artifactId>
            <version>Finchley.SR2</version>
            <type>pom</type>
            <scope>import</scope>
        </dependency>
        <dependency>
            <groupId>com.alibaba</groupId>
            <artifactId>fastjson</artifactId>
            <version>2.0.28</version>
        </dependency>
    </dependencies>
</dependencyManagement>
2
3
4
5
6
7
8
9
10
11
12
13
14
15
16
17
18
19
20
21
22
23
- 在官网中有对应版本关系可以参考:https://spring.io/projects/spring-cloud (opens new window)
# 2. eureka-server
在公司中 eureka-server 是统一一套的,我们个人学习需要搭建一个这样的工程。
# 2.1 yml 配置
server:
  port: 7397

eureka:
  instance:
    hostname: localhost
  client:
    registerWithEureka: false
    fetchRegistry: false
    serviceUrl:
      defaultZone: http://${eureka.instance.hostname}:${server.port}/eureka/

spring:
  application:
    name: eureka-server
2
3
4
5
6
7
8
9
10
11
12
13
14
15
- 添加 eureka 配置信息。这个端口 7397 后面其他的客户端调用就连接这个端口。
# 2.2 启动类
package cn.bugstack.xfg.dev.tech;

import org.springframework.boot.SpringApplication;
import org.springframework.boot.autoconfigure.SpringBootApplication;
import org.springframework.cloud.netflix.eureka.server.EnableEurekaServer;

@SpringBootApplication
@EnableEurekaServer
public class EurekaServerApplication {

    public static void main(String[] args) {
        SpringApplication.run( EurekaServerApplication.class, args );
    }

}
2
3
4
5
6
7
8
9
10
11
12
13
14
15
# 3. Eureka-client
# 3.1 yml 配置
server:
  port: 8002

spring:
  application:
    name: eureka-client-api

eureka:
  client:
    serviceUrl:
      defaultZone: http://localhost:7397/eureka/
2
3
4
5
6
7
8
9
10
11
- 模拟启动一个客户端接口,并填写注册中心地址。
# 3.2 api 接口
@EnableEurekaClient
@RestController
public class TestApiController {

    @Value("${server.port}")
    private int port;

    @RequestMapping(path = "/api/queryUserInfo", method = RequestMethod.GET)
    public String queryUserInfo(@RequestParam String userId) {
        return "Hi 小傅哥,微信公众号:bugstack虫洞栈 | " + userId + " >: from eureka client port: " + port;
    }

}
2
3
4
5
6
7
8
9
10
11
12
13
- 添加一个客户端的接口,这里需要注意的是添加了一个
@EnableEurekaClient注解。这样这个接口就可以被 eureka 注册中心管理。 - 如果你有学习过小傅哥的API网关 (opens new window)项目,那么就可以了解这样的设计,是如何完成接口注册的。
# 4. 接口使用 - infrastructure
在工程的基础设置层配置对外部的接口调用;

如果没有 fegin 我们最开始调用外部的 http 接口时候,就需要写很多的关于 http 的调用,这个过程是比较复杂的。在使用 feign 后,这个事就变得简单了,同时还增加了负载和故障迁移的能力。
当然现在调用http的方式不只是以前的刀耕火种了,可以用 okttp、retrofit2 这样的框架处理 http 调用过程。如下这样的调用方式也是非常好维护的。
@GET("cgi-bin/token")
Call<WeixinTokenRes> getToken(@Query("grant_type") String grantType,
@Query("appid") String appId,
@Query("secret") String appSecret);
2
3
4
# 四、测试验证
# 1. eureka 启动


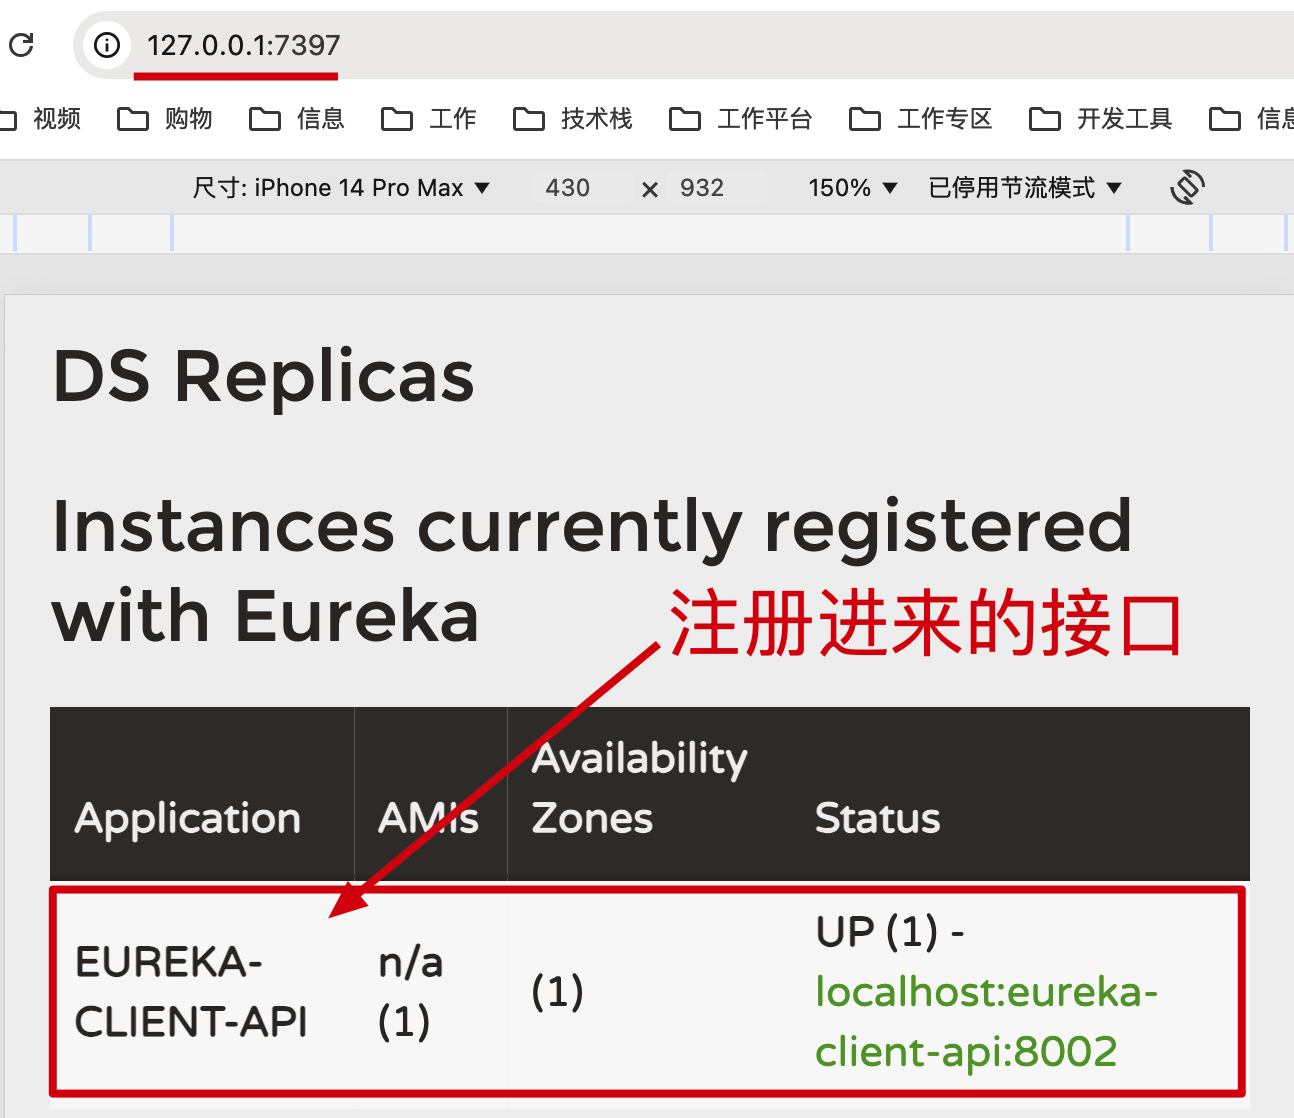
- 分别启动 eureka 的服务端和测试的客户端,提供接口能力。
- 启动后访问 eureka 服务端:http://127.0.0.1:7397/ (opens new window)
# 2. 测试工程启动

fuzhengwei@MacBook-Pro xfg-dev-tech-springcloud-feign % curl http://127.0.0.1:8091/api/v1/query_user_info
Hi 小傅哥,微信公众号:bugstack虫洞栈 | xfg >: from eureka client port: 8002%
2
]}ServerList:org.springframework.cloud.netflix.ribbon.eureka.DomainExtractingServerList@680aded0
24-11-24.10:32:49.968 [PollingServerListUpdater-0] INFO  ChainedDynamicProperty - Flipping property: eureka-client-api.ribbon.ActiveConnectionsLimit to use NEXT property: niws.loadbalancer.availabilityFilteringRule.activeConnectionsLimit = 2147483647
2
- 启动应用测试工程,启动后可以访问验证。
- 验证接口:
http://127.0.0.1:8091/api/v1/query_user_info

