# 《ChatGPT 微服务应用体系构建》 - chatglm-sdk 第2节:ChatGLM SDK - 智谱Ai(3.0、4.0、cogview)
作者:小傅哥
博客:https://bugstack.cn (opens new window)
沉淀、分享、成长,让自己和他人都能有所收获!😄
大家好,我是技术UP主小傅哥。
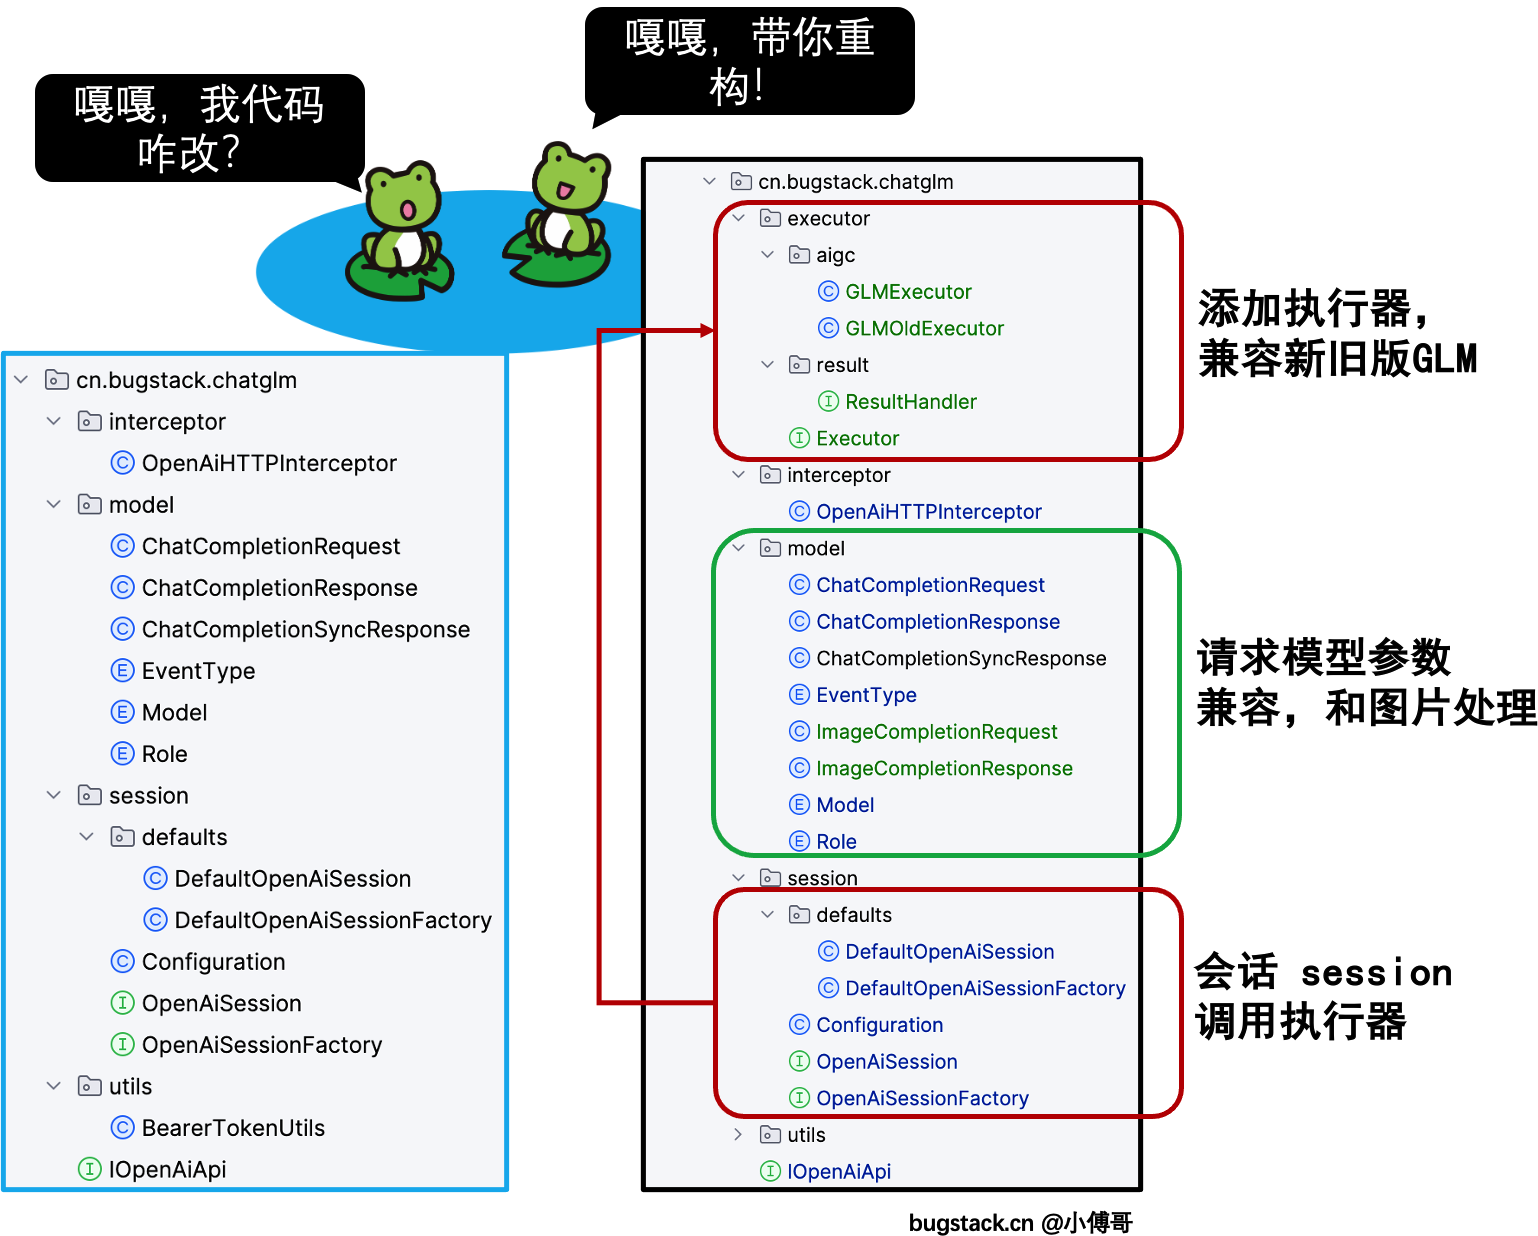
鉴于智谱AI发布了最新一代 GLM3.0、GLM4.0 基座大模型,我又要对自己开发的这款开源 chatglm-sdk-java (opens new window) 进行改造了!因为需要做新老接口的模型调用中数据格式兼容,这将是一场编码设计与复杂场景的对抗挑战。💐 请看小傅哥如何操刀改造!

为什么改造SDK会比较复杂?🤔
通常来说,我们开发好一款SDK后,就会投入到项目中使用,而使用的方式会根据SDK的出入参标准进行对接。比如一个接口的入参原本有2个参数,A String、B String 类型,但现在因为有额外的功能添加,从2个参数调整为3个参数,同时需要对原本的 B 参数 String 类型,扩展为 Object 类型,添加更多的属性信息。同时出参也有对应响应结构变化。
那么对于这种线上正在使用又需要改造代码的情况,我们不可能把原有的代码都铲了不要,所以需要做一些优雅的兼容的开发处理。让工程更加好维护、好迭代。
在设计原则和设计模式的锤炼下,写出高质量的代码

那么,接下来小傅哥就带着大家讲讲这段关于GLM新增模型后 SDK 的重构操作。
文末有整个 SDK 的源码,直接免费获取,拿过去就是嘎嘎学习!
# 一、需求场景
智谱AI文档:https://open.bigmodel.cn/overview (opens new window)
本次文档中新增加了 GLM-3-Turbo、GLM-4、GLM-4v、cogview,这样四个新模型,与原来的旧版 chatGLM_6b_SSE、chatglm_lite、chatglm_lite_32k、chatglm_std、chatglm_pro,在接口调用上做了不小的修改。因为新版的模型增加了如插件「联网、知识库、函数库」、画图、图片识别这样的能力,所以出入参也有相应的变化。
# 1. curl 旧版
curl -X POST \
        -H "Authorization: Bearer BearerTokenUtils.getToken(获取)" \
        -H "Content-Type: application/json" \
        -H "Accept: text/event-stream" \
        -d '{
              "top_p": 0.7,
              "sseFormat": "data",
              "temperature": 0.9,
              "incremental": true,
              "request_id": "xfg-1696992276607",
              "prompt": [
                  {
                  "role": "user",
                  "content": "写个java冒泡排序"
                  }
              ]
            }' \
  http://open.bigmodel.cn/api/paas/v3/model-api/chatglm_lite/sse-invoke
2
3
4
5
6
7
8
9
10
11
12
13
14
15
16
17
18
- 注意:旧版的调用方式是把模型放到接口请求中,如;
chatglm_lite就是放到请求地址中。
# 2. curl 3&4
curl -X POST \
        -H "Authorization: Bearer BearerTokenUtils.getToken(获取)" \
        -H "Content-Type: application/json" \
        -d '{
          "model":"glm-3-turbo",
          "stream": "true",
          "messages": [
              {
                  "role": "user",
                  "content": "写个java冒泡排序"
              }
          ]
        }' \
  https://open.bigmodel.cn/api/paas/v4/chat/completions
2
3
4
5
6
7
8
9
10
11
12
13
14
- 注意:新版的模型为入参方式调用,接口是统一的接口。此外入参格式的流式可以通过参数
"stream": "true"控制。
# 3. curl 4v
curl -X POST \
        -H "Authorization: Bearer BearerTokenUtils.getToken(获取)" \
        -H "Content-Type: application/json" \
        -d '{
                "messages": [
                    {
                        "role": "user",
                        "content": [
                          {
                            "type": "text",
                            "text": "这是什么图片"
                          },
                          {
                            "type": "image_url",
                            "image_url": {
                              "url" : "支持base64和图片地址;https://bugstack.cn/images/article/project/chatgpt/chatgpt-extra-231011-01.png"
                            }
                          }
                        ]
                    }
                ],
                "model": "glm-4v",
                "stream": "true"
            }' \
  https://open.bigmodel.cn/api/paas/v4/chat/completions
2
3
4
5
6
7
8
9
10
11
12
13
14
15
16
17
18
19
20
21
22
23
24
25
- 注意:多模态4v模型,content 字符串升级为对象。这部分与 chatgpt 的参数结构是一致的。所以我们在开发这部分功能的时候,也需要做兼容处理。因为本身它既可以支持对象也可以支持 conten 为字符串。
# 4. curl cogview
curl -X POST \
        -H "Authorization: Bearer BearerTokenUtils.getToken(获取)" \
        -H "Content-Type: application/json" \
        -d '{
          "model":"cogview-3",
          "prompt":"画一个小狗狗"
        }' \
  https://open.bigmodel.cn/api/paas/v4/images/generations
2
3
4
5
6
7
8
- 注意:图片的文生图是一个新的功能,旧版没有这个接口。所以开发的时候按照独立的接口开发即可。
综上,这些接口开发还需要注意;
- 首先,小傅哥根据官网文档编写了对应的 curl 请求格式。方便开发时可以参考和验证。
- 之后,curl 旧版是文本类处理,curl 3&4 是新版的文档处理。两个可以对比看出,旧版的入参是 prompt,新版是 messages
- 另外,本次API文档新增加了文生图,和4v(vision)多模态的图片识别。
接下来,我们就要来设计怎么在旧版的SDK中兼容这些功能实现。
# 二、功能实现
# 1. 调用流程

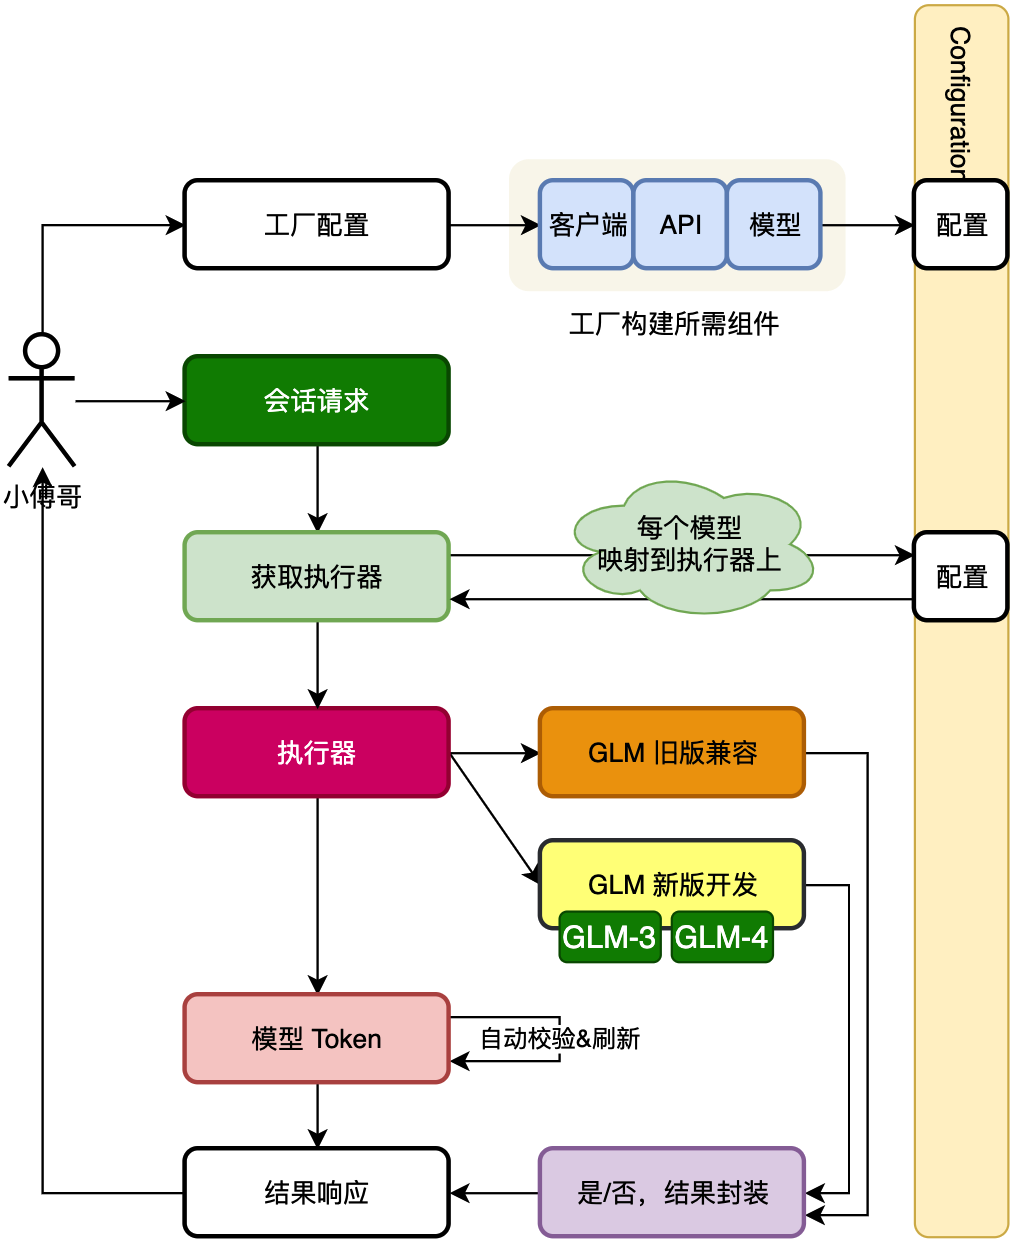
如图,是整个本次 SDK 的实现的核心流程,其中执行器部分是本次重点开发的内容。在旧版的 SDK 中是直接从会话请求进入模型的调用,没有执行器的添加。而执行器的引入则是为了解耦调用过程,依照于不同的请求模型(chatglm_std、chatglm_pro、GLM_4...),可以调用到不同的执行器上去。
# 2. 执行器「解耦」
# 2.1 接口
public interface Executor {

    /**
     * 问答模式,流式反馈
     *
     * @param chatCompletionRequest 请求信息
     * @param eventSourceListener   实现监听;通过监听的 onEvent 方法接收数据
     * @return 应答结果
     * @throws Exception 异常
     */
    EventSource completions(ChatCompletionRequest chatCompletionRequest, EventSourceListener eventSourceListener) throws Exception;

    // ... 省略部分接口
}
2
3
4
5
6
7
8
9
10
11
12
13
14
# 2.2 旧版
public class GLMOldExecutor implements Executor {

    /**
     * OpenAi 接口
     */
    private final Configuration configuration;
    /**
     * 工厂事件
     */
    private final EventSource.Factory factory;

    public GLMOldExecutor(Configuration configuration) {
        this.configuration = configuration;
        this.factory = configuration.createRequestFactory();
    }

    @Override
    public EventSource completions(ChatCompletionRequest chatCompletionRequest, EventSourceListener eventSourceListener) throws Exception {
        // 构建请求信息
        Request request = new Request.Builder()
                .url(configuration.getApiHost().concat(IOpenAiApi.v3_completions).replace("{model}", chatCompletionRequest.getModel().getCode()))
                .post(RequestBody.create(MediaType.parse("application/json"), chatCompletionRequest.toString()))
                .build();

        // 返回事件结果
        return factory.newEventSource(request, eventSourceListener);
    }

    // ... 省略部分接口

}
2
3
4
5
6
7
8
9
10
11
12
13
14
15
16
17
18
19
20
21
22
23
24
25
26
27
28
29
30
31
# 2.3 新版
public class GLMExecutor implements Executor, ResultHandler {

    /**
     * OpenAi 接口
     */
    private final Configuration configuration;
    /**
     * 工厂事件
     */
    private final EventSource.Factory factory;
    /**
     * 统一接口
     */
    private IOpenAiApi openAiApi;

    private OkHttpClient okHttpClient;

    public GLMExecutor(Configuration configuration) {
        this.configuration = configuration;
        this.factory = configuration.createRequestFactory();
        this.openAiApi = configuration.getOpenAiApi();
        this.okHttpClient = configuration.getOkHttpClient();
    }

    @Override
    public EventSource completions(ChatCompletionRequest chatCompletionRequest, EventSourceListener eventSourceListener) throws Exception {
        // 构建请求信息
        Request request = new Request.Builder()
                .url(configuration.getApiHost().concat(IOpenAiApi.v4))
                .post(RequestBody.create(MediaType.parse(Configuration.JSON_CONTENT_TYPE), chatCompletionRequest.toString()))
                .build();

        // 返回事件结果
        return factory.newEventSource(request, chatCompletionRequest.getIsCompatible() ? eventSourceListener(eventSourceListener) : eventSourceListener);
    }


    // ... 省略部分接口

}
2
3
4
5
6
7
8
9
10
11
12
13
14
15
16
17
18
19
20
21
22
23
24
25
26
27
28
29
30
31
32
33
34
35
36
37
38
39
40

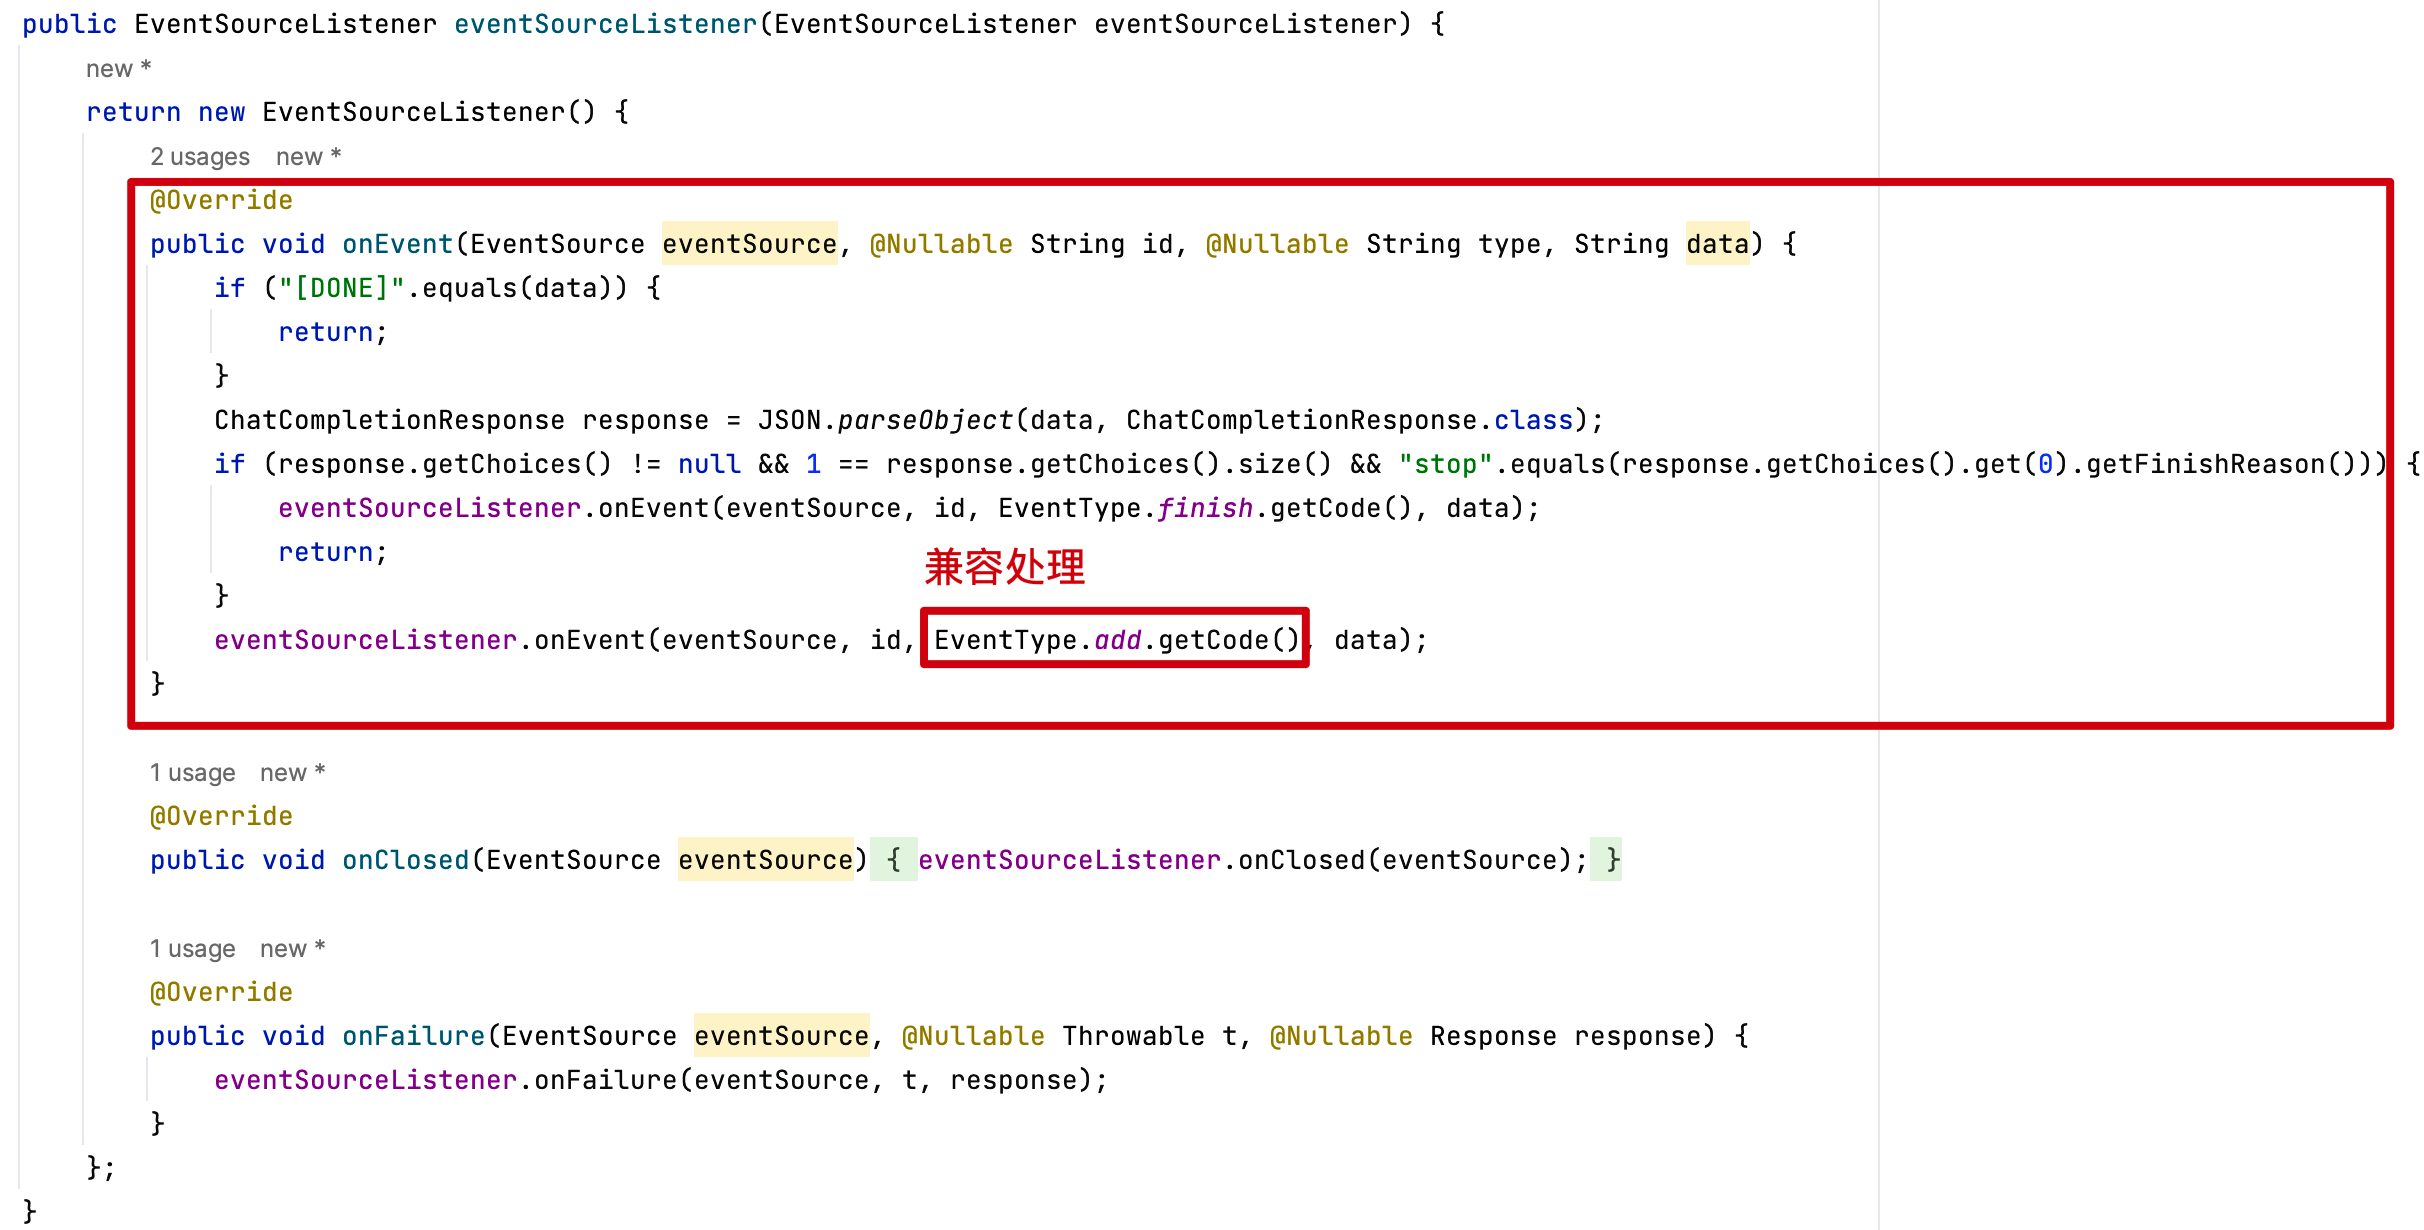
在新版的执行实现中,除了 IOpenAiApi.v4 接口的变动,还有一块是对外结果的封装处理。这是因为在旧版的接口对接中使用的是 EventType「add、finish、error、interrupted」枚举来判断。但在新版中则只是判断 stop 标记符。所以为了让之前的SDK使用用户更少的改动代码,这里做了结果的封装。
# 3. 注入配置
源码:cn.bugstack.chatglm.session.Configuration
public HashMap<Model, Executor> newExecutorGroup() {
    this.executorGroup = new HashMap<>();
    // 旧版模型,兼容
    Executor glmOldExecutor = new GLMOldExecutor(this);
    this.executorGroup.put(Model.CHATGLM_6B_SSE, glmOldExecutor);
    this.executorGroup.put(Model.CHATGLM_LITE, glmOldExecutor);
    this.executorGroup.put(Model.CHATGLM_LITE_32K, glmOldExecutor);
    this.executorGroup.put(Model.CHATGLM_STD, glmOldExecutor);
    this.executorGroup.put(Model.CHATGLM_PRO, glmOldExecutor);
    this.executorGroup.put(Model.CHATGLM_TURBO, glmOldExecutor);
    // 新版模型,配置
    Executor glmExecutor = new GLMExecutor(this);
    this.executorGroup.put(Model.GLM_3_5_TURBO, glmExecutor);
    this.executorGroup.put(Model.GLM_4, glmExecutor);
    this.executorGroup.put(Model.GLM_4V, glmExecutor);
    this.executorGroup.put(Model.COGVIEW_3, glmExecutor);
    return this.executorGroup;
}
2
3
4
5
6
7
8
9
10
11
12
13
14
15
16
17
18
- 对于不同的模型,走哪个执行器,在 Configuration 配置文件中写了这样的配置信息。
- 这样当你调用 CHATGLM_TURBO 就会走到 glmOldExecutor 模型,调用 GLM_4V 就会走到 glmExecutor 模型。
# 4. 参数兼容
ChatCompletionRequest 作为一个重要的应答参数对象,在本次的接口变化中也是调整了不少字段。但好在小傅哥之前就提供了一个 toString 对象的方法。在这里我们可以做不同类型参数的处理。
public String toString() {
    try {
        // 24年1月发布新模型后调整
        if (Model.GLM_3_5_TURBO.equals(this.model) || Model.GLM_4.equals(this.model) || Model.GLM_4V.equals(this.model)) {
            Map<String, Object> paramsMap = new HashMap<>();
            paramsMap.put("model", this.model.getCode());
            if (null == this.messages && null == this.prompt) {
                throw new RuntimeException("One of messages or prompt must not be empty!");
            }
            paramsMap.put("messages", this.messages != null ? this.messages : this.prompt);
            if (null != this.requestId) {
                paramsMap.put("request_id", this.requestId);
            }
            if (null != this.doSample) {
                paramsMap.put("do_sample", this.doSample);
            }
            paramsMap.put("stream", this.stream);
            paramsMap.put("temperature", this.temperature);
            paramsMap.put("top_p", this.topP);
            paramsMap.put("max_tokens", this.maxTokens);
            if (null != this.stop && this.stop.size() > 0) {
                paramsMap.put("stop", this.stop);
            }
            if (null != this.tools && this.tools.size() > 0) {
                paramsMap.put("tools", this.tools);
                paramsMap.put("tool_choice", this.toolChoice);
            }
            return new ObjectMapper().writeValueAsString(paramsMap);
        }

        // 默认
        Map<String, Object> paramsMap = new HashMap<>();
        paramsMap.put("request_id", requestId);
        paramsMap.put("prompt", prompt);
        paramsMap.put("incremental", incremental);
        paramsMap.put("temperature", temperature);
        paramsMap.put("top_p", topP);
        paramsMap.put("sseFormat", sseFormat);
        return new ObjectMapper().writeValueAsString(paramsMap);
    } catch (JsonProcessingException e) {
        throw new RuntimeException(e);
    }
}
2
3
4
5
6
7
8
9
10
11
12
13
14
15
16
17
18
19
20
21
22
23
24
25
26
27
28
29
30
31
32
33
34
35
36
37
38
39
40
41
42
43
- 如果为本次调整的新增模型,则走新的方式装配参数信息。
- 通过这样的方式可以很轻松的把以前叫做 prompt 的字段调整为 messages 名称。类似的操作可以看具体的代码。
关于字段的出入参处理,但比较同类,就不一一列举了
# 三、功能验证
注意:测试前需要申请ApiKey https://open.bigmodel.cn/overview (opens new window) 有非常多的免费额度。
@Before
public void test_OpenAiSessionFactory() {
    // 1. 配置文件
    Configuration configuration = new Configuration();
    configuration.setApiHost("https://open.bigmodel.cn/");
    configuration.setApiSecretKey("62ddec38b1d0b9a7b0fddaf271e6ed90.HpD0SUBUlvqd05ey");
    configuration.setLevel(HttpLoggingInterceptor.Level.BODY);
    // 2. 会话工厂
    OpenAiSessionFactory factory = new DefaultOpenAiSessionFactory(configuration);
    // 3. 开启会话
    this.openAiSession = factory.openSession();
}
2
3
4
5
6
7
8
9
10
11
12
- 申请后把你的 ApiKey 替换 setApiSecretKey 就可以使用了。
# 1. 文生文「支持联网」
@Test
public void test_completions() throws Exception {
    CountDownLatch countDownLatch = new CountDownLatch(1);
    // 入参;模型、请求信息
    ChatCompletionRequest request = new ChatCompletionRequest();
    request.setModel(Model.GLM_3_5_TURBO); // chatGLM_6b_SSE、chatglm_lite、chatglm_lite_32k、chatglm_std、chatglm_pro
    request.setIncremental(false);
    request.setIsCompatible(true); // 是否对返回结果数据做兼容,24年1月发布的 GLM_3_5_TURBO、GLM_4 模型,与之前的模型在返回结果上有差异。开启 true 可以做兼容。
    // 24年1月发布的 glm-3-turbo、glm-4 支持函数、知识库、联网功能
    request.setTools(new ArrayList<ChatCompletionRequest.Tool>() {
        private static final long serialVersionUID = -7988151926241837899L;
        {
            add(ChatCompletionRequest.Tool.builder()
                    .type(ChatCompletionRequest.Tool.Type.web_search)
                    .webSearch(ChatCompletionRequest.Tool.WebSearch.builder().enable(true).searchQuery("小傅哥").build())
                    .build());
        }
    });
    request.setPrompt(new ArrayList<ChatCompletionRequest.Prompt>() {
        private static final long serialVersionUID = -7988151926241837899L;
        {
            add(ChatCompletionRequest.Prompt.builder()
                    .role(Role.user.getCode())
                    .content("小傅哥的是谁")
                    .build());
        }
    });
    // 请求
    openAiSession.completions(request, new EventSourceListener() {
        @Override
        public void onEvent(EventSource eventSource, @Nullable String id, @Nullable String type, String data) {
            ChatCompletionResponse response = JSON.parseObject(data, ChatCompletionResponse.class);
            log.info("测试结果 onEvent:{}", response.getData());
            // type 消息类型,add 增量,finish 结束,error 错误,interrupted 中断
            if (EventType.finish.getCode().equals(type)) {
                ChatCompletionResponse.Meta meta = JSON.parseObject(response.getMeta(), ChatCompletionResponse.Meta.class);
                log.info("[输出结束] Tokens {}", JSON.toJSONString(meta));
            }
        }
        @Override
        public void onClosed(EventSource eventSource) {
            log.info("对话完成");
            countDownLatch.countDown();
        }
        @Override
        public void onFailure(EventSource eventSource, @Nullable Throwable t, @Nullable Response response) {
            log.info("对话异常");
            countDownLatch.countDown();
        }
    });
    // 等待
    countDownLatch.await();
}
2
3
4
5
6
7
8
9
10
11
12
13
14
15
16
17
18
19
20
21
22
23
24
25
26
27
28
29
30
31
32
33
34
35
36
37
38
39
40
41
42
43
44
45
46
47
48
49
50
51
52
53
# 2. 文生图
@Test
public void test_genImages() throws Exception {
    ImageCompletionRequest request = new ImageCompletionRequest();
    request.setModel(Model.COGVIEW_3);
    request.setPrompt("画个小狗");
    ImageCompletionResponse response = openAiSession.genImages(request);
    log.info("测试结果:{}", JSON.toJSONString(response));
}
2
3
4
5
6
7
8
# 3. 多模态
public void test_completions_v4() throws Exception {
    CountDownLatch countDownLatch = new CountDownLatch(1);
    // 入参;模型、请求信息
    ChatCompletionRequest request = new ChatCompletionRequest();
    request.setModel(Model.GLM_4V); // GLM_3_5_TURBO、GLM_4
    request.setStream(true);
    request.setMessages(new ArrayList<ChatCompletionRequest.Prompt>() {
        private static final long serialVersionUID = -7988151926241837899L;
        {
            // content 字符串格式
            add(ChatCompletionRequest.Prompt.builder()
                    .role(Role.user.getCode())
                    .content("这个图片写了什么")
                    .build());
            // content 对象格式
            add(ChatCompletionRequest.Prompt.builder()
                    .role(Role.user.getCode())
                    .content(ChatCompletionRequest.Prompt.Content.builder()
                            .type(ChatCompletionRequest.Prompt.Content.Type.text.getCode())
                            .text("这是什么图片")
                            .build())
                    .build());
            // content 对象格式,上传图片;图片支持url、basde64
            add(ChatCompletionRequest.Prompt.builder()
                    .role(Role.user.getCode())
                    .content(ChatCompletionRequest.Prompt.Content.builder()
                            .type(ChatCompletionRequest.Prompt.Content.Type.image_url.getCode())
                            .imageUrl(ChatCompletionRequest.Prompt.Content.ImageUrl.builder().url("https://bugstack.cn/images/article/project/chatgpt/chatgpt-extra-231011-01.png").buil
                            .build())
                    .build());
        }
    });
    openAiSession.completions(request, new EventSourceListener() {
        @Override
        public void onEvent(EventSource eventSource, @Nullable String id, @Nullable String type, String data) {
            if ("[DONE]".equals(data)) {
                log.info("[输出结束] Tokens {}", JSON.toJSONString(data));
                return;
            }
            ChatCompletionResponse response = JSON.parseObject(data, ChatCompletionResponse.class);
            log.info("测试结果:{}", JSON.toJSONString(response));
        }
        @Override
        public void onClosed(EventSource eventSource) {
            log.info("对话完成");
            countDownLatch.countDown();
        }
        @Override
        public void onFailure(EventSource eventSource, @Nullable Throwable t, @Nullable Response response) {
            log.error("对话失败", t);
            countDownLatch.countDown();
        }
    });
    // 等待
    countDownLatch.await();
}
2
3
4
5
6
7
8
9
10
11
12
13
14
15
16
17
18
19
20
21
22
23
24
25
26
27
28
29
30
31
32
33
34
35
36
37
38
39
40
41
42
43
44
45
46
47
48
49
50
51
52
53
54
55
56
# 四、工程源码
- 申请ApiKey:https://open.bigmodel.cn/usercenter/apikeys (opens new window) - 注册申请开通,即可获得 ApiKey
- 运行环境:JDK 1.8+
- 支持模型:chatGLM_6b_SSE、chatglm_lite、chatglm_lite_32k、chatglm_std、chatglm_pro、chatglm_turbo、glm-3-turbo、glm-4、glm-4v、cogview-3
- maven pom -
已发布到Maven仓库
<dependency>
    <groupId>cn.bugstack</groupId>
    <artifactId>chatglm-sdk-java</artifactId>
    <version>2.0</version>
</dependency>
2
3
4
5

