# 《ChatGPT 微服务应用体系构建》 - chatgpt-sdk 第4节:支持多渠道对话
作者:小傅哥
博客:https://bugstack.cn (opens new window)
沉淀、分享、成长,让自己和他人都能有所收获!😄
- 本章难度:★★☆☆☆
- 本章重点:让 ChatGPT SDK 支持多种渠道的对话,因为 ChatGPT 的 API 除了官网以外,还有很多公司有相应的资质,他们会提供对应的 ApiHost、ApiKey,以及 3.5/4.0 模型。
- 课程视频:https://t.zsxq.com/12BVNBcAe (opens new window)
# 一、本章诉求
原本在 ChatGPT SDK 中,我们想调用一个 ChatGPT 的接口,是在 SDK 初始化阶段设置 ApiKey、ApiHost,那么所有的访问用户都会调用到这一套的 ApiKey、ApiHost 上来。但对于一些特殊场景,需要给每个用户分配不同的 ApiKey 甚至可能还有对应的 ApiHost 时,目前的 SDK 就不好扩展了。所以我们要完善这块的功能,让 ChatGPT SDK 支持不同的渠道对话。
另外在本节中会使用 @Deprecated 注释掉 authToken,后续不在需要使用。如果你的服务设置了 Token 校验,可以继续保留。
# 二、流程设计
整个流程为;扩展会话入参信息,在 HTTP 客户端中支持动态参数处理;
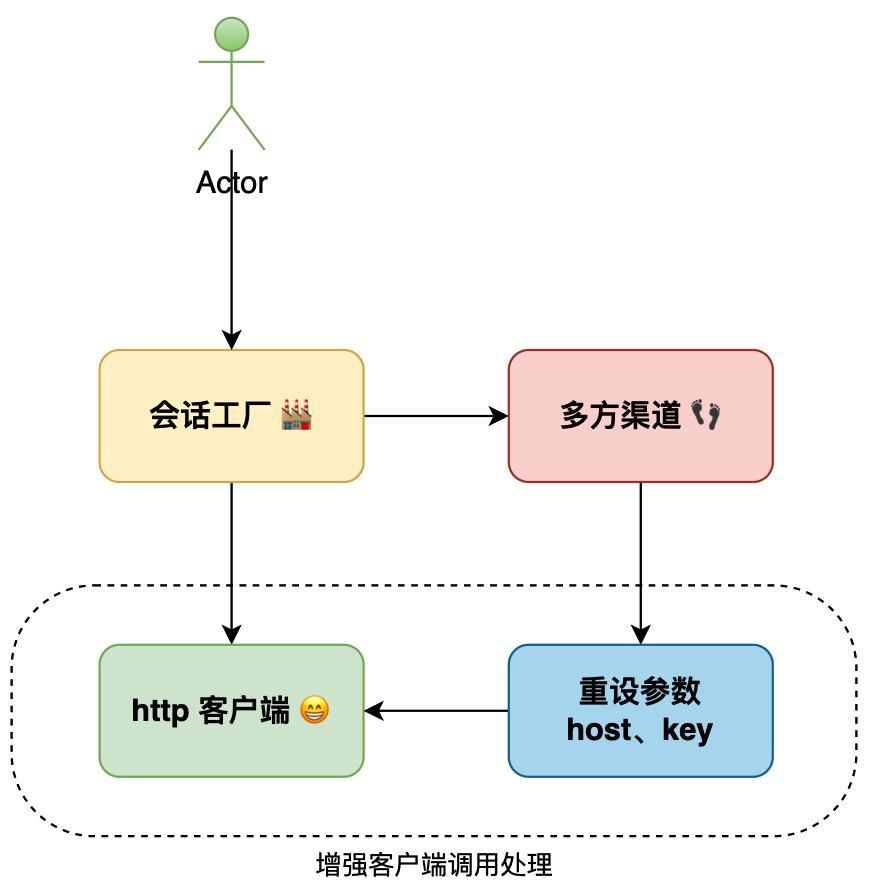
- 小傅哥会在原有的 SDK 中增加对参数的透传处理,重点涉及对 OpenAiInterceptor 的改造。相当于你要动态的处理 ApiKey 的参数传递。另外 ApiHost 是已经动态的拼接到 URL 重新组合了。
- 那么现在的 DefaultOpenAiSession#chatCompletions 接口,就有了动态使用 ApiHost、ApiKey 的能力。
# 三、方案实现
# 1. 工程结构
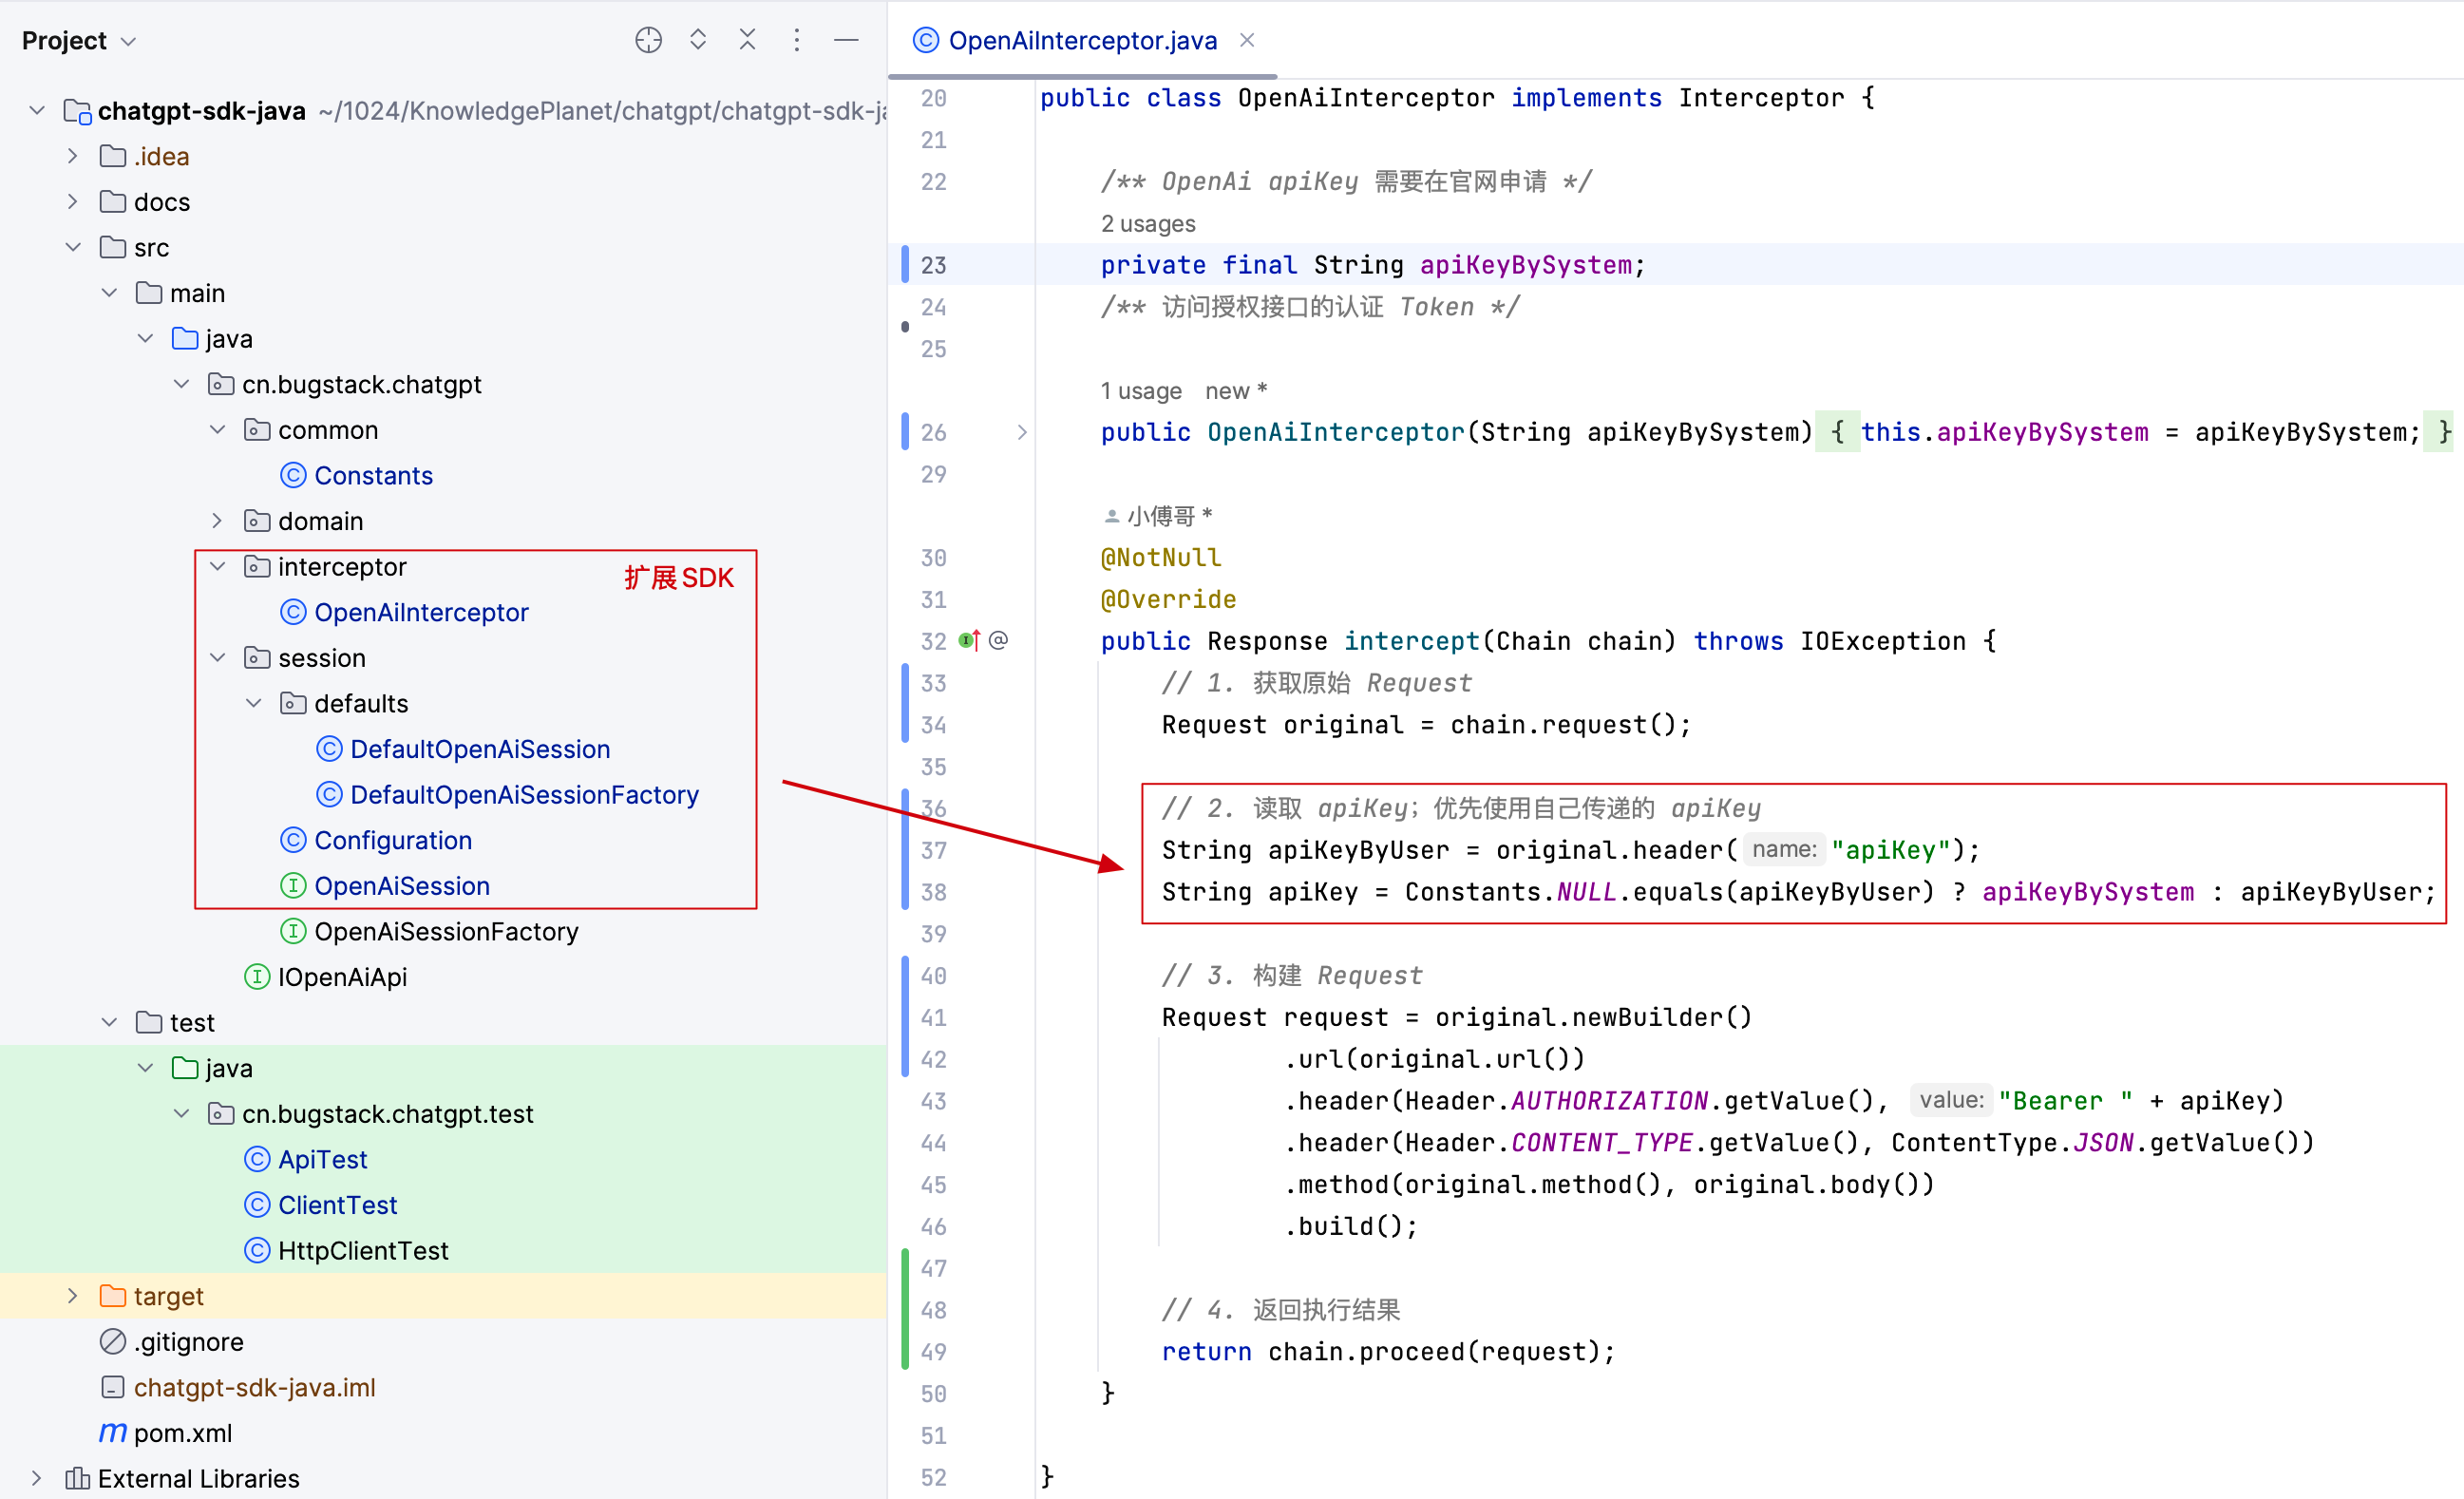
- 如图工程中的蓝色部分,为本次需要修改的代码区域。
- 学习时候可以,以接口 OpenAiSession#chatCompletions 为入口,会看到整个模块的修改变化。
# 2. 接口定义 - 扩展一个新接口
源码:cn.bugstack.chatgpt.session.OpenAiSession
/**
 * 问答模型 GPT-3.5/4.0 & 流式反馈
 *
 * @param apiHostByUser         自定义host
 * @param apiKeyByUser          自定义Key
 * @param chatCompletionRequest 请求信息
 * @param eventSourceListener   实现监听;通过监听的 onEvent 方法接收数据
 * @return 应答结果
 */
EventSource chatCompletions(String apiHostByUser, String apiKeyByUser, ChatCompletionRequest chatCompletionRequest, EventSourceListener eventSourceListener) throws JsonProcessingException;
1
2
3
4
5
6
7
8
9
10
2
3
4
5
6
7
8
9
10
- 重载一个 chatCompletions 方法,增加 apiHostByUser、apiKeyByUser 两个字段。便于我们可以使用主机需要的 host、key
# 3. 接口实现
源码:cn.bugstack.chatgpt.session.defaults.DefaultOpenAiSession
public EventSource chatCompletions(String apiHostByUser, String apiKeyByUser, ChatCompletionRequest chatCompletionRequest, EventSourceListener eventSourceListener) throws JsonProcessingException {
    // 核心参数校验;不对用户的传参做更改,只返回错误信息。
    if (!chatCompletionRequest.isStream()) {
        throw new RuntimeException("illegal parameter stream is false!");
    }

    // 动态设置 Host、Key,便于用户传递自己的信息
    String apiHost = Constants.NULL.equals(apiHostByUser) ? configuration.getApiHost() : apiHostByUser;
    String apiKey = Constants.NULL.equals(apiKeyByUser) ? configuration.getApiKey() : apiKeyByUser;

    // 构建请求信息
    Request request = new Request.Builder()
            // url: https://api.openai.com/v1/chat/completions - 通过 IOpenAiApi 配置的 POST 接口,用这样的方式从统一的地方获取配置信息
            .url(apiHost.concat(IOpenAiApi.v1_chat_completions))
            .addHeader("apiKey", apiKey)
            // 封装请求参数信息,如果使用了 Fastjson 也可以替换 ObjectMapper 转换对象
            .post(RequestBody.create(MediaType.parse(ContentType.JSON.getValue()), new ObjectMapper().writeValueAsString(chatCompletionRequest)))
            .build();

    // 返回结果信息;EventSource 对象可以取消应答
    return factory.newEventSource(request, eventSourceListener);
}
1
2
3
4
5
6
7
8
9
10
11
12
13
14
15
16
17
18
19
20
21
22
2
3
4
5
6
7
8
9
10
11
12
13
14
15
16
17
18
19
20
21
22
- 接口的实现有2部分,一个是透传 URL 一个是设置 apiKey 写入进去。
- 之后需要在【自定义的拦截器】中,设置 URL 和 ApiKey。
# 4. 自定义拦截器
源码:cn.bugstack.chatgpt.interceptor.OpenAiInterceptor
public Response intercept(Chain chain) throws IOException {
    // 1. 获取原始 Request
    Request original = chain.request();

    // 2. 读取 apiKey;优先使用自己传递的 apiKey
    String apiKeyByUser = original.header("apiKey");
    String apiKey = Constants.NULL.equals(apiKeyByUser) ? apiKeyBySystem : apiKeyByUser;

    // 3. 构建 Request
    Request request = original.newBuilder()
            .url(original.url())
            .header(Header.AUTHORIZATION.getValue(), "Bearer " + apiKey)
            .header(Header.CONTENT_TYPE.getValue(), ContentType.JSON.getValue())
            .method(original.method(), original.body())
            .build();

    // 4. 返回执行结果
    return chain.proceed(request);
}
1
2
3
4
5
6
7
8
9
10
11
12
13
14
15
16
17
18
19
2
3
4
5
6
7
8
9
10
11
12
13
14
15
16
17
18
19
- 因为后续已经不在需要 authToken 所以这里的实现已经去掉了这个字段的使用。
- 通过判断是否设置了自己的 apiKey 来判断使用系统默认的还是用户自己传的,系统默认的就是我们在创建会话的时候初始化的。【这样就可以满足用户可以体验使用 OpenAI 也可以绑定自己的 APIKey 使用】
# 四、功能验证
# 1. 必要信息
- 官网原始 apiHost https://api.openai.com/ - 官网的Key可直接使用
- 三方公司 apiHost https://pro-share-aws-api.zcyai.com/ - 需要找我获得 Key
# 2. 单元测试
@Before
public void test_OpenAiSessionFactory() {
    // 1. 配置文件 [联系小傅哥获取key]
    // 1.1 官网原始 apiHost https://api.openai.com/ - 官网的Key可直接使用
    // 1.2 三方公司 apiHost https://pro-share-aws-api.zcyai.com/ - 需要找我获得 Key 【支持3.5\4.0流式问答模型调用,有些模型已废弃不对接使用】
    Configuration configuration = new Configuration();
    configuration.setApiHost("https://pro-share-aws-api.zcyai.com/");
    configuration.setApiKey("sk-8Fpeb11ARRIi5JGQCe480fCcF688436a8d9e3c7a6553Af2b");

    // 2. 会话工厂
    OpenAiSessionFactory factory = new DefaultOpenAiSessionFactory(configuration);

    // 3. 开启会话
    this.openAiSession = factory.openSession();
}
1
2
3
4
5
6
7
8
9
10
11
12
13
14
15
2
3
4
5
6
7
8
9
10
11
12
13
14
15
public void test_chat_completions_stream() throws JsonProcessingException, InterruptedException {
    // 1. 创建参数
    ChatCompletionRequest chatCompletion = ChatCompletionRequest
            .builder()
            .stream(true)
            .messages(Collections.singletonList(Message.builder().role(Constants.Role.USER).content("1+1").build()))
            .model(ChatCompletionRequest.Model.GPT_3_5_TURBO.getCode())
            .maxTokens(1024)
            .build();

    // 2. 用户配置 【可选参数,支持不同渠道的 apiHost、apiKey】- 方便给每个用户都分配了自己的key,用于售卖场景
    String apiHost = "https://pro-share-aws-api.zcyai.com/";
    String apiKey = "sk-UAOxqX3EnM0zXxrz07CbC9E905E74549B4FdCcFcAd6bFbA3";

    // 3. 发起请求
    EventSource eventSource = openAiSession.chatCompletions(apiHost, apiKey, chatCompletion, new EventSourceListener() {
        @Override
        public void onEvent(EventSource eventSource, String id, String type, String data) {
            log.info("测试结果 id:{} type:{} data:{}", id, type, data);
        }
        @Override
        public void onFailure(EventSource eventSource, Throwable t, Response response) {
            log.error("失败 code:{} message:{}", response.code(), response.message());
        }
    });

    // 等待
    new CountDownLatch(1).await();
}
1
2
3
4
5
6
7
8
9
10
11
12
13
14
15
16
17
18
19
20
21
22
23
24
25
26
27
28
29
2
3
4
5
6
7
8
9
10
11
12
13
14
15
16
17
18
19
20
21
22
23
24
25
26
27
28
29
- 首先,在测试中
@Before方法下初始化设置了 ApiHost、ApiKey 这个也就是所有的用户都使用的设置。 - 之后,在 test_chat_completions_stream 测试中,又设置了用户自己的 apiHost、apiKey,那么就可以在调用的时候根据需要自己设置了,也就是用户购买的配置。
# 3. 测试结果
[OkHttp https://pro-share-aws-api.zcyai.com/...] INFO cn.bugstack.chatgpt.test.ApiTest - 测试结果:{"id":"chatcmpl-85SMBxN77xL024C4ExM7kaZAl93IV","object":"chat.completion.chunk","created":1696311335,"model":"gpt-3.5-turbo-0613","choices":[{"index":0,"delta":{"role":"assistant","content":""},"finish_reason":null}]}
[OkHttp https://pro-share-aws-api.zcyai.com/...] INFO cn.bugstack.chatgpt.test.ApiTest - 测试结果:{"id":"chatcmpl-85SMBxN77xL024C4ExM7kaZAl93IV","object":"chat.completion.chunk","created":1696311335,"model":"gpt-3.5-turbo-0613","choices":[{"index":0,"delta":{"content":"1"},"finish_reason":null}]}
[OkHttp https://pro-share-aws-api.zcyai.com/...] INFO cn.bugstack.chatgpt.test.ApiTest - 测试结果:{"id":"chatcmpl-85SMBxN77xL024C4ExM7kaZAl93IV","object":"chat.completion.chunk","created":1696311335,"model":"gpt-3.5-turbo-0613","choices":[{"index":0,"delta":{"content":"+"},"finish_reason":null}]}
[OkHttp https://pro-share-aws-api.zcyai.com/...] INFO cn.bugstack.chatgpt.test.ApiTest - 测试结果:{"id":"chatcmpl-85SMBxN77xL024C4ExM7kaZAl93IV","object":"chat.completion.chunk","created":1696311335,"model":"gpt-3.5-turbo-0613","choices":[{"index":0,"delta":{"content":"1"},"finish_reason":null}]}
[OkHttp https://pro-share-aws-api.zcyai.com/...] INFO cn.bugstack.chatgpt.test.ApiTest - 测试结果:{"id":"chatcmpl-85SMBxN77xL024C4ExM7kaZAl93IV","object":"chat.completion.chunk","created":1696311335,"model":"gpt-3.5-turbo-0613","choices":[{"index":0,"delta":{"content":" equals"},"finish_reason":null}]}
[OkHttp https://pro-share-aws-api.zcyai.com/...] INFO cn.bugstack.chatgpt.test.ApiTest - 测试结果:{"id":"chatcmpl-85SMBxN77xL024C4ExM7kaZAl93IV","object":"chat.completion.chunk","created":1696311335,"model":"gpt-3.5-turbo-0613","choices":[{"index":0,"delta":{"content":" "},"finish_reason":null}]}
[OkHttp https://pro-share-aws-api.zcyai.com/...] INFO cn.bugstack.chatgpt.test.ApiTest - 测试结果:{"id":"chatcmpl-85SMBxN77xL024C4ExM7kaZAl93IV","object":"chat.completion.chunk","created":1696311335,"model":"gpt-3.5-turbo-0613","choices":[{"index":0,"delta":{"content":"2"},"finish_reason":null}]}
[OkHttp https://pro-share-aws-api.zcyai.com/...] INFO cn.bugstack.chatgpt.test.ApiTest - 测试结果:{"id":"chatcmpl-85SMBxN77xL024C4ExM7kaZAl93IV","object":"chat.completion.chunk","created":1696311335,"model":"gpt-3.5-turbo-0613","choices":[{"index":0,"delta":{"content":"."},"finish_reason":null}]}
[OkHttp https://pro-share-aws-api.zcyai.com/...] INFO cn.bugstack.chatgpt.test.ApiTest - 测试结果:{"id":"chatcmpl-85SMBxN77xL024C4ExM7kaZAl93IV","object":"chat.completion.chunk","created":1696311335,"model":"gpt-3.5-turbo-0613","choices":[{"index":0,"delta":{},"finish_reason":"stop"}]}
[OkHttp https://pro-share-aws-api.zcyai.com/...] INFO cn.bugstack.chatgpt.test.ApiTest - 测试结果:[DONE]
1
2
3
4
5
6
7
8
9
10
2
3
4
5
6
7
8
9
10
- 流式对话返回结果。
# 五、读者作业
- 简单作业:学习本章的代码,完成功能的开发和测试。
- 复杂作业:做到现在的章节,以及有 openai.itedus.cn 在前面引路,你也会有了一些想法。那么你完全可以根据这些内容做一些扩展实现,让你的 OpenAI 即可自己使用,也可以让别人使用。
京ICP备19031103号 | 
京公网安备 11030102010881号
| GPL Licensed | Copyright © 2019 小傅哥,All rights reserved.